Introduction to Properties/it: Difference between revisions
| Line 116: | Line 116: | ||
Approposito: non preoccuparti di nessun tokens che potresti aver già configurato - aggiungere o modificare i valori predefiniti ''non'' ne sovrascriverà le proprietà. MapTool è sufficientemente furbo da gestire la cosa. | Approposito: non preoccuparti di nessun tokens che potresti aver già configurato - aggiungere o modificare i valori predefiniti ''non'' ne sovrascriverà le proprietà. MapTool è sufficientemente furbo da gestire la cosa. | ||
=== | ===Mettere in Mostra le Proprietà nello Statsheet=== | ||
[[Image:Statsheet-props.png|thumb| | [[Image:Statsheet-props.png|thumb|Gli Statsheet visualizzano le proprietà del gruppo che avete selezionato. Vedrete come farle apparire in questa sezione]] | ||
MapTool | MapTool integra una funzionalità chiamata '''Statsheet''' (scheda delle statistiche) che abbiamo brevemente accennato nel capitolo [[Introduction to Tokens/it|Introduzione ai Tokens]] - in pratica è una finestra a scomparsa che appare nell'angolo a sinistra della map ogni volta che indugiate con il mouse sopra un token. | ||
Potreste dire: "Un momento... quando punto il mio token non c'è nessun statsheet! dove sta?" Il motivo per cui non lo vedete è che lo Statsheet è gestito dalle Campaign Properties - mostrerà le proprietà di un token (insieme ad una versione larga della sua immagine) ''solo'' dopo aver soddisfatto un paio di requisiti: | |||
* | * Le proprietà sono configurate per essere mostrate dallo statsheet; e | ||
* | * Le proprietà da mostrare devono avere effettivamente un valore | ||
==== | ====Configurare le Properties essere visualizzate==== | ||
[[Image:Newprops-visible.png|thumb| | [[Image:Newprops-visible.png|thumb|Notate gli asterischi prima delle proprietà, questo le abiliterà alla comparsa nello Statsheet]] | ||
Se guardate in basso della parte adibita alle '''Campaign Properties''', nella scheda '''Token Properties''', vedrete una legenda dei caratteri che serviranno a rendere visibile una proprietà nello Statsheet. Ci sono tre opzioni di visualizzazione, ognuna di queste va indicata ponendo il simbolo corrispondente prima del nome della proprietà: | |||
# '''<nowiki>*</nowiki>''': | # '''<nowiki>*</nowiki>''': un asterisco significa "mostra questa proprietà sullo statsheet" | ||
# '''@''': | # '''@''': significa "mostra questa proprietà solo al proprietario del token (ed al GM)" | ||
# '''<nowiki>#</nowiki>''': | # '''<nowiki>#</nowiki>''': significa "mostra questa priprietà solo al GM (nemmeno il proprietario del token può vederla)" | ||
L'asterisco è '''richiesto''' per ogni statistica da mostrare in generale - se non mettete un asterisco per prima, niente verrà mostrato a prescindere di quant'altro scriviate li. D'altro canto i simboli @ e # sono facoltativi. | |||
Quindi, per il nostro gioco, andremo a configurare tutte le proprietà per essere visibili a chiunque (solo con una stellina). Per farlo, aprite le vostre proprietà ed editatele come mostrato in seguito: | |||
<blockquote style="background-color:lightgray; width:30%;"><tt> | <blockquote style="background-color:lightgray; width:30%;"><tt> | ||
* | *Forza:1<br> | ||
* | *Destrezza:1<br> | ||
* | *Intelligenza:1<br> | ||
* | *Resistenza:1<br></tt> | ||
</blockquote> | </blockquote> | ||
Da adesso, quando sposterete il mouse sopra un token, vedrete la finestra a scomparsa dello Statsheet (guardate la schermata sopra) con i valori delle proprietà di Forza, Destrezza, Intelligenza e Resistenza. Inoltre, poiché ogni nuovo token parte con dei valori predefiniti, lo Statsheet apparirà subito per tutti quanti. | |||
====Short Names==== | ====Short Names==== | ||
Revision as of 06:07, 22 October 2010
{{#customtitle:Introduzione alle Proprietà |Introduzione alle Proprietà}}
Campaign Properties
Una delle caratteristiche più utili in MapTool è la capacità dei tokens di portarsi dietro un assortimento di Properties (proprietà) allegate ad esse, che possono essere manipolate dalle macro ed usate per creare rapide esposizioni di informazioni. Di base le proprietà dei token sono come schede del personaggio incorporate.
Tuttavia, per il fatto che queste opzioni sono così utili, gli sviluppatori di MapTool hanno creato molti differenti modi di usarle e manipolarle. La presente guida tratterà della creazione di gruppi di Campaign Property (proprietà campagna), di come regolarli affinché abbiano valori predefiniti e del modo in cui impiegarli per plasmare gli Statsheet (scheda delle statistiche).
Il Regolamento d'Esempio o MTRPG
Al fine di avere utili riferimenti durante lo svolgimento della guida, diversi collaboratori ed utenti di MapTool hanno creato il Regolamento d'Esempio -- un semplice sistema di gioco di ruolo prodotto specificatamente per illustrare parti di Maptool. Chiameremo le suddette regole "MapTool RPG" - o in breve MTRPG. Quello che andremo a fare sarà creare un nuovo Campaign File (file di campagna) e impostare diverse campaign properties che corrispondano agli attributi delle MTRPG.
La Finestra Campaign Properties
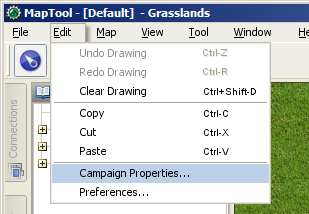
Per cominciare ad operare sulle Campaign Properties (Proprietà Campagna), la prima cosa da fare è andare su Edit > Campaign Properties così da aprire l'apposita finestra. Una volta dentro vedrete diverse schede e una mole considerevole d'informazioni.
Le schede presenti nella finestra Campaign Properties conteranno sei elementi:
- Token Properties: qui dimorano tutte i gruppi di proprietà che un token potrebbe adoperare nella campaign corrente
- Repositories: qui è dove potete designare un "repository" (deposito) online per contenere i campaign files, specialmente le immagini, allo scopo di migliorare i tempi di caricamento e la velocità quando ospitate o partecipate ad un gioco online
- Sight: qui è dove si configurano le opzioni per i tipi di campi visivi della campaign corrente
- Light: qui si configurano le sorgenti di luce e le aure della campaign corrente
- States: questa scheda permette la configurazione degli stati dei token per la campaign corrente
- Bars: qui è dove si configurano le barre dei token per la campaign in corso
Questa guida terrà in considerazione solamente la prima scheda, Token Properties.
La scheda Token Properties
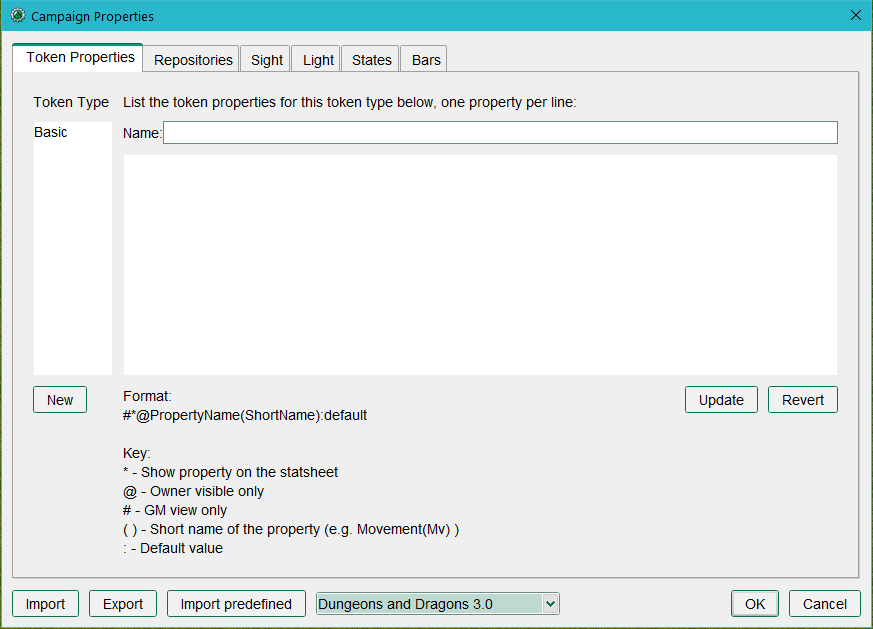
La prima scheda visualizzata all'apertura di Campaign Properties è la "Token Properties". Questa appare relativamente semplice, ma li si annidano enormi potenziali. Ci sono 3 campi di testo in questa scheda:
- Name: questo è come chiamerete una gruppo di proprietà esposto in basso. Quando aprite la finestra campaign properties nessun gruppo di proprietà sarà evidenziato, perciò il campo sottostante risulterà vuoto.
- Token Type: la colonna sul fianco sinistro non è editabile, elenca per nome tutti i gruppi di proprietà appartenenti alla campaign corrente. L'unico gruppo predefinito esistente è Basic, è presente anche se non si carica nessuna campaign.
- Una larga area di testo dove potete immettere le proprietà per la campaign corrente. In primo luogo apparirà vuota, lo sarà fintanto che non evidenzierete il nome di gruppo di proprietà dalla lista di sinistra Token Type, in questo caso compariranno le nomenclature di quella selezione con i loro valori.
Token Type
In questo campo potete vedere i nomi della serie di "Property Types" differenti (potremmo immaginarli come insiemi di proprietà) che sono stati configurati nella campaign corrente. Se nessuna campaign è caricata, l'unico gruppo di proprietà presente sarà il Basic, quello predefinito. Il campo Token Type non sarà direttamente editabile dall'utente.
Name
Questo è un semplice campo di testo dove potete inserire il nome che volete dare al rispettivo gruppo di proprietà. Questo nome comparirà nella colonna "Token Type" una volta fatto l'update (aggiornamento) cliccando in basso a destra. I nomi possono essere come preferite; per esempio molti utenti creano gruppi chiamati "PNG" per distinguerli dai "PG" nei giochi dove le statistiche e i tratti fra queste due entità differiscono.
Properties
Qui è dove vi dovrete sbizzarrire. In questa area di testo potrete creare qualsivoglia proprietà che rifletta tutti i possibili valori numerici o statistiche attribuibili ad un personaggio da GDR (e anche altre proprietà, molti utenti ne creano alcune utili per scrivere macros ma che poi non appaiono in nessuna scheda del personaggio!).
Creare Properties
Properties Senza Valori Predefiniti
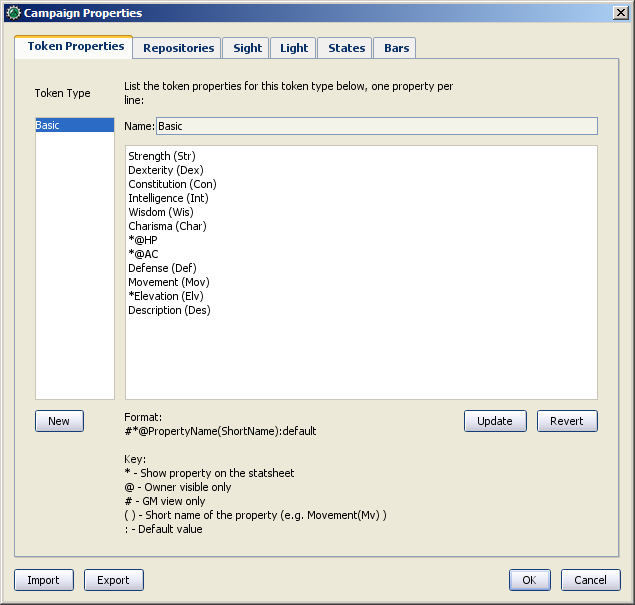
Se andate a guardare gli Attributi Primari del MTRPG, potrete vedere che ce n'è sono quattro basilari per un personaggio: Forza, Destrezza, Intelligenza e Resistenza. Stiamo per sbarazzarci delle proprietà predefinite e sostituirle con queste nuove.
1. Andate su Edit > Campaign Properties. Vedrete nel lato sinistro, sotto Token Type, che l'unico gruppo presente è "Basic". Ora gli creeremo una nuova selezione di proprietà.
2. Nell'elenco Token Type a sinistra, selezionate Basic. Una volta fatto, vedrete molte proprietà stagliarsi con simboli di ogni sorta, come @, #, e simili.
3. Selezionate tutto quello che è nell'area di testo e premete il tasto Cancella sulla vostra tastiera per eliminare ciò che concerne le proprietà. Avanti - non siate timidi!
4. Lasciate il campo Name inalterato - MapTools necessita obbligatoriamente di avere un gruppo di proprietà chiamato Basic, non potete cambiargli nome.
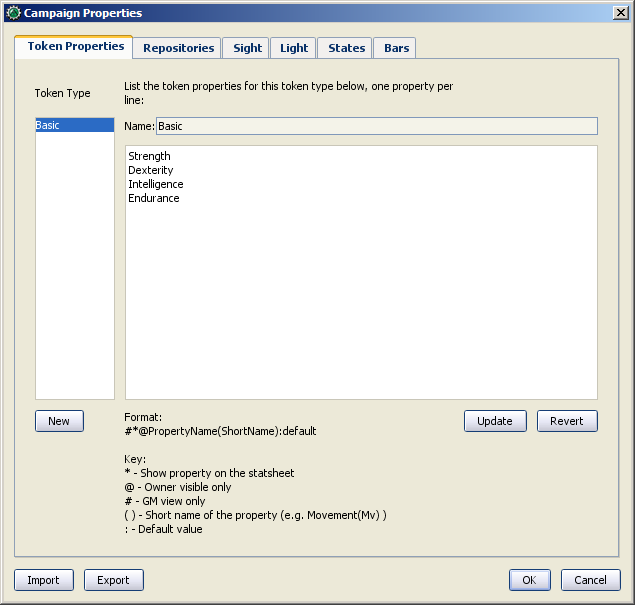
5. Nell'area di testo sotto al campo Name, inserite il nome di ognuno dei quattro Attributi Primari del MTRPG in questo modo:
Forza
Destrezza
Intelligenza
Resistenza
Quando avete finito la vostra finestra assomiglierà a quella della schermata qui di fianco.
6. Una volta finito d'inserire le proprietà che volete, cliccate sul pulsante Update. Niente Panico! Le proprietà sono scomparse ma se riselezionerete Basic dalla colonna di sinistra riappariranno nell'area principale di testo.
7. Cliccate su OK per confermare tutti i vostri cambiamenti e chiudere la finestra Campaign Properties.
8. Andate su File > Save Campaign As e salvate la vostra campaign col nome di MTRPG.cmpgn. A questo punto avete creato un nuovo file di campaign con un rinnovato gruppo di proprietà.
Quando create le proprietà in questo modo -- semplicemente elencando gli attributi uno dopo l'altro -- all'apertura di un token vedrete che queste proprietà non hanno alcun valore. Questo non significa che valgano zero o come se fossero una riga vuota - loro hanno letteralmente nessun valore. Generalmente questo non significa molto, ma è una distinzione importante in termini di scrittura delle macro (nella programmazione c'è una grossa differenza fra una stringa lasciata in bianco ed una variabile al momento vuota!).
Una volta aggiornato la scheda Token Properties tutti i nuovi tokens e quelli già presenti sulla map "erediteranno" le nuove proprietà impostate.
NOTA: Il Name dei gruppi di proprietà non può contenere al suo interno degli spazi - quindi se avete dei gruppi chiamati ad esempio "Punti Ferita", dovrete necessariamente inserirli come PuntiFerita.
Creare Proprietà comprese di Valori Predefiniti
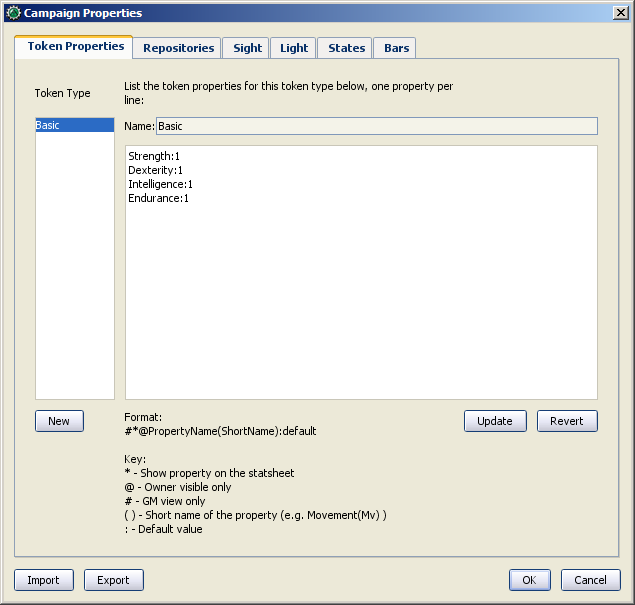
Ora, sappiamo che le MTRPG contemplano un valore minimo di 1 per ogni attributo primario. Ha quindi senso impostare il "valore predefinito" di queste proprietà a 1, cosicché ogni token non possa scendere al di sotto del punteggio minimo consentito per gli attributi. Le direttive di conseguimento sono::
1. Aprire la finestra Campaign Properties.
2. Selezionare il gruppo Basic.
3. Editare le proprietà copiandole dalle seguenti (come anche dall'immagine):
Forza:1
Destrezza:1
Intelligenza:1
Resistenza:1
4. Cliccate su Update.
Inserendo i due punti alla fine di ogni attributo seguiti dal numero 1, avete detto a MapTool che il valore predefinito per le proprietà corrispondenti è 1 (in altre parole, qualsiasi valore mettiate dopo i due punti diventerà il valore prerdefinito per quella proprietà). Notate che in basso alla finestra Token Properties c'é una legenda descrittiva sulle varie opzioni utilizzabili nelle proprietà.
Adesso, se trascinate un nuovo token sulla map e guardate le sue proprietà (doppio-cliccate sul token ed entrate nelle scheda Properties all'interno della finestra di dialogo Edit Token), vedrete che ha i valori predefiniti.
Approposito: non preoccuparti di nessun tokens che potresti aver già configurato - aggiungere o modificare i valori predefiniti non ne sovrascriverà le proprietà. MapTool è sufficientemente furbo da gestire la cosa.
Mettere in Mostra le Proprietà nello Statsheet
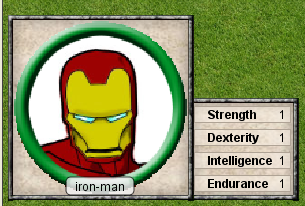
MapTool integra una funzionalità chiamata Statsheet (scheda delle statistiche) che abbiamo brevemente accennato nel capitolo Introduzione ai Tokens - in pratica è una finestra a scomparsa che appare nell'angolo a sinistra della map ogni volta che indugiate con il mouse sopra un token.
Potreste dire: "Un momento... quando punto il mio token non c'è nessun statsheet! dove sta?" Il motivo per cui non lo vedete è che lo Statsheet è gestito dalle Campaign Properties - mostrerà le proprietà di un token (insieme ad una versione larga della sua immagine) solo dopo aver soddisfatto un paio di requisiti:
- Le proprietà sono configurate per essere mostrate dallo statsheet; e
- Le proprietà da mostrare devono avere effettivamente un valore
Configurare le Properties essere visualizzate
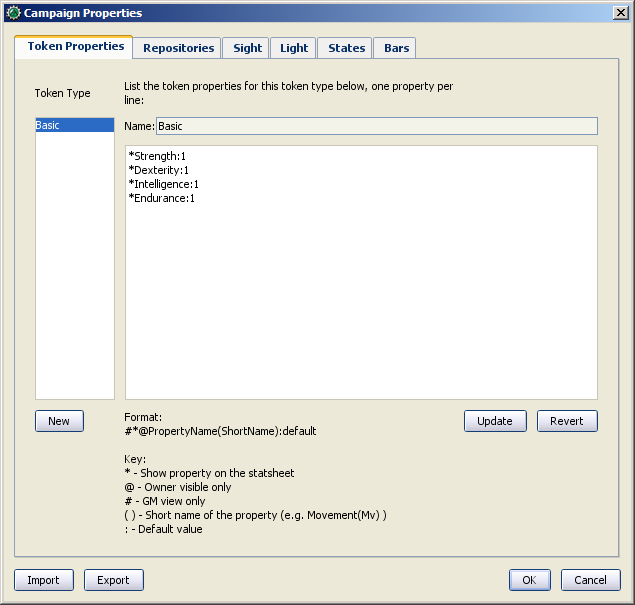
Se guardate in basso della parte adibita alle Campaign Properties, nella scheda Token Properties, vedrete una legenda dei caratteri che serviranno a rendere visibile una proprietà nello Statsheet. Ci sono tre opzioni di visualizzazione, ognuna di queste va indicata ponendo il simbolo corrispondente prima del nome della proprietà:
- *: un asterisco significa "mostra questa proprietà sullo statsheet"
- @: significa "mostra questa proprietà solo al proprietario del token (ed al GM)"
- #: significa "mostra questa priprietà solo al GM (nemmeno il proprietario del token può vederla)"
L'asterisco è richiesto per ogni statistica da mostrare in generale - se non mettete un asterisco per prima, niente verrà mostrato a prescindere di quant'altro scriviate li. D'altro canto i simboli @ e # sono facoltativi.
Quindi, per il nostro gioco, andremo a configurare tutte le proprietà per essere visibili a chiunque (solo con una stellina). Per farlo, aprite le vostre proprietà ed editatele come mostrato in seguito:
*Forza:1
*Destrezza:1
*Intelligenza:1
*Resistenza:1
Da adesso, quando sposterete il mouse sopra un token, vedrete la finestra a scomparsa dello Statsheet (guardate la schermata sopra) con i valori delle proprietà di Forza, Destrezza, Intelligenza e Resistenza. Inoltre, poiché ogni nuovo token parte con dei valori predefiniti, lo Statsheet apparirà subito per tutti quanti.
Short Names
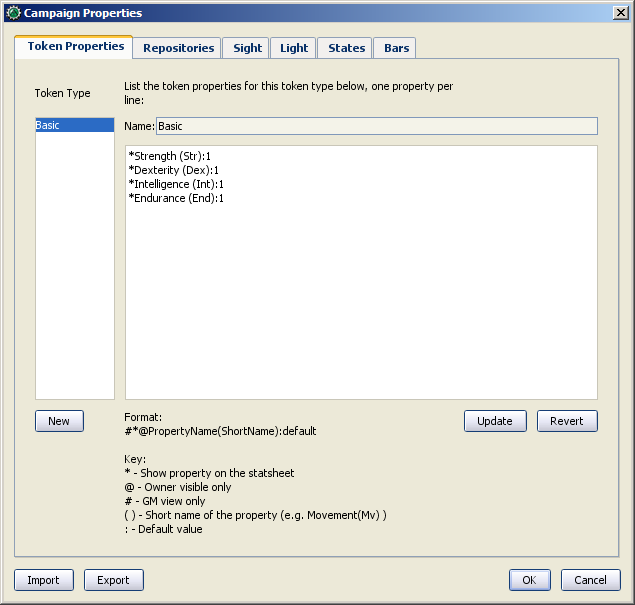
Sometimes, property names can get pretty long (or look unfriendly - no spaces, and all that). MapTool lets you put a Short Name in for each property. To do that, you just enter the short name in parentheses after the property name, like so:
*Strength(Str):1
*Dexterity(Dex):1
*Intelligence(Int):1
*Endurance(End):1
These short names are displayed in the Statsheet instead of the full name of the property
Short Names are for display purposes only - when referencing properties in macros, you must use the full property name.
Creating Derived Properties
Okay, now let's do something pretty cool. In a lot of roleplaying games, there are character attributes that are derived from other stats - for instance, in the Savage Worlds rules, your "Parry" stat is based on your Fighting ability; likewise, in Dungeons & Dragons, your "Hit Points" are derived partly from your "Constitution" score.
Now, you could create these other derived attributes as separate properties and manually enter the values in when you make a new token - but how about we allow MapTool to calculate these derived values? That's right - MapTool's campaign properties can not only be numbers and text, but also calculations and equations based on other properties that the token has.
In MTRPG, there are three derived stats: Hit Points, Armor, and Movement. These stats have the short names "HP", "AR," and "MV." For this example, we're going to set up Hit Points and Movement to be calculated from existing properties. We'll leave Armor until later (it takes a bit more complex a calculation to figure out the armor value, and we're taking it slow).
First, we need to add properties for these three derived values:
1. Open up the Basic property set.
2. Beneath Endurance, enter the following:
*HitPoints(HP)
*Armor(AR)
*Movement(MV)
You'll notice at this point, we've set no default values. Don't hit Update just yet - let's enter some macro code to create a derived value.
We can see from the MTRPG rules that Hit Points is equal to the value of Endurance multiplied by 6. Replicating this calculation in the campaign properties is very simple. Edit the Hit Points property to read:
*HitPoints(HP):{Endurance * 6}
What we've done here is enter a default value for the property (remember, default values are whatever comes after the colon), and used some macro code to instruct MapTool to perform a calculation in order to find the value for the properties. Two thing are happening here:
- We've enclosed the calculations in { }, which warns MapTool that the text enclosed inside the brackets is to be handled like a macro, and not just plain text
- Inside the brackets, we've said, "Find the value of the Endurance property, multiply it by 6, and make that result the value of the Hit Points property"
Now, to handle the Movement attribute, our job is even simpler: we need to instruct MapTool to get the value of the Dexterity property, and assign that same value to the Movement property. To do so, edit the Movement property to read:
*Movement(MV):{Dexterity}
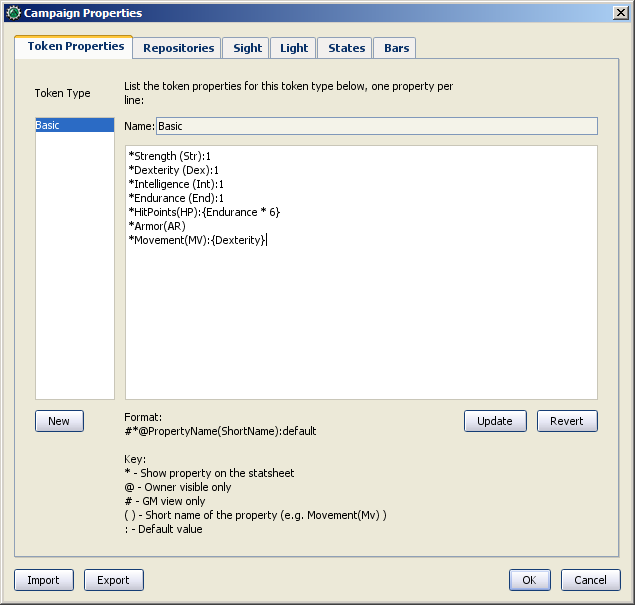
When you are finished, your full property set should look like:
*Strength:1
*Dexterity:1
*Intelligence:1
*Endurance:1
*HitPoints(HP):{Endurance * 6}
*Armor(AR)
*Movement(MV):{Dexterity}
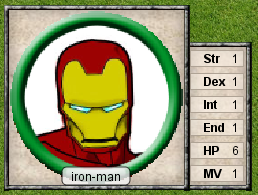
And when you hover your mouse over a token, the Statsheet should look like the screenshot to the right. Remember, even though we've said that Armor should be displayed on the statsheet, the statsheet only shows properties that have a value - Armor is still empty, so it won't show up until you give it a value.
Saving Your Campaign
At this point, you've created a bunch of campaign properties, placed a token on the map, and messed around with manipulation of the properties you made. You should probably save your work in a [Campaign] file. This will save the tokens, properties you created, and all the information you put into the campaign so far.
Also, this will let you work on the campaign further, trying tricks from the other MapTool tutorials.
To save your campaign:
- Go to File -> Save Campaign As...
- In the dialog, enter a file name. Something like MTRPG.cmpgn is good!
- Click OK
Your campaign will now be saved, and you can open it up whenever you feel like it, and work on it some more!
Please note that campaigns saved in one version of MapTool will not open properly in an older version of MapTool; however most campaign files created in an older version can be opened in the newest version (this isn't guaranteed, though...MapTool is evolving at all times!)
Some Technical Details
A couple times in this guide and in other guides the token properties have been described as "those properties that are visible" in this campaign, or the properties set up "for this campaign." There's a reason for phrasing it like this.
See, a token - if you cut one open and looked at its inner workings - is an XML file that contains a ton of information. It has information about its image, its size, its vision, light, and shape, and - of course - its properties. What's important to understand here is that the token will remember not only the properties from the MTRPG, but if it was ever saved as an .rptok file or brought in from another campaign file, it will remember the properties from that campaign too. They won't be visible, but they're stored in the token even so.
So, in reality, a set of Campaign Properties really indicates those properties that:
- You can see if you open up a token by double-clicking on it, and
- You can directly edit by clicking in the cell next to them
This may sound like a recipe for disaster - what if you set up a property that was already set up but is hidden? Fortunately, MapTool will not, when running a macro, attempt to access any hidden properties unless you specifically instruct it to do so, using two special macro functions. So rest assured, you cannot accidentally access a property that's not set up in the Campaign Properties.
In summary, if a Property Type (such as the default Basic property type) has a property named HP, it will be stored in the token under the XML name HP. If another property type (such as a user-defined Pathfinder property type) also has a property named HP, they will both be referencing the same data on the token. Modifying the value of HP when the token is Basic and then changing the token Pathfinder will show the same value for HP.
Moving On from Here
MapTool supports very elaborate properties and derived properties, with a number of math functions and operations. A couple of the most common ones you might want to use are (the examples are not necessarily part of MTRPG; they're just examples):
- Basic math operators: addition (+), subtraction (-), multiplication (*), and division (/)
- Example: HitPoints: {Endurance * 6}
- Rounding: there are some functions to let you round numbers when you divide
- Floor: the floor() function rounds down. Example: HitPoints:{floor(Constitution / 2)} would divide Constitution by two, and round down
- Ceiling: the ceil() function works like floor(), but rounds up. Example: HitPoints:{ceil(Constitution/2)}