Introduction to Properties/es
BEGINNER
THIS IS A BEGINNER ARTICLE
La traducción está en proceso
Campaign Properties
One of the most useful features in MapTool is the capability of tokens to carry around a set of Properties, attached to that token, that can be manipulated by macros and can be used to create quick displays of information. Basically, token properties are like built-in character sheets.
However, because they are so useful, the MapTool developers have created many different ways to use them and manipulate them. This guide will address creating Campaign Property Sets, setting them to have default values, and using them to manipulate the Statsheet.
The Sample Ruleset, or MTRPG
In order to have useful examples as we move through this tutorial, several MapTool users and contributors developed the Sample Ruleset -- a simple roleplaying game system developed specifically to illustrate parts of MapTool. For this guide, we're going to call these rules the MapTool RPG - or MTRPG for short, and what we're going to do is create a new Campaign File and set up some campaign properties that correspond to attributes of the MTRPG.
The Campaign Properties Window
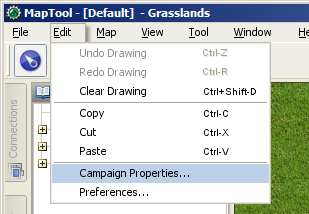
To get started with Campaign Properties, the first thing you'll need to do is go to Edit > Campaign Properties, and open the Campaign Properties window. In this window, you'll see several tabs and a whole lot of information.
When you open up the Campaign Properties window, you'll see it has six tabs. Briefly, they are:
- Token Properties: this houses all the property sets that a token in the current campaign may have
- Repositories: this is where you can designate an online "repository" to hold campaign files, especially images, to improve load times and speed when you host or play an online game
- Sight: this tab is where you configure the settings for vision in the current campaign
- Light: this tab is where you configure light sources and auras for the current campaign
- States: this tab lets you configure token states for the current campaign
- Bars: this is where you configure token bars for the current campaign
This guide will only address the first tab, Token Properties.
The Properties Tab
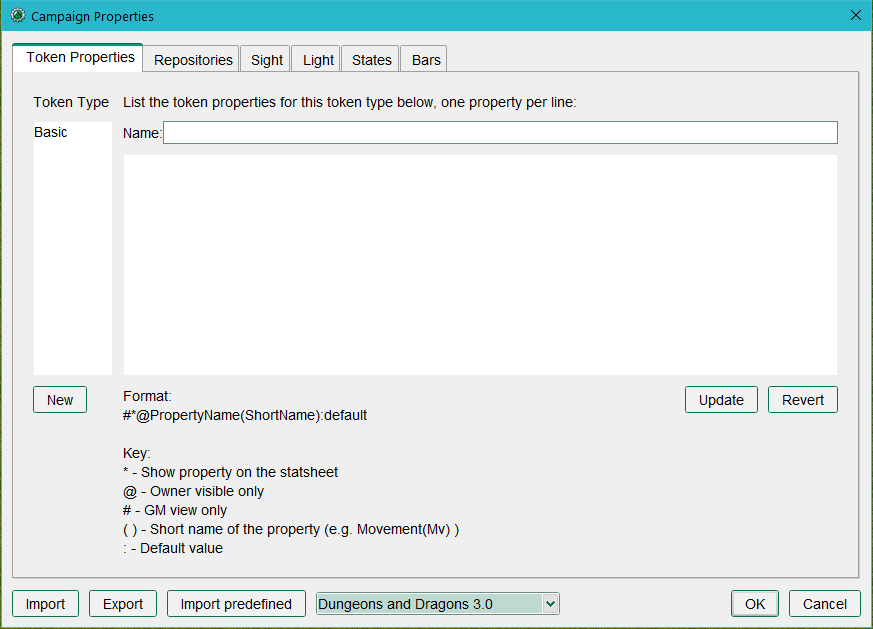
The first visible tab is the properties tab. This appears relatively uncomplicated, but it's home to some really nifty potential. There are 3 text fields in this tab:
- Name: this is the name of the property set you're currently viewing. When you open the campaign properties window, this is blank.
- Type: this column on the left side is not editable, but it will list the names of all the available property sets in the current campaign. If you have no campaign loaded, the only entry will be Basic
- A large text area where you enter the properties for the current campaign. It will be blank when first loaded, but if you select a property set from the Token Type list on the left side, you will see the names and default values of the properties in that set.
Type
In this field, you'll see the names of the different "Property Types" (you can think of them as property sets) that are configured in the current campaign. If you have no campaign loaded, the default property set will be called Basic. The Type field is not directly editable by the user.
Name
This is a simple text field where you can enter the name you want to give the property set. This name will, when you update the set, appear in the Type list to the left, and it becomes the name for that particular set of properties. Names can be anything you like; many users create sets called "NPC" for games where NPC stats and traits differ from those of player characters, for example.
Properties
This is where it gets funky. In this text area, you can create any and every property you can think of, which can reflect every possible number or statistic an RPG character might have (and many properties that they don't have -- lots of users create properties that are useful for when they write macros, but wouldn't appear on any character sheet!).
Creating Properties
Properties with No Default Value
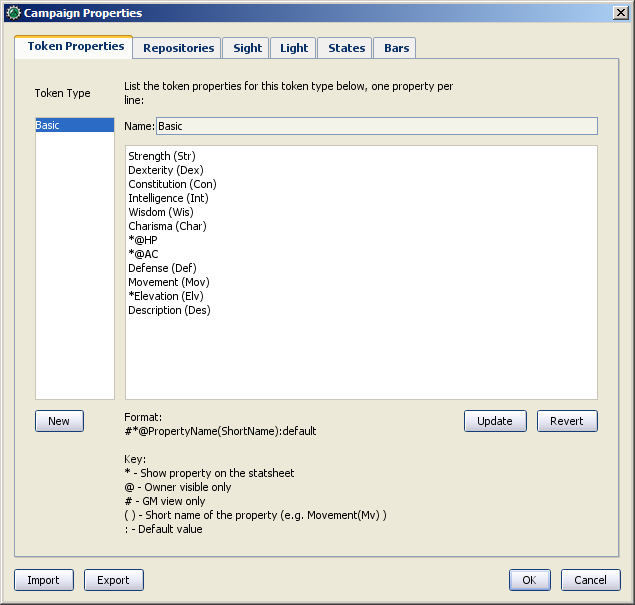
If you look at MTRPG's Primary Attributes, you will see that there are four separate attributes that are the basic attributes of a character: Strength, Dexterity, Intelligence, and Endurance. We're going to get rid of the default properties, and put new ones in their place.
1. Go to Edit > Campaign Properties. You'll see in the left side, under Token Type, that the only entry is "Basic." We're going to create a new property set.
2. In the Token Type list on the left, select Basic. When you do this, you'll see a whole bunch of properties with all kinds of symbols like @, #, and so forth.
3. In the text area with all the properties, use your mouse to highlight them all, and hit Delete on your keyboard. Go ahead - don't be shy!
4. Leave the Name field alone - MapTools must always have a Basic property set, so you can't change that name.
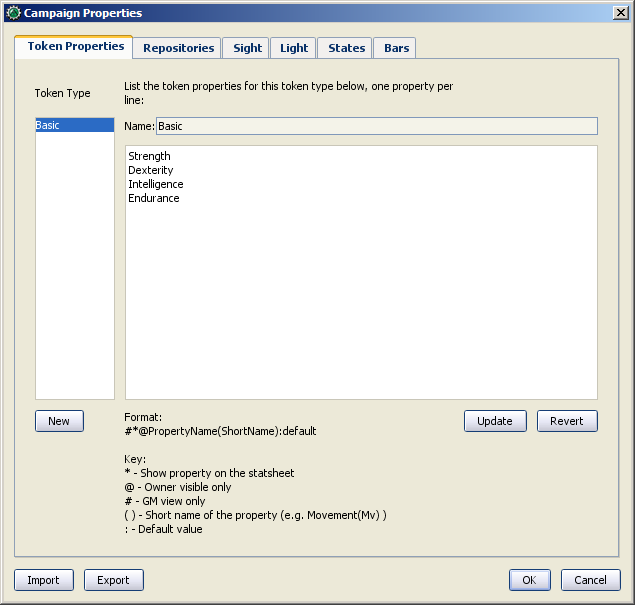
5. In the text area below the Name field, enter the name of each of the four Primary Attributes in MTRPG, like so:
Strength
Dexterity
Intelligence
Endurance
When done, your properties window should look like the screenshot on the right.
6. Once you've finished entering the properties you want, click the button labeled Update. Don't panic! The properties will disappear, but if you select the Basic list from the left, your properties will reappear in the main text area.
7. Click OK to confirm all of your changes and close the Campaign Properties window.
8. Go to File > Save Campaign As and save your campaign as MTRPG.cmpgn. You've now created a new campaign file, with a new set of campaign properties.
When you create properties like this -- just listing the values one after the other -- and then open a token, you will see that these properties have no value. That does not mean that they are equal to zero, or equal to a blank line - they literally have no value. This doesn't mean much for most purposes, but it is an important distinction in macro writing terms (in programming, there's a big difference between a blank string, and an actually empty variable!).
Once properties are updated, all of the tokens on the map will be updated with the new properties, and any new tokens you drop on the map will "inherit" the properties you set up.
NOTE: Property names cannot have spaces in them - so if you have a property called "Hit Points", you would need to enter it as HitPoints.
Creating Properties with Default Values
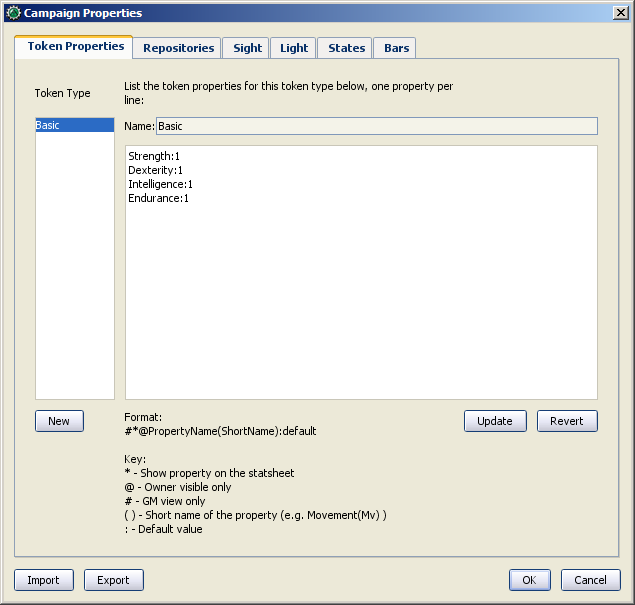
Now, in MTRPG, the minimum value an attribute can have is 1. So, it makes sense to set the default value of these properties to 1 (that way, every new token will at least have the minimum value an attribute can have). To do this:
1. Open the Campaign Properties window.
2. Select the Basic property set.
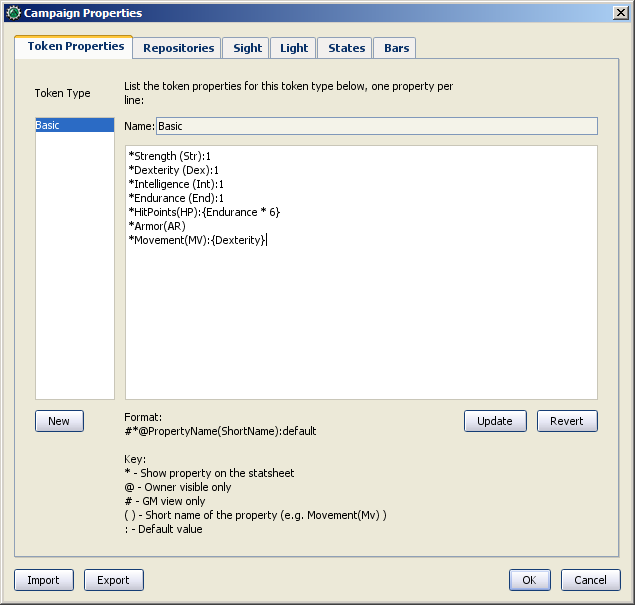
3. In the Basic Properties set, edit your properties so they now read (see the image, as well):
Strength:1
Dexterity:1
Intelligence:1
Endurance:1
4. Click Update.
By placing a colon at the end of the name of each attribute, and putting the number 1 after the colon, you have instructed MapTool that the default value for those properties is 1 (in other words, whatever value you put after the colon becomes the default value for that property). You'll note that at the bottom of the Token Properties tab there is a key describing the various options you can set on a property.
Now, if you drag a new token onto the map and look at its properties (double-click on the token and go to the Properties Tab in the Edit Token dialog), you will see that the new token has the default values.
By the way: don't worry about any tokens you may have already set the property values on - setting up or changing the default values will not override the properties you've already set. MapTool is smart enough to handle that.
Displaying Properties in the Statsheet
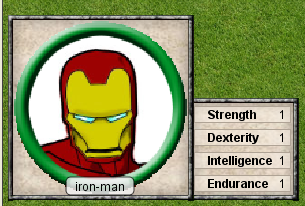
MapTool has a neat feature called the Statsheet, which is briefly mentioned in the Introduction to Tokens - basically, it is an automatic popup that appears in the lower left corner of the map, when you hover over a token.
You may be saying, "Wait...when I hover over my token, there's no statsheet! Where is it?" The reason you don't see it yet is that the Statsheet is governed by the Campaign Properties - it displays the token's properties (along with a larger version of the token's image) - but only when a couple requirements are met:
- The properties are set up to display on the statsheet; and
- The properties that are displayed actually have a value
Setting Properties to Display
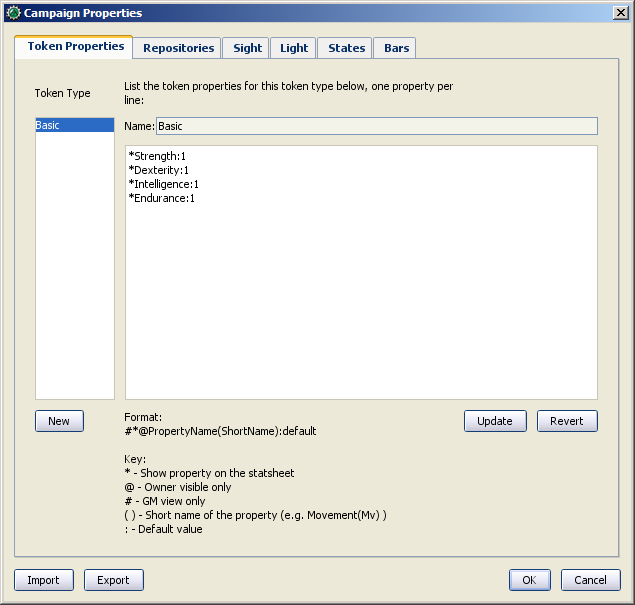
If you look at the bottom of the Token Properties tab in the Campaign Properties dialog, you'll see a key showing how to set up a property to display in the Statsheet. There are three display options, each of which is indicated by putting a symbol in front of the property name:
- *: an asterisk means "show this property on the statsheet"
- @: means "only show this property to the owner of the token (and the GM)"
- #: means "only show this property to the GM (not even the token owner can see it)"
The asterisk is required for any stat to display at all - if you don't have an asterisk first, it won't show no matter what else you put on there. The @ and # symbols, on the other hand, are optional.
So, for our new game, we're going to set all of the properties to be visible to everyone (by just using a star). To do this, open up your properties, and edit them to look like this:
*Strength:1
*Dexterity:1
*Intelligence:1
*Endurance:1
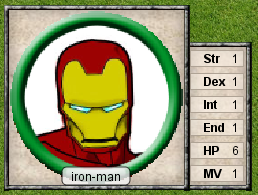
Now, when you hover over a token, you'll see the Statsheet pop up (see the screenshot, above) with the values in the Strength, Dexterity, Intelligence, and Endurance properties. Also, since even brand new tokens have a default value, the Statsheet will appear for all tokens.
Short Names
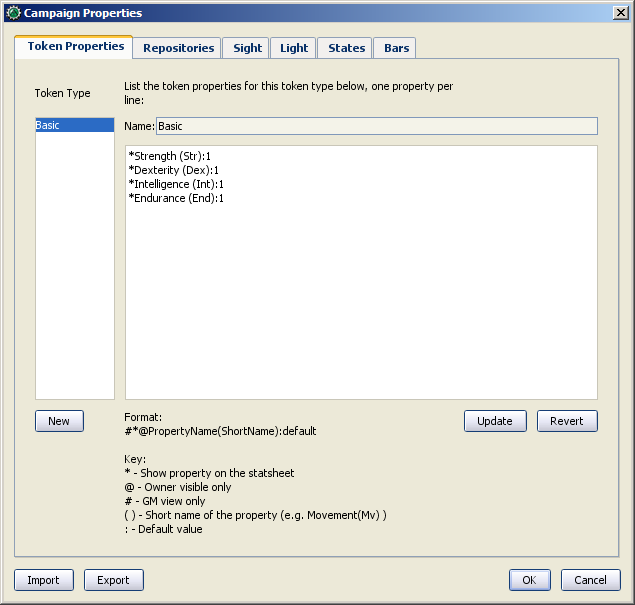
Sometimes, property names can get pretty long (or look unfriendly - no spaces, and all that). MapTool lets you put a Short Name in for each property. To do that, you just enter the short name in parentheses after the property name, like so:
*Strength(Str):1
*Dexterity(Dex):1
*Intelligence(Int):1
*Endurance(End):1
These short names are displayed in the Statsheet instead of the full name of the property
Short Names are for display purposes only - when referencing properties in macros, you must use the full property name.
Creating Derived Properties
Okay, now let's do something pretty cool. In a lot of roleplaying games, there are character attributes that are derived from other stats - for instance, in the Savage Worlds rules, your "Parry" stat is based on your Fighting ability; likewise, in Dungeons & Dragons, your "Hit Points" are derived partly from your "Constitution" score.
Now, you could create these other derived attributes as separate properties and manually enter the values in when you make a new token - but how about we allow MapTool to calculate these derived values? That's right - MapTool's campaign properties can not only be numbers and text, but also calculations and equations based on other properties that the token has.
In MTRPG, there are three derived stats: Hit Points, Armor, and Movement. These stats have the short names "HP", "AR," and "MV." For this example, we're going to set up Hit Points and Movement to be calculated from existing properties. We'll leave Armor until later (it takes a bit more complex a calculation to figure out the armor value, and we're taking it slow).
First, we need to add properties for these three derived values:
1. Open up the Basic property set.
2. Beneath Endurance, enter the following:
*HitPoints(HP)
*Armor(AR)
*Movement(MV)
You'll notice at this point, we've set no default values. Don't hit Update just yet - let's enter some macro code to create a derived value.
We can see from the MTRPG rules that Hit Points is equal to the value of Endurance multiplied by 6. Replicating this calculation in the campaign properties is very simple. Edit the Hit Points property to read:
*HitPoints(HP):{Endurance * 6}
What we've done here is enter a default value for the property (remember, default values are whatever comes after the colon), and used some macro code to instruct MapTool to perform a calculation in order to find the value for the properties. Two thing are happening here:
- We've enclosed the calculations in { }, which warns MapTool that the text enclosed inside the brackets is to be handled like a macro, and not just plain text
- Inside the brackets, we've said, "Find the value of the Endurance property, multiply it by 6, and make that result the value of the Hit Points property"
Now, to handle the Movement attribute, our job is even simpler: we need to instruct MapTool to get the value of the Dexterity property, and assign that same value to the Movement property. To do so, edit the Movement property to read:
*Movement(MV):{Dexterity}
When you are finished, your full property set should look like:
*Strength:1
*Dexterity:1
*Intelligence:1
*Endurance:1
*HitPoints(HP):{Endurance * 6}
*Armor(AR)
*Movement(MV):{Dexterity}
And when you hover your mouse over a token, the Statsheet should look like the screenshot to the right. Remember, even though we've said that Armor should be displayed on the statsheet, the statsheet only shows properties that have a value - Armor is still empty, so it won't show up until you give it a value.
Saving Your Campaign
At this point, you've created a bunch of campaign properties, placed a token on the map, and messed around with manipulation of the properties you made. You should probably save your work in a [Campaign] file. This will save the tokens, properties you created, and all the information you put into the campaign so far.
Also, this will let you work on the campaign further, trying tricks from the other MapTool tutorials.
To save your campaign:
- Go to File -> Save Campaign As...
- In the dialog, enter a file name. Something like MTRPG.cmpgn is good!
- Click OK
Your campaign will now be saved, and you can open it up whenever you feel like it, and work on it some more!
Please note that campaigns saved in one version of MapTool will not open properly in an older version of MapTool; however most campaign files created in an older version can be opened in the newest version (this isn't guaranteed, though...MapTool is evolving at all times!)
Some Technical Details
A couple times in this guide and in other guides the token properties have been described as "those properties that are visible" in this campaign, or the properties set up "for this campaign." There's a reason for phrasing it like this.
See, a token - if you cut one open and looked at its inner workings - is an XML file that contains a ton of information. It has information about its image, its size, its vision, light, and shape, and - of course - its properties. What's important to understand here is that the token will remember not only the properties from the MTRPG, but if it was ever saved as an .rptok file or brought in from another campaign file, it will remember the properties from that campaign too. They won't be visible, but they're stored in the token even so.
So, in reality, a set of Campaign Properties really indicates those properties that:
- You can see if you open up a token by double-clicking on it, and
- You can directly edit by clicking in the cell next to them
This may sound like a recipe for disaster - what if you set up a property that was already set up but is hidden? Fortunately, MapTool will not, when running a macro, attempt to access any hidden properties unless you specifically instruct it to do so, using two special macro functions. So rest assured, you cannot accidentally access a property that's not set up in the Campaign Properties.
In summary, if a Property Type (such as the default Basic property type) has a property named HP, it will be stored in the token under the XML name HP. If another property type (such as a user-defined Pathfinder property type) also has a property named HP, they will both be referencing the same data on the token. Modifying the value of HP when the token is Basic and then changing the token Pathfinder will show the same value for HP.
Moving On from Here
MapTool supports very elaborate properties and derived properties, with a number of math functions and operations. A couple of the most common ones you might want to use are (the examples are not necessarily part of MTRPG; they're just examples):
- Basic math operators: addition (+), subtraction (-), multiplication (*), and division (/)
- Example: HitPoints: {Endurance * 6}
- Rounding: there are some functions to let you round numbers when you divide
- Floor: the floor() function rounds down. Example: HitPoints:{floor(Constitution / 2)} would divide Constitution by two, and round down
- Ceiling: the ceil() function works like floor(), but rounds up. Example: HitPoints:{ceil(Constitution/2)}
{{#customtitle:Inroducción a las propiedades(inacabado)|Inroducción a las propiedades(inacabado)}}