Introduction to Macro Writing/Ko
BEGINNER
THIS IS A BEGINNER ARTICLE
매크로란?
마찬가지로 토큰 매크로 페이지에서 언급한, 간단히 매크로 MapTool에서 작업을 자동화하는 방법입니다. 기본적으로, 매크로 parser에 의해, 이는 그들을 해석하고 그 오른쪽 부분을 올바른 방법으로 (예를 들어, 그 명령을 함께 숫자 두 개를 추가하는 매크로 명령으로 처리됩니다 확보에 대한 처리를 읽을 수 있도록하는 스크립트 , 그리고 단순히 텍스트 채팅 창을에) 넣어합니다.
매크로에서 작은 MapTool에서 시작하지만이 시점에서, 매크로 스크립트 언어가되고있다 아주 완전한 명령과 당신이 상상할 수있는 거의 모든 작업을 수행할 수있는 기능 집합을 특징!
먼저 알아야 할 사항
우리는 보다 강력한 - 그리고 더 복잡한 - 기능과 MapTool의 기능에 대해 탐구하기 시작한 결과가 매크로입니다. 이 가이드를 시도하는 동안에도 새로운 사용자에 따라 쉬울 것 같은데요, 거기에 당신과 읽기는 이미 어떻게해야할지 생각 몇 가지있습니다:
- 난 당신이 지도기능 안내를 읽었다고 가정합니다. 그래서 MapTool 인터페이스를 만드는 방법, 캠페인 파일 저장, 맵에 토큰을 넣기 등에 친숙하다고 생각합니다.
- 난 당신이 토큰 안내도 읽었다고 가정합니다. 그래서 토큰을 어떻게 조작하는지 기본적인 아이디어는 그들의 속성 등을 살펴보세요.
- 마지막으로 매크로는 일반적으로 토큰의 properties과 밀접하게 연결되어있습니다. 나는 당신이 등록정보 안내에 따라 차근차근 읽었고, 새 사용자 MapTool에 대해 배울 수 있도록 만든 새로운 캠페인 파일을 Sample RPG ruleset에 기반해 만들었다고 가정합니다. 아직 가이드를 읽지 않았다면 읽으세요. 그게 아래 예제를 이해하는데 훨씬 더 도움이됩니다!
Conventions for this Guide
I will do my best to keep my language and terminology consistent. In this guide:
- Macro refers to a collection of commands that are grouped together to automate a task
- Macro command will refer to any particular individual command or function you use inside a macro
- Macro language will mean the whole collection of commands, functions, and operations you can use whenever you write macros. You can see a huge array of functions at the List of Macro Functions.
Also, although it is possible for one macro to trigger another (called "calling" another macro), for this guide, the only macros we'll talk about are triggered by clicking a button on the appropriate Macro Panel, and only affect the tokens they run on.
Why Would I Use Them?
There's nothing requiring you to use macros at all when you use MapTool. Remember, the core purpose of MapTool is to share a map with your friends, and play games (read the Introduction to Mapping and the Introduction to Game Hosting to learn how to make and share maps with your gaming groups), and MapTool gives you everything you need to do that: maps, tokens, and a chat system that lets you chat in- and out-of-character, roll dice, and take on the roles of whatever character you are playing.
However, there's a lot more that can be done with MapTool, if you're interested in learning a little bit about the macro capabilities. For example, if you want to click a button that will automatically roll 1d20 and add a modifier to it, it's possible to create a macro for that. If you want to change your hit points after getting hurt, you can write a macro to do that. And this tutorial will show you how.
Where are These So-Called "Macros?"
Macros are associated with various parts of the MapTool interface and the objects in it. It turns out that there are three places a macro can "reside," so to speak:
Token Macros
The first, and most common place, is for a macro to reside on a token. Token macros are associated with the token on which they are created, and will travel around with that token as long as you let them.
Token macros are only directly accessible to the people who own the token, so if you don't own the token, you won't be able to click (or even see!) the button for that macro.
Campaign Macros
Campaign Macros are macros that aren't linked to a specific token in a campaign, but to the campaign as a whole. These macros work in almost every respect exactly like a token macro, except that:
- You don't have to select a token to see the macros
- Anyone can access them and run them
Campaign Macros are quite useful for the GM and for the Players to handle common functions - in fact, if you set up a common task as a campaign macro, then you only need to make one copy of it (instead of making copies on every token that needs it).
Global Macros
Global Macros aren't linked to a token or a campaign - instead, they are macros that are linked with your copy of MapTool. These macros are not visible to anyone else who connects to your game.
This is a good place to put macros for tasks you don't want other people seeing - like information you want to show to players only when you decide; or tasks you want to perform on your NPCs but you don't want PCs to be able to do.
The Macro Panels

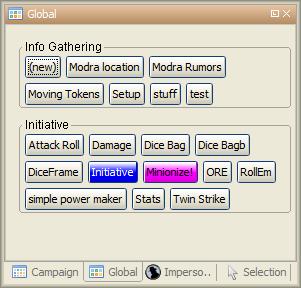
With all this talk about macros and locations and especially the macro "buttons," you are probably wondering - where are these buttons? You'll find macro buttons on one of the 4 macro panels that appear in MapTool. If you cannot see any of the macro panels, go to the Windows menu, and make sure that these four windows are checked:
- Selection
- Impersonated
- Campaign
- Global
You should see these windows pop up in MapTool if they were not already there. If you look at the screenshots to the right, you will see that the Global panel is covered with a bunch of buttons. Each of those buttons will execute a macro; the buttons appear when you create a new macro.
Please note, however, that the Global panel contains macros that are specific to your computer and your installation of MapTool. The buttons you see in the Global Panel screenshots are my Global macros; yours...well, you'll have to write some!
Selection and Impersonated Panels
There are two panels that deal directly with token macros: Selection, and Impersonated.
The Selection panel will show buttons for all of the macros that are currently residing on the token you have selected (you select tokens by clicking on them with the mouse). Each of these buttons runs a particular group of macro commands.
The Impersonated panel shows buttons for the macros on the token you are impersonating. Impersonating a token is a way to "assume the token's persona" - when you chat, text will appear as if the token was speaking, and so forth. It is possible to impersonate one token, and select another, so make sure you know what panel you're looking at!
Campaign Panel
This panel shows all of the macros currently set up for the Campaign. Remember, these are visible to everybody.
Global Panel
This panel contains the Global Macros you've set up. Remember, these are only visible to you.
Before You Go Any Further: The Basics
Before we proceed, there are some essential elements of the macro syntax you need to understand, or unpredictable things will happen. Macros originated as ways to script short sections of text and very brief dice rolls, which were sent to the chat window. So, if you wanted a battle cry to be displayed, but didn't want to retype it every time, you could write a "macro" to send that battle cry to the chat window. Likewise, if you always rolled 2d6 to make an attack, you could write a macro to generate that output, rather than typing /roll 2d6 every time you needed to roll.
From there, it grew - the macro commands became more complex until they were almost a programming language; but they're still just a bunch of text passed to a parser, which handled all the commands in the macro, and generated results.
So, one of the big things to remember is this:
IMPORTANT: Macros are a sequence of text containing both text you want to display in chat AND special commands that do things like make dice rolls.
The Current Token
Before you begin writing macros, please consult the page on the Current Token concept. When you write macros, you will usually - unless the macros are very minimal - be manipulating Token Properties. In order to manipulate the correct set of properties with your macro, it is crucial to understand the concept of the Current Token.
IMPORTANT: A macro always refers to the Current Token, unless you explicitly instruct the functions/operations of that macro to address a token other than the Current Token.
Brackets and Braces
Now, because they are plain text, there must be a way to distinguish the parts that are just text to send to chat, and the parts that are "programming commands." MapTool handles that by enclosing the programming commands in brackets - either the square brackes, [ ], or the curly brackets, { } .
IMPORTANT: Anything found in between square brackets or curly braces is handled not as regular text, but as a command to the parser to do something. Likewise, if it's not between curly or square braces, it is sent to the chat window as text.
So, something like:
[1d20]or
{1d20}is not telling MapTool to send the text [1d20] or {1d20} to chat; rather, it's saying "generate a random number between 1 and 20 and send that to the chat window." The brackets and braces (although braces aren't recommended for use anymore, due to complications they cause with the branching and looping functions) indicate to MapTool that the information between them is a macro command or variable, and not just text. So, as you'll see later, you can mix text and macro commands:
I roll [1d20+4] for initiative.in a macro will replace the [1d20+4] with the result of that dice expression, and then print the entire sentence to chat, so it looks something like:
I roll 16 for initiative.Roll Options
Roll Options are another special feature of the macro language. Their name is somewhat of a legacy - since most macros were dice rolls (e.g. the aforementioned [1d20+4], there was a request to have different ways to display them (or not display them at all). Since those options were used to change how a roll appeared, they were called Roll Options, and the name stuck. In fact, it's still applicable, even though the options no longer really just handle how something is displayed.
Roll Options are a critical thing to understand in macro writing. There are a couple rules. First, the general format of any macro command in MapTool is this:
[(comma-list-of-options): operation(s)]Now, to explain: a roll option has the following rules:
- It always goes at the beginning of a macro statement (for our purposes, a statement is any macro line between square brackets).
- It is always followed by a colon.
- It may be combined with other roll options; if so, you separate each option with a comma, and at the end of the comma-separated list, you put a single colon.
- It needs to appear only once in a given macro statement for it to apply to the operations contained within. This gets tricky when you start using the CODE roll option, since you can begin to nest entire, separate statements, but that is explained in the sections on branching and looping.
A simple example of a roll option is this:
[r:1d20+4]That uses the "regular output" roll option to display the result of 1d20+4 as plain text (without highlighting or tooltips). A complex example might look like this:
[h,if(d20roll == 20): output = "Critical Hit"; output = "Not a Critical Hit"]This combines the [h: ] roll option (which means, "hide this from the chat window"), and the [if(): ] roll option, which performs an if-then operation. Note, though, the roll options all appear only at the beginning of the macro statement to which they apply.
A very complex example might involve the use of the [CODE: ] roll option (learn more about that at [Introduction to Macro Branching] to allows you to nest entire macro statements within blocks to be executed as if they were a single statement. For instance:
[h,if(d20roll == 20),CODE:
{
    [damageAmount = 16]
    [damageType = "acid"]
    [TargetHP = TargetHP - damageAmount]
};
{
    [damageAmount = 1d10+6]
    [damageType = "acid"]
    [TargetHP = TargetHP - damageAmount]
}]
This is a complex statement, but the roll options for the overall command (the outermost set of square brackets) are all at the beginning, separated by commas, and followed by a single colon. The inner statements are nested.
Quotes and Apostrophes
Under most circumstances, macros containing single quotes (or apostrophes) will work fine - they're just text, and thus they will be sent to the chat window without issue. However, there are certain situations where a lone, or unmatched, single quote will cause MapTool to think you have created an unterminated string. When that happens, the text of the macro (all the commands, etc.) is usually dumped to chat, resulting in a big block of ugly output.
To avoid this, remember this rule: if you have text that you wish to appear in chat contained between a set of curly braces, a lone quote character (single or double quotes) will cause an error. So, modifying the example above:
[h,if(d20roll == 20),CODE:
{
    [damageAmount = 16]
    [damageType = "acid"]
    [TargetHP = TargetHP - damageAmount]
    The target's HP is now [r:TargetHP].
};
{
    [damageAmount = 1d10+6]
    [damageType = "acid"]
    [TargetHP = TargetHP - damageAmount]
}]
The single quote character in the line The target's HP is now [r:TargetHP] will cause an error. There are two ways around this:
- Don't use apostrophes. This can be a bit awkward.
- Replace the apostrophe with the HTML character code for the single quote:
'
Comments
THERE IS NO COMMENT MECHANISM IN THE MACRO CODE. ALL PROPERLY WRITTEN MACRO COMMANDS IN A MACRO WILL BE EXECUTED.
The macro language directs all of the content of a macro through the built-in parser, looking for text to send to chat and commands to execute. It is possible to hide output from the chat window in a couple of fashions, but it is not possible to prevent the execution of properly written macro commands. In other words, you cannot comment out code.
There are two ways to hide output: the [H():], or "hidden", roll option, and HTML comment format. The hidden roll option you've already seen, but if you're not familiar with HTML, comments in HTML look like this:
<!--This is an HTML comment-->
In an actual HTML page, anything between the <!-- and --> is completely ignored. In contrast, in MapTool's macro language, anything between the comment tags is hidden from chat, but if you embed macro commands in there, they will be executed. In other words, in a macro, if you have this line:
<!--In this part of the macro I roll some dice-->
it will be hidden from chat and act like a comment. However, if the line said:
<!--In this part of the macro I roll some dice using the format [r:1d20+9]-->
the parser will hide all that from chat, but it will perform that macro command, whether you want it to or not.
The lesson to be learned here: You cannot comment out macro code.
Writing Macros
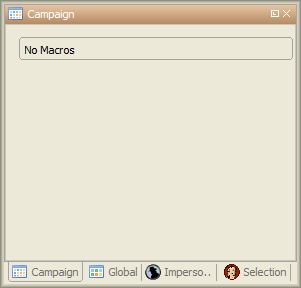
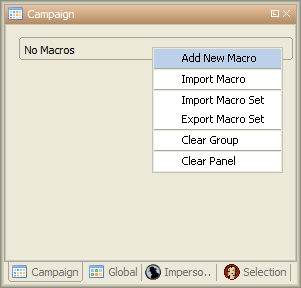
Macro creation is a three-step procedure (though those three steps can contain multitudes!):
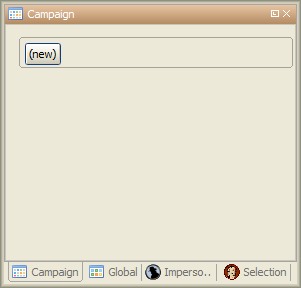
1. Right-click on the panel where you want the macro to appear (either one of the token panels, the Campaign panel, or the Global panel) and select Add New Macro. A gray button with the label (new) will appear.
2. Right-click on the button, and select Edit.
3. Enter your macro code, give it a name, and hit OK. There! You've created a macro!
But wait...what do you mean, "macro code?"
As I said, those three steps can contain a huge amount of details, steps, tips, tricks, victories, failures, frustrations, and sometimes, hollering and gnashing of teeth. So, we'll take a step back and look at some very simple macros in a step-by-step fashion. If you want to see what some advanced macros can look like, there are plenty of tutorials and how-tos on this wiki to read through. For now, though, we'll do some simple, but useful, macro writing.
Roll for Initiative
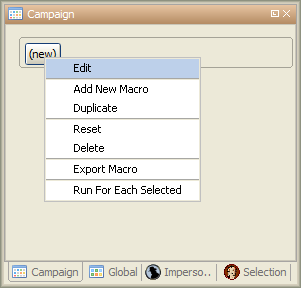
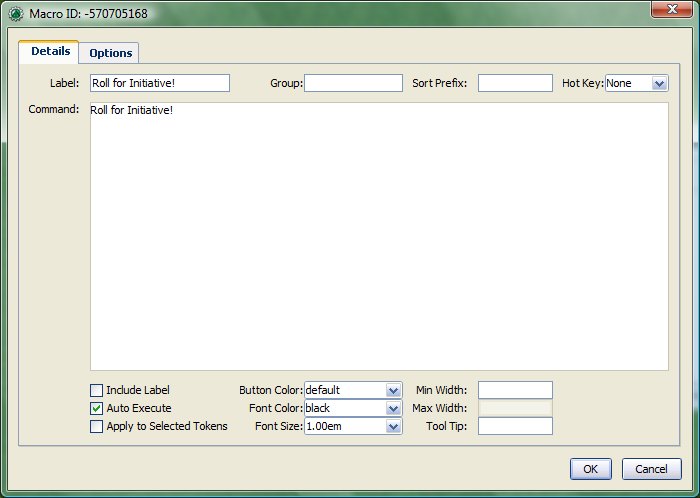
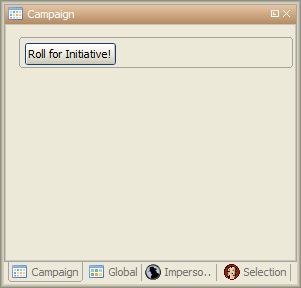
The simplest macros are no more than text, which is output to the chat window. In effect, a macro containing text (in fact, all macros) just send a string of commands to the chat window where it is read and interpreted. Most programming languages start off with the classic "Hello World!" program, so this guide is not going to do that. Instead, let's do something a bit more RPG: create the dreaded "Roll for Initiative!" message!
1. Select the Campaign Panel.
2. Right-click on it, and select Add New Macro.
3. Right-click on the new macro button, and click Edit.
4. In the Label field, enter "Roll for Initiative!"
5. Leave the Group and Sort Prefix fields blank.
6. In the Command field, type
Roll for Initiative!
7. Click OK.
8. When you're done, you'll see that the button has changed - it now says Roll for Initiative! on it, and when you click it, lo and behold, the text "Roll for Initiative!" appears in the chat window.
That is macro writing at its most basic: you enter some text in the macro, and that text is read by the parser and sent to the chat window when you press the button.
Something More Interesting
"Roll for Initiative," though scary when your GM utters it, is not all that interesting a macro. You probably thought, "why wouldn't I just type that in chat?" And in fact, the answer is, "you probably would." So let's do something more interesting, and more in keeping with why we're using MapTool in the first place (after all, we're not here to write programs - we're here to play games): we're going to add some macro commands to the macro, in addition to just plain text. Macro commands are special instructions that, when read by the parser, tell it to do something more than just print text in the chat window, like roll some dice or calculate a value.
Macro commands must always be enclosed in square brackets (e.g, [macro command]) or curly braces (e.g., {macro command}). Enclosing them in this fashion is what clues the parser in that a command is coming - otherwise, it will treat the command just like any other text, and print it in chat.
Roll Some Dice
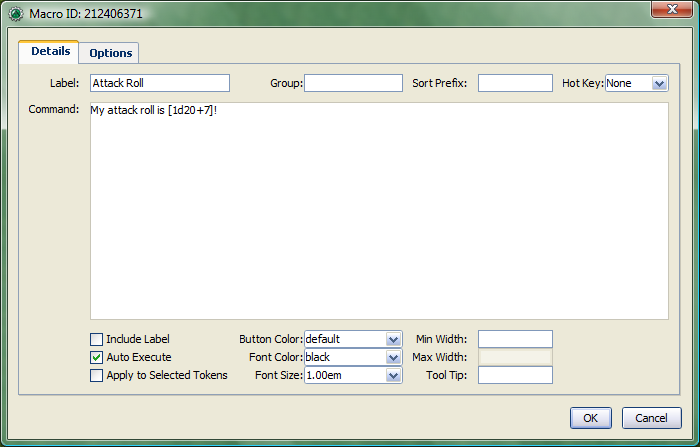
This is a simple macro that's going to automatically roll some dice, and add a number to that roll, before displaying the whole thing in the chat window.
1. Create a new macro (this can be created anywhere you like - on a token, in the campaign panel, or in the global panel), and open the edit dialog (remember, you do that by right-clicking on the button labeled (new)).
2. In the Label field, call the macro something like "Attack Roll" or "Dice Roll"
3. In the Command area, enter:
My attack roll is [1d20+7]!
4. Click OK. You should see a button labeled with whatever you chose in Step 2, above. When you click it, you'll see something like the following appear in chat:
Chris: My attack roll is 8!
What has happened is that MapTool read through the contents of the macro, and when it got to the section [1d20+7], it knew to:
- Roll a 20-sided die (or, in reality, choose a random number between 1 and 20), and
- Add 7 to that result, and
- Display the results in the chat window, inserted into the text in the right place
You'll see that the number 8 has a gray background. If you hover over that number, a "tooltip" will pop up showing how that number was reached. In this case, I managed to roll a 1 on the 1d20 (bummer! a critical fumble!) If you don't see this tooltip, check your MapTool Preferences#Chat settings, specifically Use ToolTips for Inline Rolls.
Also, you probably won't see the name "Chris", unless your name happens to be Chris. That part of the chat output is just indicates who "said" that particular bit of text; if it was a token, it would have the token's picture and name instead of boring old "Chris."
More than Just Numbers
Macro commands can work with numbers and with text -- you can manipulate strings (that is, collections of alphanumeric characters) as well using the MapTool macro language. Say, for instance, you wanted to roll your attack, but wanted to enter the name of your target so that it showed up in chat.
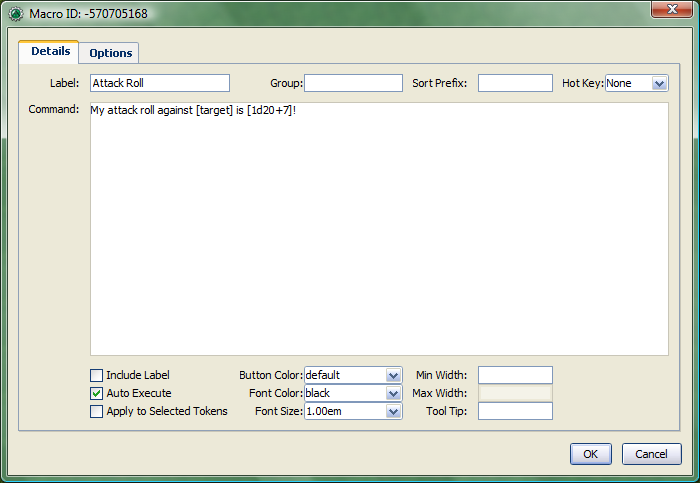
What you can do is edit your Attack Roll macro to look like this:
My attack roll against [target] is [1d20+7]!
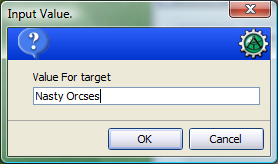
When you run this macro, though, suddenly a window pops up in your face demanding a "Value For target." What happened?
Well, when MapTool looked at that macro, it saw a macro command that just says [target]. MapTool assumes that any word inside a macro command that is not enclosed in quotes is actually the name of a variable (in other words, a value that might change).
MapTool also noted that nowhere in that macro do we say what the variable target happens to equal. Programming languages call this sort of situation an undeclared variable (in other words, you never declared what it equaled). Since MapTool has no way of knowing what target should be, it asks! If you type a name, number, or pretty much anything in that popup window, MapTool will take that information, assign it to the variable target, and finish the macro.
Go ahead and type "Nasty Orcses" (you can leave off the quotes) in the box, and hit OK. You should see in the chat window something like:
Chris: My attack roll against Nasty Orcses is 23!
Once again, the parser read through the text and macro commands you put inside the macro, and in the places where a macro command was indicated (by the square brackets, remember), MapTool substituted the appropriate information.
Using Variables in a Macro
We've seen in a couple of the examples some use of variables (like target in the example above) in a macro, but we haven't gone into the process too deeply yet. However, variables, and their use, is really the core of macro writing, so it would be remiss of me to leave it go.
What's a Variable?
If you're familiar with programming at all, you will know this already, but if you're just stepping into this stuff cold, the simple definition of a variable in terms of the macro language is:
- A variable is a value that might change (i.e., vary) based on a token property, a calculation, or another macro command
Since the value of a variable might change, we have to give it a name (which is called declaring the variable - you declare that "this variable exists!") in order to talk about it. Then, whenever we need to use whatever value the variable has at that time, we just put its name in the macro command, and MapTool will substitute the appropriate value at that time.
Think of it this way: if the value of a dice roll could be anything between 1 and 20, for example, you can't just enter 19 wherever you need to use that dice roll - it could be 19, or 2, or 7, or whatever. So instead, you'd want to say "whatever this dice roll is, put that number here."
- Note: that doesn't mean that MapTool will substitute the correct value for your needs; it means it will substitute the value corresponding to that variable at that time. So if your program has a mistake in it, the value might end up being wrong - but MapTool doesn't understand "wrong," it just understand "this is what it says right now."
Variable Assignments
When you want to give a variable a value, this is called "assigning" a value to the variable. The "asignment operator" in MapTool is the equals sign ( = ). That sounds fancy, but it just means that you use an equals sign to tell MapTool that a particular variable has a particular value. An example of a variable assignment is
[h:myHP = 30]
As you have probably figured out, what that line does is first declare a variable called myHP exists, and then assign it the value 30. That is variable assignment at its root - some variable equals some value. The h: with a colon tells maptools to "hide" the output. It's not necessary, but if you don't want all your variable numbers being sent to the chat window you should put an h: in front of your assignments.
You'll remember from the example where you were prompted for the name of a target that you can use a variable name without assigning a value to it. If you do that, you have declared that the variable exists, but no value is assigned, so MapTool asks you (or whoever runs that macro) for a value. The lesson learned is that a variable needs to have a value assigned to it for the macro to finish, but you don't always have to enter it ahead of time - sometimes you want to get input from the user.
Variable assignments are the only way to set or change the value of a variable; no variables are modified in-place. If you're using a function to change the value of a variable the function returns the content of the modified variable which must be assigned to the existing variable or a new variable.
When to Make an Assignment
MapTool processes each macro command in a macro in order, starting at the top. Therefore, unless you want MapTool to pop up a window asking for input from the user, you have to assign a value to a variable before you use it! For example, in the macro command:
The hit does [damage] [damageType] damage, leaving you with [remainingHP] hit points!
Unless you want MapTool to prompt the user for the variables damage, damageType, and remainingHP, you'll want to make sure to give them a value before you get to that line. Maybe something like:
[h:damage = 1d6+4]
[h:damageType = "fire"]
[h:remainingHP = 30 - damage]
The hit does [damage] [damageType] damage, leaving you with [remainingHP] hit points!
As you can see, we've made three variable assignments before the variables are used in the line about the hit. We've assigned the value of a dice roll of 1d6+4 to the variable damage, the value "fire" to the variable damageType, and the value of the operation 30 - damage to the variable remainingHP.
If you look carefully, you'll see that we've even used one variable in assigning a value to another variable: the value of the variable damage is used when we assign a value to remainingHP - so variables can be used to set and manipulate other variables.
Variable Rules
There are two rules to remember when making up variables:
- No spaces: variable names can't have spaces in them, so you can't use the variable
Hit Points- it has to beHitPoints. - Special Variables: there are several "special variables" that MapTool has reserved - which means you can't use them for other purposes than what MapTool already reserves them for. You can usually tell a special variable because it has a period in it's name, like
roll.countormacro.args. We'll get into those in another guide, but for now, just know that you can't create a variable with the same name as any of the variables on the Special Variables page.
Stepping Up Our Game
The examples above show very basic macro use: printing text to the chat window at the click of a button; making a simple dice roll inside a macro; and even getting some simple input from the user in order to complete a macro.
Now, let's step it up: we'll play with some formatting options, change token properties, and look at some basic looping (doing the same thing over and over again) and branching (doing different things based on some condition or situation).
Formatting Options
Macro output (like any chat output) can be formatted using basic HTML tags, as well as some options built into MapTool. We'll first look at the HTML briefly, and then at a couple Display Roll Options.
Expanded Rolls
In MapTool 1.3.b54, the default way to output the result of a dice roll or calculation is just to print out the total or final value. So if you rolled 1d20+7, what will appear in chat is just the final result, with the tooltip (remember when you hovered your mouse over the number) showing the mathematical breakdown.
If you wish, you can instruct MapTool to print out the full math breakdown for a roll too, by using a Roll Formatting Option - specifically, the Expanded Roll.
Think of a formatting option as a switch telling MapTool how to treat the results of a roll. To get the expanded form, edit your attack roll macro to show:
My attack roll against [target] is [e:1d20+7]!
Then, when you run it, you'll get something like this in the chat:
My attack roll against Nasty Orcses is « 1d20+7 = 1 + 7 = 8 »
Now you can see the full breakdown of your roll.
Result-Only Rolls
But what if you don't want anyone to be able to see the breakdown? So far, both options still let everyone see the actual roll. For this, you use the Result Roll option. Edit your macro to look like this:
My attack roll against [target] is [r:1d20+7]!
And your output will look like this:
My attack roll against Nasty Orcses is 11!
Note that there's no gray background behind the number 11, and you can't get a tooltip if you hover over it. The Results Roll option strips out the special formatting, giving you just the plain text. If you wanted to get rid of the highlight behind the words "Nasty Orcses," you can just change the macro to:
My attack roll against [r:target] is [r:1d20+7]!
And the name of the target will be shown without any special highlighting.
Hidden Rolls
Sometimes, you don't want to see any output from the macro - maybe you just want it to show some text, and do the math in the background, without revealing everything. In those cases, you would replace the "r:" or "e:" in the above examples with an "h:", like in the example below:
[h:myHP = 30]
[h:Bloodied = myHP / 2]
My bloodied value is [Bloodied].
The example above is a very simple illustration of how the hidden roll is useful. In that macro, we're doing three things:
- Setting the value of the variable myHP to 30, but telling MapTool to hide this calculation
- Setting the value of the variable Bloodied to the value of myHP divided by 2, but telling MapTool to hide this calculation too
- Displaying some text, and inserting the value of Bloodied in at the end of the text output.
If you run this macro, the output will look like:
My bloodied value is 15
However, if you don't use the hidden roll option, the output would look like:
30 15 My bloodied value is 15
The extra numbers come from the two calculations before the line of text. You don't need to see those, so, conveniently, you can hide them!
HTML Formatting
MapTool macros support formatting using some basic HTML tags. Let's say you wanted to put the name of your target as one line, the attack roll you're making as another, and as a third line, you wanted to add a dice roll for damage. You might edit your Attack Roll macro to look like this:
I make an attack roll!<br>
<b>Target</b>: [r:target]<br>
<b>Attack</b>: [1d20+7]<br>
<b>Damage</b>: [1d8+5]
When you run that macro, your output in chat will look like:
I make an attack roll!
Target: Nasty Orcses
Attack: 15
Damage: 7
That's just simple formatting - you could put the output in a table, change the font and background colors, change its size...many options are available!
NOTE: If you're handy with HTML, be aware that MapTool supports HTML 3.2 - so things like the <br> tag should not be closed - it's <br>, not <br/>. Additionally, MapTool supports a subset of CSS 1 in the form of in-line styles, and also style sheets in certain instances. More information on the supported CSS tags can be found at Supported CSS Styles.
Using Token Properties
So far, we've manipulated some variables that are entered ahead of time, or that MapTool will ask for when you run a macro. We've got a formatted attack macro that lists a target, an attack, and a damage roll. However, we're still either hardcoding the values into the macro, or having the user put them in themselves every time they're needed. Since RPG characters are not all the same, we'll have to figure out a way to automate some of the numbers, so we can:
- Make one macro that many people or characters can use
- Minimize how much typing we have to do!
As discussed in the Introduction to Tokens, every token carries around with it a personal "character sheet" of sorts, in the form of the token's properties. These properties can be referenced by a macro - so you can, for instance, write a macro that says "Roll 1d20, and add my character's Dexterity to the roll." I'm sure you see how this might be useful.
Setting Some Sample Properties
Of course, for token properties to work, we've got to set them up. It's a good thing you read the Introduction to Properties and created a campaign file for the MapTool RPG Sample Ruleset!
The first step is to open up the MTRPG.cmpgn file (or whatever name you saved it as), and drag a token onto the map (if you don't already have one on there). If you've got no idea what that means, check out the Introduction to Mapping to learn about making maps and putting tokens on them. Now, follow these steps:
1. Double click on a token to open the Edit Token dialog.
2. Go to the tab marked Properties.
3. You'll see a spreadsheet-style list of all the properties in the token that you can edit directly (tokens have other properties that can be edited only with macros, but for now, let's not worry about them!). You should see (if you're using the MTRPG.cmpgn file we set up in Introduction to Properties):
*Strength:1
*Dexterity:1
*Intelligence:1
*Endurance:1
*HitPoints(HP):{Endurance * 6}
*Armor(AR)
*Movement(MV):{Dexterity}
4. Click in the cell next to Strength. A cursor will appear, showing that you can type in that cell. Enter a number in that cell as the token's Strength value. I'm going to use 6.
5. Repeat step 4 for Dexterity, Intelligence, and Endurance, choosing whatever number you like (I'm going to use 3, 2, and 6, respectively). Remember that HitPoints and Movement will be automatically calculated!
6. Click OK. You have just manually updated the token's properties. If you double-click on the token, and look at those properties again, you'll see that the numbers you entered are remembered.
You'll also see that now, when you hover your mouse over the token, a little popup appears in the lower right corner of the map, showing the values for the properties you've entered. This popup is called the Statsheet, and is a quick way to look at the token's properties - it's basically a convenient quick-reference "character sheet."
Referencing a Token Property in a Macro
Now that we've configured some token properties, let's use them in a macro. For our first macro, we're going to roll 1d20, and instead of adding 7, we're going to add the token's Strength.
1. Open up your Attack Roll macro.
2. In the lower left corner, make sure the box Apply to Selected Tokens is checked (otherwise, the macro won't know which token's Strength to use!)
3. Edit your macro to look like this:
I make an attack roll!<br>
<b>Target</b>: [r:target]<br>
<b>Attack</b>: [1d20+Strength]<br>
<b>Damage</b>: [1d8+5]
You'll note I replaced the 7 with the word "Strength." Since Strength is not in quotes, MapTool will know that you mean it to be a variable, and it will look on the current token (that is, the token that is selected) for a property called Strength. If it doesn't find it (or if the property has never been set), it will prompt you for it (just like you were prompted for the value of target). If it does find it, MapTool will put the value of Strength into the macro when it runs.
4. Select your token, and run the macro by clicking the button. The output will look something like:
I make an attack roll!
Target: Nasty Orcses
Attack: 27
Damage: 6
The important thing to note is that if you hover over the attack roll result, the tooltip will now say something like « 1d20 + Strength = 17 + 10 » indicating that the value being plugged in to the dice roll is the property Strength.
Changing a Property with a Macro
Token properties can also be changed using a macro. Suppose we want to reduce the token's hit points after an enemy hit the character. You can manually edit the token and change the value in the HP property, or, you can create a macro that subtracts the amount of damage from the value of HP. Here's how:
1. Create a new macro on the Campaign panel.
2. In the Label field, enter "Damage".
3. In the Command field, enter:
Aarrgh! I'm hit! I have [HitPoints = HitPoints - damage] hit points left.
4. Check the box Apply to Selected Tokens (in the lower left corner).
5. Click OK. When you run the macro, you will be prompted for a value to put in the variable damage. I put in the number 7. The output will look something like this:
Aarrgh! I'm hit! I have 23 hit points left
And, if you double click on the token, you will see that the property HP is now 23. What this macro did was:
- Prompt the user for a value for damage (in this example, I entered 7)
- Retrieve the value of HitPoints from the token (in this example, the value is 30, because it is equal to Endurance * 6)
- Subtract the value of damage from the value of HitPoints (30 - 7, resulting in 23)
- Set the value of HitPoints (originally 30) to the newly calculated total (23)
- Output the text and the new value of HitPoints to chat
String Concatenation
An essential ability to master when writing macros is the ability to assemble strings - that is, collections of alphanumeric characters that are then manipulated or sent to chat. Frequently, you'll want to construct a string from some text that is always the same ("hardcoded" text) and text that can change (text that is the value of a variable, in other words). The construction of a string is often called "concatenation," but it just means "building a long string out of multiple short pieces."
There are two ways to do this in a macro - outside of a macro command, and inside of a macro command.
Outside of a Command
The basic way a macro works is this:
- The parser reads through the whole macro, and separates the macro commands from the plain text
- The parser diverts those macro commands to the appropriate places to be processed (so, numbers are added up, dice are rolled, etc.)
- The processed commands are sent back to the parser, which substitutes the results of those commands in the place where each command was.
- The whole mess - plain text, and the results of the commands (now sitting in place of the actual commands) is sent to the chat window.
So, when you want to display the result of a command along with some text (for instance, you want to print the word "Attack:" and then next to it print the result of a 1d20 roll) in a macro, the easiest way is to just insert a command in the right place in your text, like so:
Attack: [1d20]
The parser will read that whole thing, send off the command [1d20] to be processed, and when it gets that result back, plug it in in place of the command, and send it off to chat. The result will be something like "Attack: 17."
That's the most straightforward way to send text to chat - just put the variables you want displayed in the right place in the text, and they will be shown in the chat window.
Inside of a Macro Command
Sometimes, though, you need to use strings inside of the square brackets. In that case, putting them together is a little different. First of all, within square brackets, you need to use single or double quotes to surround something you want to be treated as a string. Otherwise, MapTool will think you want each word to be a variable! For example:
Correct String
[string = "This is a string"]
Incorrect String
[string = This is a string]
Remember - outside of square brackets, no need for quotes. Inside? QUOTES.
So what if we need to build up a string dynamically? That is, what if we need to make a string that is partly "hardcoded," and partly based on user input? You can't guess what the user is going to say, so you can't write that part ahead of time. What you can do is concatenate the user input into your hardcoded string. The way to do that is to use the plus sign (+), which - when it's used with strings - will piece them together into a long string.
Here's an example: suppose we want the user to enter the name of a skill, and we then want to put that skill name into an existing, hardcoded string, which will be stored in another variable. You would do that like this:
[h:existingString = "The skill name you entered is "]
[h:concatString = existingString+skill+"."]
[r:concatString]
What happens here is this:
- Line 1 sets the "hardcoded" portion of the output
- Line 2 sets the concatenated string -
concatStringto equal the value ofexistingStringplus the value ofskill(which MapTool will prompt for). However, in this case, since MapTool knows thatexistingStringis a string, it will not try to add them mathematically, but just append the value ofskillafter the value ofexistingString. To be grammatically correct, we concatenate another little string on the end, this time, the period. Remember - strings inside square brackets need to be in quotes (but variable names, of course, do not!) - Line 3 displays the final value of
concatString, afterskillhas been appended to it. The output will look something like:
The skill name you entered is Archery.
That's a very simple example, but it illustrates the essence of constructing strings - you "add" them together with a plus sign.
Where do We Go From Here?
This guide barely brushes the surface of the full potential of the macro language in MapTool. However, using just the basic techniques shown here, you can create a lot of very handy, convenient macros to make playing your game easier and more fun. In future guides, I'll cover more advanced macro commands and techniques.