Introduction to Macro Writing/ja

From RPTools Wiki
Revision as of 20:34, 15 March 2023 by Taustin (talk | contribs)
Jump to navigation Jump to search

Languages:  English  • Deutsch  • français  • italiano  • 日本語  • 한국어

BEGINNER
THIS IS A BEGINNER ARTICLE

マクロとは何か?

As mentioned in the Token Macros page, a macro is simply a way to automate a task in MapTool. Essentially, macros are scripts that are read by a parser, which interprets them and ensures that the right parts are processed in the right way (for instance, ensuring that a command to add two numbers together is processed as a macro command, and not simply text to put into the chat window).

トークン・マクロのページでも言ったとおり、単にマクロと言えば、MapTool上での処理を自動化するための手段のことである。マクロは基本的にはスクリプトであり、パーザーがこれを読み取って、解釈し、正しいパーツが正しいやり方で処理されていることを保障する(例えば、ある二つの数値が与えられたとき、そのテキストをチャット・ウィンドウに出力するのではなく、両者を足し合わせる処理をマクロ・コマンドとして実行する、というように)。

Macros started off small in MapTool, but at this point, the macro scripting language has become a very full-featured set of commands and functions that can perform nearly any operation you can imagine!

当初、MapToolの中ではマクロの扱いはささやかなものだったが、今ではマクロ記述言語は非常に充実した命令や関数のセットを持っており、考えうるほとんどの処理をこなせるようになった。

知っているべきこと

Macros are where we begin to delve into the more powerful - and more complicated - features and capabilities of MapTool. While this guide attempts to be easy for even brand new users to follow, there are a few things I assume you've read and already know how to do:

マクロは、MapToolの機能や能力ををより深く―そして複雑なやり方で―利用していく手がかりとなるものだ。このガイドはまったくの初心者でもついてこられるように噛み砕いた内容になるよう心がけてはいるが、あらかじめ理解していることを前提としていることもいくつかある:

  1. I assume you've read the Introduction to Mapping, so you are familiar with the MapTool interface, and how to create maps, save campaign files, and put tokens on maps.
  2. I assume you've also read the Introduction to Tokens, so you have a basic idea how to manipulate tokens, look at their properties, and so forth.
  3. Finally, because macros are usually intimately connected to token properties, I assume that you have read and followed the steps in the Introduction to Properties, and created a new campaign file based on the Sample RPG ruleset created to help new users learn about MapTool. If you haven't read that guide, please do - it will help some of the examples below make a lot more sense!
  1. Introduction to Tokensに目を通していること。トークンの操作について基本的な概念を理解していて、そのプロパティを見るなどができる。
  2. マクロはトークンのプロパティと密接に関わっているのが普通なので、最終的にはIntroduction to Propertiesを読み、そのステップを実行して、Sample RPG rulesetに基づいて新しいキャンペーン・ファイルを作成している必要がある。この文書は、新しいユーザーがMapToolについて学ぶために作られたものだ。もしまだそのガイドを読んでいないのなら、ぜひそうして欲しい。そうすれば、この下で挙げている例をかなり理解しやすくなるはずだ。

このガイドの用語規約

I will do my best to keep my language and terminology consistent. In this guide:

述語や用語については一貫したものになるよう努力する。このガイドでは以下の用語を用いる:

  • Macro refers to a collection of commands that are grouped together to automate a task
  • Macro command will refer to any particular individual command or function you use inside a macro
  • Macro language will mean the whole collection of commands, functions, and operations you can use whenever you write macros. You can see a huge array of functions at the List of Macro Functions.
  • マクロとは、ある処理を自動化するための一連のコマンドを一つにまとめたものことを指す。
  • マクロ・コマンドとは、一つのマクロの中に含まれていて、マクロの内部で使われている一つ一つのコマンドや関数のことを指す。
  • マクロ言語とは、マクロを書くときに使うコマンド、関数、処理全体のことを指す。膨大な関数のリストがList of Macro Functionsにある。
Also, although it is possible for one macro to trigger another (called "calling" another macro), for this guide, the only macros we'll talk about are triggered by clicking a button on the appropriate Macro Panel, and only affect the tokens they run on.

なお、一つのマクロが別のマクロを起動することも可能だが(これを他のマクロを「呼び出す」という)、このガイドでは、マクロ・パネル上にあるボタンをクリックして起動し、そのマクロが実行されているトークンにだけ影響を及ぼすものについてのみ話すことにする。

なぜマクロを使うの?

There's nothing requiring you to use macros at all when you use MapTool. Remember, the core purpose of MapTool is to share a map with your friends, and play games (read the Introduction to Mapping and the Introduction to Game Hosting to learn how to make and share maps with your gaming groups), and MapTool gives you everything you need to do that: maps, tokens, and a chat system that lets you chat in- and out-of-character, roll dice, and take on the roles of whatever character you are playing.

MapToolを使うからと言って、マクロを使わなければならないなどということは全くない。MapToolの最大の目的は、友達とマップを共有し、ゲームをプレイすること(グループ内でマップを共有する方法については、Introduction to MappingIntroduction to Game Hostingを読んで欲しい)であり、Maptoolはそれに必要な全てを提供している。マップ、トークン、そしてあなたがプレイしているキャラクターとして、あるいはプレイヤーとしてそれぞれ話し、ダイスを振り、その役割をこなすことのできるチャットツールもある。

However, there's a lot more that can be done with MapTool, if you're interested in learning a little bit about the macro capabilities. For example, if you want to click a button that will automatically roll 1d20 and add a modifier to it, it's possible to create a macro for that. If you want to change your hit points after getting hurt, you can write a macro to do that. And this tutorial will show you how.

ただ、マクロについてちょっと勉強して見る気になってくれれば、MapToolには他にもたくさんできることがある。たとえば、自動的に1d20を振ってそれに修正値を加えてくれるボタンが欲しければ、それをやるマクロを作ることもできる。攻撃を受けたあとで自分のヒットポイントの値を変えたければ、それをやるマクロを書ける。このチュートリアルではその方法を説明する。

「マクロ」と呼ばれているものはどこにあるの?

Macros are associated with various parts of the MapTool interface and the objects in it. It turns out that there are three places a macro can "reside," so to speak:

マクロはMapTool上のインターフェイスのさまざまな部分や、その内部のオブジェクトと関連している。どうやらマクロが「住み着く」ことのできる場所には、三つの種類があるようだ:

トークン・マクロ

The first, and most common place, is for a macro to reside on a token. Token macros are associated with the token on which they are created, and will travel around with that token as long as you let them.

第一の、そして最もよくある住処は、tokenだ。トークン・マクロはそのマクロが生成されたトークンと関連しており、そのトークンと一緒について回る。

Token macros are only directly accessible to the people who own the token, so if you don't own the token, you won't be able to click (or even see!) the button for that macro.

トークン・マクロにアクセスできるのは、そのトークンの直接的なオーナーだけだ。つまり、オーナーでないトークンのマクロのボタンはクリック(それどころか見ることも!)できない。

キャンペーン・マクロ

Campaign Macros are macros that aren't linked to a specific token in a campaign, but to the campaign as a whole. These macros work in almost every respect exactly like a token macro, except that:

キャンペーン・マクロは、キャンペーン上の特定のマクロと関連しているのではなく、そのキャンペーン全体と関連している。このマクロはトークン・マクロとあらゆる面で同じように機能するが、以下の点で違っている:

  1. You don't have to select a token to see the macros
  2. Anyone can access them and run them
  1. トークンを選択しなくても見ることができる
  2. 誰でもアクセスでき、実行できる
Campaign Macros are quite useful for the GM and for the Players to handle common functions - in fact, if you set up a common task as a campaign macro, then you only need to make one copy of it (instead of making copies on every token that needs it).

キャンペーン・マクロはGMとプレイヤーが共通の機能を扱うのにとても便利だ。実際、共通のタスクをキャンペーン・マクロとして設定しておけば、複数作る必要はないのだ(そのマクロを必要とする全てのトークンにそのマクロを書いてやる必要はない)。

グローバル・マクロ

Global Macros aren't linked to a token or a campaign - instead, they are macros that are linked with your copy of MapTool. These macros are not visible to anyone else who connects to your game.

グローバル・マクロはトークンやキャンペーンとは結びついていない。その代わりに、あなたのMapToolと結びついている。このマクロは、ゲームに接続している他の人たちからは見えないのだ。

This is a good place to put macros for tasks you don't want other people seeing - like information you want to show to players only when you decide; or tasks you want to perform on your NPCs but you don't want PCs to be able to do.

この場所は、他の人には見られたくないタスクのためのマクロを置くのに便利だ。例えば、あなたが他のプレイヤーたちに見せたいと思ったときにだけ見せるような情報や、NPCにだけ実行させて、PCたちには実行できないようにしたいタスクなどだ。

マクロ・パネル

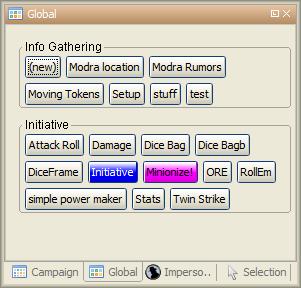
The four Macro Panels
4枚のパネルが重ね合わせてあり、下部にあるタブで選択できる(スペースを節約するために、このようにパネルを重ねておくプレイヤーは多い)
With all this talk about macros and locations and especially the macro "buttons," you are probably wondering - where are these buttons? You'll find macro buttons on one of the 4 macro panels that appear in MapTool. If you cannot see any of the macro panels, go to the Windows menu, and make sure that these four windows are checked:

マクロとその居場所について、特にマクロの「ボタン」について話してきたが、疑問に思っている人もいるだろう。そのボタンはどこにあるのか、と。マクロ・ボタンは、MapTool内に表示されている4枚のマクロ・パネルの上にある。マクロ・パネルが見当たらない場合には、Windowsメニューに行き、以下の4つのウィンドウがチェックされていることを確かめて欲しい。

  • Selection
  • Impersonated
  • Campaign
  • Global
You should see these windows pop up in MapTool if they were not already there. If you look at the screenshots to the right, you will see that the Global panel is covered with a bunch of buttons. Each of those buttons will execute a macro; the buttons appear when you create a new macro.

もしまだ表示されていなかったのなら、MapTool内に現れたのが見えるはずだ。右にあるスクリーンショットを見ると、グローバル・パネルにいろいろなボタンが載っているのが見えるだろう。それぞれのボタンがマクロを実行する。新しいマクロを作ると、新しいボタンが現れる。

Please note, however, that the Global panel contains macros that are specific to your computer and your installation of MapTool. The buttons you see in the Global Panel screenshots are my Global macros; yours...well, you'll have to write some!

注意 グローバル・パネルにはあなたのコンピューターと、あなたのMapToolにのみ存在するマクロが含まれている。先ほどのグローバル・パネルのスクリーンショットにあるのは私のグローバル・マクロだ。あなたのパネルにはないって?……そのうちできると思うよ。

セレクション・パネルとインパーソネイテッド・パネル

There are two panels that deal directly with token macros: Selection, and Impersonated.

トークン・マクロを直接扱うのが、セレクションとインパーソネイテッドの二つのパネルだ。

The Selection panel will show buttons for all of the macros that are currently residing on the token you have selected (you select tokens by clicking on them with the mouse). Each of these buttons runs a particular group of macro commands.

セレクションパネルには、あなたが今選択している全てのトークン上にあるマクロのボタンが表示されている(トークンを選択するには、それをマウスでクリックすればいい)。

The Impersonated panel shows buttons for the macros on the token you are impersonating. Impersonating a token is a way to "assume the token's persona" - when you chat, text will appear as if the token was speaking, and so forth. It is possible to impersonate one token, and select another, so make sure you know what panel you're looking at!

インパーソネイテッドパネルは何かに扮しているトークンのマクロのボタンを表示している。トークンをインパーソネイトするということは、「そのトークンのペルソナを想定する」ということだ。チャットをしていると、そのトークンが喋っているかのようにテキストが表示される、というように。あるトークンをインパーソネイトし、それから次、というようにして、今自分が誰に向いているのかを確認することもできる。

キャンペーン・パネル

This panel shows all of the macros currently set up for the Campaign. Remember, these are visible to everybody.

このパネルには、そのキャンペーン用に設定されている全てのマクロが表示される。このマクロは誰でも見ることができるということを忘れないように。

グローバル・パネル

This panel contains the Global Macros you've set up. Remember, these are only visible to you.

このパネルには、あなたが設定しているグローバル・マクロが表示されている。このマクロはあなたにしか見えない点に注意。

マクロを書く
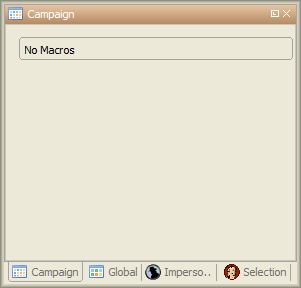
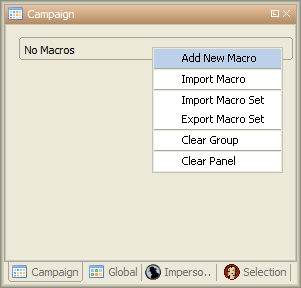
キャンペーン・パネル。今のところマクロはない。
キャンペーン・パネルの上で右クリックすると、新しいマクロを作ることができる
Macro creation is a three-step procedure (though those three steps can contain multitudes!):

マクロは三つの手順を踏んで作成する(ただし、それぞれの手順はさらに細かく分けられることもある)。

1. Right-click on the panel where you want the macro to appear (either one of the token panels, the Campaign panel, or the Global panel) and select Add New Macro. A gray button with the label (new) will appear.

1. そのマクロを置きたいパネル(二つのトークン・パネルのどちらか、キャンペーン・パネル、グローバル・パネル)の上で右クリックし、Add New Macroを選ぶ。(new)というラベルの灰色のボタンが現れる。

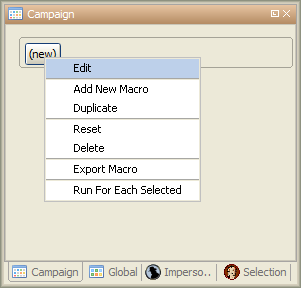
2. Right-click on the button, and select Edit.

2. そのボタンを右クリックし、Editを選ぶ。

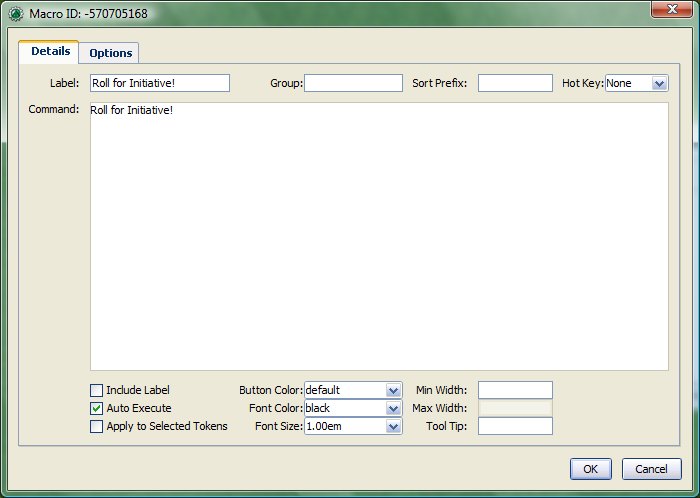
3. Enter your macro code, give it a name, and hit OK. There! You've created a macro!

3. マクロのコードを書き込み、名前を付け、それからOKを押す。ほら、マクロができた!

But wait...what do you mean, "macro code?"

……ちょっと待て。「マクロのコード」って何だ?

As I said, those three steps can contain a huge amount of details, steps, tips, tricks, victories, failures, frustrations, and sometimes, hollering and gnashing of teeth. So, we'll take a step back and look at some very simple macros in a step-by-step fashion. If you want to see what some advanced macros can look like, there are plenty of tutorials and how-tos on this wiki to read through. For now, though, we'll do some simple, but useful, macro writing.

先ほども言ったように、この三つのステップの中にはさらに「膨大な」ディティール、ステップ、コツ、ワザ、勝利、敗北、欲求不満、それに時には「やったー!」とか「歯軋りギリギリギリ」などが含まれることがある。そんなわけで、ここで一旦立ち止まって、簡単なマクロをステップ・バイ・ステップで見ていくことにしよう。高度なマクロがどういうものか見てみたいと言う人向けには、このwiki上にチュートリアルやハウトゥがたくさん載せてある。ただし今は、シンプルな、でも役に立つマクロの書き方をやっていこう。

イニシアティブを振る
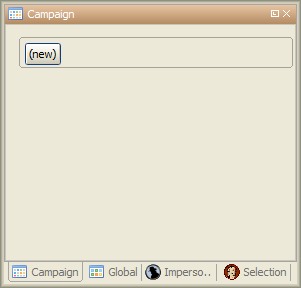
"Add New Macro"を選択すると、キャンペーン・パネル上に(new)というラベルのボタンが出てくる
そのボタンを右クリックすると、マクロ・エディタが開く
マクロのラベルと、マクロ・コマンドを入力する
新しく作ったマクロがキャンペーン・パネルに載っている
The simplest macros are no more than text, which is output to the chat window. In effect, a macro containing text (in fact, all macros) just send a string of commands to the chat window where it is read and interpreted. Most programming languages start off with the classic "Hello World!" program, so this guide is not going to do that. Instead, let's do something a bit more RPG: create the dreaded "Roll for Initiative!" message!

最もシンプルなマクロは単なるテキストで、それをチャット・ウィンドウに出力するだけのものだ。実際のところ、テキストを含むマクロ(すなわち全てのマクロは)チャットウィンドウにコマンド文字列を送るもので、チャットウィンドウがその文字列を読み取って解釈している。ほとんどのプログラム言語はお約束の"Hello World!"プログラムからスタートしているから、このガイドではその定石に従わない。その代わりに、もうちょっとRPGっぽいことをしよう:あの恐ろしい「イニシアティブを振れ!」メッセージだ。

1. Select the Campaign Panel.
2. Right-click on it, and select Add New Macro.
3. Right-click on the new macro button, and click Edit.
4. In the Label field, enter "Roll for Initiative!"
5. Leave the Group and Sort Prefix fields blank.
6. In the Command field, type

Roll for Initiative!

7. Click OK.
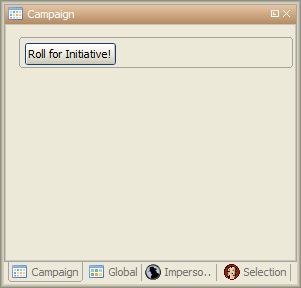
8. When you're done, you'll see that the button has changed - it now says Roll for Initiative! on it, and when you click it, lo and behold, the text "Roll for Initiative!" appears in the chat window.

1. キャンペーン・パネルを選択する

2. 右クリックして、Add New Macroを選択する

3. 新しいマクロのボタンを右クリックし、それからEditをクリックする

4. Labelフィールドの中に"イニシアティブを振れ!"と入力する

5. GroupSort Prefixのフィールドは空にしておく

6. Commandフィールドの中に以下のように入力する

イニシアティブを振れ!

7. OKをクリックする。

8. ボタンの姿が変わっているのが見えるはず。イニシアティブを振れ!という表示になっていて、それをクリックすると、驚くなかれ、なんとチャット・ウィンドウに「イニシアティブを振れ!」と表示されるではないか。

That is macro writing at its most basic: you enter some text in the macro, and that text is read by the parser and sent to the chat window when you press the button.

これはマクロ作成の中でも最も基本的なものだ。つまり、マクロにテキストを入れておくと、パーザーがそのテキストを読み取り、あなたがボタンを押したときにチャット・ウィンドウに送り込む、というものだ。

もう少し面白いことをやってみる

"Roll for Initiative," though scary when your GM utters it, is not all that interesting a macro. You probably thought, "why wouldn't I just type that in chat?" And in fact, the answer is, "you probably would." So let's do something more interesting, and more in keeping with why we're using MapTool in the first place (after all, we're not here to write programs - we're here to play games): we're going to add some macro commands to the macro, in addition to just plain text. Macro commands are special instructions that, when read by the parser, tell it to do something more than just print text in the chat window, like roll some dice or calculate a value.

GMに「イニシアティブを振れ」と言われるのは恐ろしいが、マクロとして面白いかというと、決してそんなことはない。たぶんあなたはこう考えているだろう。「チャットでそう書けばいいんじゃないの?」と。そして事実、その質問に対する答えは「十中八九そうするだろうね」だ。だからもうちょっと手ごたえがあって、MapToolを使うべき理由と関係していることをやろう(だいたい私たちがこうしているのはプログラムを書きたいからではなく、ゲームをプレイしたいからだ)。これからこのマクロにいくつかのマクロ・コマンドを付け加えて、プレーンテキスト以外のものを入れる。マクロ・コマンドは特殊な命令であり、それを読み込んだパーザーに対して、チャット・ウィンドウにテキストを出力する以外のことをするように指図する。例えばダイスを振ったりとか、値を計算したりといった具合に。

Macro commands must always be enclosed in square brackets (e.g, [macro command]) or curly braces (e.g., {macro command}). Enclosing them in this fashion is what clues the parser in that a command is coming - otherwise, it will treat the command just like any other text, and print it in chat.

マクロ・コマンドは必ず大カッコか(例えば、[macro command] )、中カッコで({macro command})くくっておかなければならない。こうすることでパーザーはコマンドが来たことを検知できる。そうしておかないと、コマンドを他のテキストと同じものだと思って、そのままチャット・ウィンドウに表示してしまう。

ダイスを振ってみる
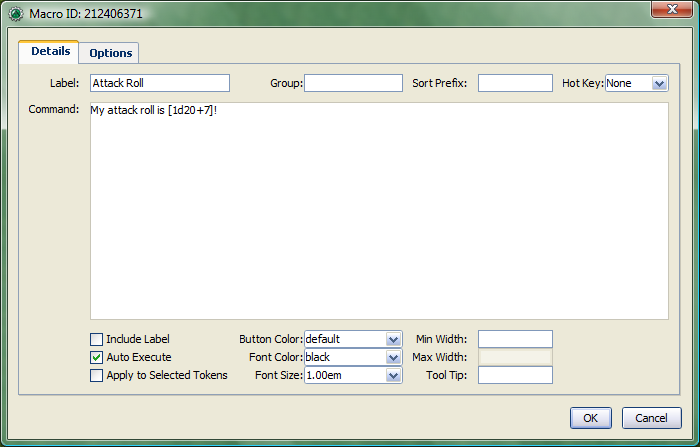
テキストと基本的なダイス 1d20+7 を持つマクロ
This is a simple macro that's going to automatically roll some dice, and add a number to that roll, before displaying the whole thing in the chat window.

これは、いくつかのダイスを振って、自動的にその出目を合計してからチャット・ウィンドウに表示するという、シンプルなマクロだ。

1. Create a new macro (this can be created anywhere you like - on a token, in the campaign panel, or in the global panel), and open the edit dialog (remember, you do that by right-clicking on the button labeled (new)).

1. 新しいマクロを作り(好きな場所に作っていい。トークン、キャンペーン・パネル、グローバル・パネルのどの上ででも)、編集ダイアログを開く(覚えてるかな。(new)というラベルのボタンの上で右クリックするんだ)

2. In the Label field, call the macro something like "Attack Roll" or "Dice Roll"

2. Labelフィールドに名前を入れる。"攻撃ロール"とか"ダイスロール"とか。

3. In the Command area, enter:

My attack roll is [1d20+7]!

3. Commandエリアの中に、次のように入力する:

私の攻撃ロールは [1d20+7]!

4. Click OK. You should see a button labeled with whatever you chose in Step 2, above. When you click it, you'll see something like the following appear in chat:

Chris: My attack roll is 8!

4. OKをクリックする。ステップ2でつけた名前がボタンについているのが見えるはずだ。これをクリックすると、こんな感じにチャット・ウィンドウに表示されるはずだ。

Chris: 私の攻撃ロールは 8!

What has happened is that MapTool read through the contents of the macro, and when it got to the section [1d20+7], it knew to:

MapTool がマクロの中身を読み、[1d20+7]の所まで来ると、こういう風に理解する:

  1. Roll a 20-sided die (or, in reality, choose a random number between 1 and 20), and
  2. Add 7 to that result, and
  3. Display the results in the chat window, inserted into the text in the right place
  1. 20面ダイスを振り(実際には、1から20までの値をランダムに選ぶ)
  2. その出目に7を足し
  3. その結果をテキスト内の適切な場所に挿入して、チャット・ウィンドウに表示する。
You'll see that the number 8 has a gray background. If you hover over that number, a "tooltip" will pop up showing how that number was reached. In this case, I managed to roll a 1 on the 1d20 (bummer! a critical fumble!) If you don't see this tooltip, check your MapTool Preferences#Chat settings, specifically Use ToolTips for Inline Rolls.

8という数字の背景が灰色になっていることに気づくだろう。その上にマウスポインタを持ってくると、"tooltip"がポップアップして、その値がどうやって得られたのかを表示してくれる。今回の場合、私は1d20で1の目を出したわけだ(ぎゃあ!クリティカル・ファンブルじゃないか!)。このtooltipが表示されない場合、MapTool Preferences#Chatの設定を確認して欲しい。特にUse ToolTips for Inline Rollsのところを。

Also, you probably won't see the name "Chris", unless your name happens to be Chris. That part of the chat output is just indicates who "said" that particular bit of text; if it was a token, it would have the token's picture and name instead of boring old "Chris."

また、おそらく"Chris"という名前も表示されていないはずだ。あなたが"Chris"という名前でない限りはね。チャット出力のこの部分は、誰がその文字列を「言った」のかを表している。トークンから出たものなら、面白くもない"Chris"なんて文字じゃなくて、そのトークンの画像と名前が表示される。

数字だけでは面白くない

Macro commands can work with numbers and with text -- you can manipulate strings (that is, collections of alphanumeric characters) as well using the MapTool macro language. Say, for instance, you wanted to roll your attack, but wanted to enter the name of your target so that it showed up in chat.

マクロ・コマンドは数字と文字とを組み合わせることができる。つまり、MapToolのマクロ言語を使えば、文字列を操作できるということだ(ちなみに文字列というのは英数字の並びのことだ)。例えば、攻撃のダイスを振るときに、その攻撃対象の名前を入力して、チャット・ウィンドウに表示させることもできるということだ。
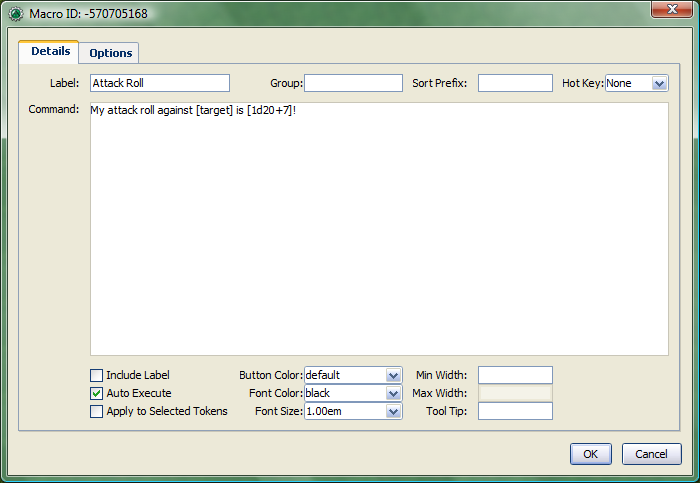
基本的なダイス・コマンドとtargetと言う名前の変数を持つマクロ
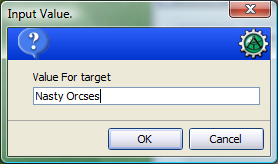
"未定義変数"を入力するためのプロンプト
What you can do is edit your Attack Roll macro to look like this:

My attack roll against [target] is [1d20+7]!

あなたがやるべきなのは、攻撃ロール・マクロを次のように編集することだ:

私の [target] に対する攻撃ロールは [1d20+7]!

When you run this macro, though, suddenly a window pops up in your face demanding a "Value For target." What happened?

このマクロを実行すると、突然目の前にウィンドウが現れて、"Value for target"を入力しろと言ってくる。いったい何が起きたんだろうか?

Well, when MapTool looked at that macro, it saw a macro command that just says [target]. MapTool assumes that any word inside a macro command that is not enclosed in quotes is actually the name of a variable (in other words, a value that might change).

Maptoolがこのマクロを読んでいるときに、[target]とだけ書いてあるマクロ・コマンドを見つけたんだ。MapToolは、マクロ・コマンドのにあって引用符で囲まれていない文字列を変数名だと解釈する(変数の値は変化するかも知れない)。

MapTool also noted that nowhere in that macro do we say what the variable target happens to equal. Programming languages call this sort of situation an undeclared variable (in other words, you never declared what it equaled). Since MapTool has no way of knowing what target should be, it asks! If you type a name, number, or pretty much anything in that popup window, MapTool will take that information, assign it to the variable target, and finish the macro.

さらにMapToolは、このマクロの中にはこのtargetの値がと等しいのかが書いていないことにも気づく。プログラム言語の世界では、こういう状況のことを未定義変数という(要は、その変数と等しいものが何かを宣言していないということだ)。MapToolはこのtargetがどんな値をとるべきかを知る手段がないので、質問する! あなたがこのポップアップ・ウィンドウに名前、数字、あるいは他の何かを入力すると、MapToolはその情報を拾って、target変数の値に割り付け、そしてマクロを終える。

Go ahead and type "Nasty Orcses" (you can leave off the quotes) in the box, and hit OK. You should see in the chat window something like:

Chris: My attack roll against Nasty Orcses is 23!

さっそくボックスの中に"Nasty Orcses"と入力して(引用符は入れなくていい)、OKをクリックしてみよう。チャット・ウィンドウにこんな風に表示されているはずだ:

Chris: 私の Nasty Orcses に対する攻撃ロールは 23!


Once again, the parser read through the text and macro commands you put inside the macro, and in the places where a macro command was indicated (by the square brackets, remember), MapTool substituted the appropriate information.

ここでも、あなたがこのマクロの中に書き込んだテキストとマクロ・コマンドをパーザーが解釈し、マクロ・コマンドの部分(大カッコで囲まれている箇所だ)を、適切な情報で置き換えている。

マクロ内で変数を使う

We've seen in a couple of the examples some use of variables (like target in the example above) in a macro, but we haven't gone into the process too deeply yet. However, variables, and their use, is really the core of macro writing, so it would be remiss of me to leave it go.

これまでに変数を使ったマクロの例(先ほどのtargetなどのような)をいくつか見てきたが、その処理についてはまだ深入りしてこなかった。だが、変数とその使い方は、マクロ作成の本当の核心部分なので、これを解説しないで済ませてしまえば、怠慢と言われても仕方ないだろう。

変数とは何か?

If you're familiar with programming at all, you will know this already, but if you're just stepping into this stuff cold, the simple definition of a variable in terms of the macro language is:

プログラミングに慣れている人ならとっくに知っているはずのことだが、新しく足を踏み入れたばかりの人のために説明すると、マクロ言語における変数を簡単に言うと:

A variable is a value that might change (i.e., vary) based on a token property, a calculation, or another macro command
変数とは、トークンのプロパティ、計算結果、他のマクロ・コマンドなどによって変化する(さまざまな値をとる)ことのある数のことである
Since the value of a variable might change, we have to give it a name (which is called declaring the variable - you declare that "this variable exists!") in order to talk about it. Then, whenever we need to use whatever value the variable has at that time, we just put its name in the macro command, and MapTool will substitute the appropriate value at that time.

変数の値は変化することがあるので、それについて話すためには、名前をつける必要がある(これを変数の宣言と言う。「この変数は存在するんだ!」と宣言するわけだ)。それから、その変数がその時点でとっている値を使うために、その名前をマクロ・コマンドに書いておく。MapToolはその名前をその時点での適切な値に置き換える。

Think of it this way: if the value of a dice roll could be anything between 1 and 20, for example, you can't just enter 19 wherever you need to use that dice roll - it could be 19, or 2, or 7, or whatever. So instead, you'd want to say "whatever this dice roll is, put that number here."

こういう風に考えて欲しい。例えば、あるダイスロールが1から20までの値をとりうるのなら、ダイスを振る必要があるときに、そこに必ず19を入れればいいというわけにはいかない。それが19以外の2、7、などの値でも同じだ。だからそうする代わりに、「ダイスロールの結果がどうであれ、その出目をここに入れろ」と書きたいということになる。

Note: that doesn't mean that MapTool will substitute the correct value for your needs; it means it will substitute the value corresponding to that variable at that time. So if your program has a mistake in it, the value might end up being wrong - but MapTool doesn't understand "wrong," it just understand "this is what it says right now."
注意:ただし、これは必ずしもMapToolがあなたにとって正しい値に置き換えてくれるということではない。ただ、その時点でその変数と結びついた値に置き換えられるだけだ。もしあなたの書いたプログラムに間違いがあったなら、変数は正しい値をとらないだろう。しかし、MapToolにはその値が「間違っている」ことが分からない。単に「今はそういう値なんだ」と思うだけだ。

変数への代入

When you want to give a variable a value, this is called "assigning" a value to the variable. The "asignment operator" in MapTool is the equals sign ( = ). That sounds fancy, but it just means that you use an equals sign to tell MapTool that a particular variable has a particular value. An example of a variable assignment is
[h:myHP = 30]

変数に値を与えることを、その変数に値を「代入する」と呼ぶ。MapToolでは、この「代入演算子」は等号(=)だ。少々洒落すぎているように見えるかもしれないが、この等号を使って、特定の変数に特定の値を代入したことをMapToolに伝えることができる。以下は変数代入の例だ。

[h:myHP = 30]
As you have probably figured out, what that line does is first declare a variable called myHP exists, and then assign it the value 30. That is variable assignment at its root - some variable equals some value.

おそらくもう気が付いていると思うが、ここではmyHPという名前の変数が存在することを宣言しており、それからその変数に30という値を代入している。これが変数への代入の基本的な考え方だ。つまり、何らかの変数イコール何らかの値ということだ。

You'll remember from the example where you were prompted for the name of a target that you can use a variable name without assigning a value to it. If you do that, you have declared that the variable exists, but no value is assigned, so MapTool asks you (or whoever runs that macro) for a value. The lesson learned is that a variable needs to have a value assigned to it for the macro to finish, but you don't always have to enter it ahead of time - sometimes you want to get input from the user.

以前に、target の名前を入力した例を覚えていると思う。値を代入しなくても変数として使える例だ。これを行う場合、つまりある変数が存在することは宣言するが、その変数に値を代入しない場合、MapTool(や、実行されているマクロ)はその変数の値を尋ねてくる。ここで理解しておくべきなのは、マクロが動作を完了するには、変数に値が代入される必要があるが、その値を最初から代入しておく必要はない、ということだ。ユーザーに入力を求めることにしてもいい。

Variable assignments are the only way to set or change the value of a variable; no variables are modified in-place. If you're using a function to change the value of a variable the function returns the content of the modified variable which must be assigned to the existing variable or a new variable.

変数に値をセットしたり、その値を変えることのできる唯一の手段が代入だ。変数の値をその場で変更することはできない。ある変数の値を変更するために関数を利用するのであれば、その関数が返した値は、既存の変数か新規の関数に代入しなければならない。

いつ代入するのか

MapTool processes each macro command in a macro in order, starting at the top. Therefore, unless you want MapTool to pop up a window asking for input from the user, you have to assign a value to a variable before you use it! For example, in the macro command:

The hit does [damage] [damageType] damage, leaving you with [remainingHP] hit points!

MapToolは一つのマクロの中にあるマクロ・コマンドを先頭からひとつずつ実行していく。従って、ポップアップ・ウィンドウを出してユーザーからの入力を要求したいのでもない限り、変数の値はマクロを実行する前に代入しておかなければならない。例えば、以下のマクロ・コマンドでは:

その攻撃は [damage]点の [damageType] ダメージを与え, あなたの残りヒットポイントは [remainingHP] 点になった!


Unless you want MapTool to prompt the user for the variables damage, damageType, and remainingHP, you'll want to make sure to give them a value before you get to that line. Maybe something like:
[h:damage = 1d6+4]
[h:damageType = "fire"]
[h:remainingHP = 30 - damage]
The hit does [damage] [damageType] damage, leaving you with [remainingHP] hit points!

damagedamageTyperemainingHPといった変数の値をユーザーに入力させたいのでないのなら、そこよりも前の行で値を与えておく必要がある。たぶんこんな風に:

[h:damage = 1d6+4]
[h:damageType = "fire"]
[h:remainingHP = 30 - damage]
その攻撃は [damage]点の [damageType] ダメージを与え, あなたの残りヒットポイントは [remainingHP] 点になった!
As you can see, we've made three variable assignments before the variables are used in the line about the hit. We've assigned the value of a dice roll of 1d6+4 to the variable damage, the value "fire" to the variable damageType, and the value of the operation 30 - damage to the variable remainingHP.

ご覧の通り、ここでは三つの変数について、攻撃が命中してその変数が使われる前に代入を行っている。damageには1d6+4、damageTypeには"fire"、そしてremainingHPには30 - damageという計算の結果を与えている。

If you look carefully, you'll see that we've even used one variable in assigning a value to another variable: the value of the variable damage is used when we assign a value to remainingHP - so variables can be used to set and manipulate other variables.

注意してみると、ある変数に代入する値に別の変数を使っていることが分かるだろう。変数remainingHPの値を決めるときにdamage の値が使われている。つまり、変数は他の変数にセットされる値を決めたり、操作するために使うことができる。

変数の命名規則

There are two rules to remember when making up variables:
  1. No spaces: variable names can't have spaces in them, so you can't use the variable Hit Points - it has to be HitPoints.
  2. Special Variables: there are several "special variables" that MapTool has reserved - which means you can't use them for other purposes than what MapTool already reserves them for. You can usually tell a special variable because it has a period it's name, like roll.count or macro.args. We'll get into those in another guide, but for now, just know that you can't create a variable with the same name as any of the variables on the Special Variables page.

変数の名前をつけるには、以下の二つの規則を守らなければならない:

  1. スペース禁止: 変数名はスペースを含んではならない。従って、Hit Pointsという変数名は使えない。使うならHitPointsとすること。
  2. 特殊な変数名: MapToolがあらかじめ予約している"特殊な変数名"がある。特殊変数の名前には、roll.countmacro.argsというように、たいていピリオドがついているのですぐに見分けがつく。これについては別のガイドで詳しく説明するが、とりあえず今は、Special Variablesにあるものと同じ名前の変数は作れないと覚えて欲しい。

ゲームのレベルを上げてみる

The examples above show very basic macro use: printing text to the chat window at the click of a button; making a simple dice roll inside a macro; and even getting some simple input from the user in order to complete a macro.

これまでに挙げてきた例は、マクロの使い方の中でもとても基礎的なものだ。ボタンをクリックするとチャット・ウィンドウにテキストを表示するとか、マクロ内で簡単なダイス振りを行うとか、マクロの動作に必要な入力をユーザーに求めるといったものだ。

Now, let's step it up: we'll play with some formatting options, change token properties, and look at some basic looping (doing the same thing over and over again) and branching (doing different things based on some condition or situation).

さて、それではステップアップと行こう。フォーマット・オプションや、トークンのプロパティの変更、それに繰り返し処理(同じ処理を何度も繰り返すこと)と分岐処理(ある条件や状況に応じて異なる処理をすること)の基本を見てみるとしよう。

フォーマット・オプション

Macro output (like any chat output) can be formatted using basic HTML tags, as well as some options built into MapTool. We'll first look at the HTML briefly, and then at a couple Display Roll Options.

マクロの出力は(チャットの出力と同じように)簡単なHTMLタグや、MapToolに組み込まれているいくつかのオプションを使ってフォーマットすることができる。まずはHTMLについてざっと見てから、Display Roll Optionsをいくつか見てみよう。

展開ロール

In MapTool 1.3.b54, the default way to output the result of a dice roll or calculation is just to print out the total or final value. So if you rolled 1d20+7, what will appear in chat is just the final result, with the tooltip (remember when you hovered your mouse over the number) showing the mathematical breakdown.

MapTool 1.3.b54 では、ダイスロールや計算結果の出力フォーマットのデフォルトは、単に合計値や最終的な値のみを出力するだけになっている。つまり1d20+7を振ると、チャット・ウィンドウには最終的な値と、(その上にマウスポインタを持ってくると)計算式を見せるtooltipだけが表示される。

If you wish, you can instruct MapTool to print out the full math breakdown for a roll too, by using a Roll Formatting Option - specifically, the Expanded Roll.

もし必要なら、Roll Formatting のオプションを指定して、Maptoolに対して計算過程を全て表示するよう指示することもできる。これを特に展開ロールという。

Think of a formatting option as a switch telling MapTool how to treat the results of a roll. To get the expanded form, edit your attack roll macro to show:

My attack roll against [target] is [e:1d20+7]!

フォーマット・オプションとは、ダイスを振った結果をどう扱うのかをMapToolに指示するためのものだと考えてみて欲しい。展開した形式で出力させたければ、攻撃ロール・マクロを以下のように修正すればいい:

私の [target] に対する攻撃ロールは [e:1d20+7]!

Then, when you run it, you'll get something like this in the chat:

My attack roll against Nasty Orcses is « 1d20+7 = 1 + 7 = 8 »

それからこのマクロを実行すると、チャット・ウィンドウにこんな感じで表示されるはずだ:

Now you can see the full breakdown of your roll.

私の Nasty Orcses に対する攻撃ロールは « 1d20+7 = 1 + 7 = 8 »

結果ロール

But what if you don't want anyone to be able to see the breakdown? So far, both options still let everyone see the actual roll. For this, you use the Result Roll option. Edit your macro to look like this:

My attack roll against [target] is [r:1d20+7]!

ところで、ロールの過程を他の人に知られたくない場合にはどうしたらいいだろうか? 今のところは、どちらのオプションを使っても、全員にロールの結果が見えてしまう。これを行うには、結果ロールオプションを使えばいい。マクロの内容を以下のように編集する:

私の [target] に対する攻撃ロールは [r:1d20+7]!

And your output will look like this:

My attack roll against Nasty Orcses is 11!

出力結果はこういう風になる:

私の Nasty Orcses に対する攻撃ロールは 11!

Note that there's no gray background behind the number 11, and you can't get a tooltip if you hover over it. The Results Roll option strips out the special formatting, giving you just the plain text. If you wanted to get rid of the highlight behind the words "Nasty Orcses," you can just change the macro to:

My attack roll against [target] is [r:1d20+7]!

なお、11という数字には背景色がついておらず、その上にマウスポインタを持っていってもtooltipが出てこない点に注意。結果ロールのオプションは特殊なフォーマットを全て削除し、単純なプレーンテキストのみを出力させる。"Nasty Orcses"のハイライトも消したければ、以下のようにすればいい:

私の [r:target] に対する攻撃ロールは [r:1d20+7]!

And the name of the target will be shown without any special highlighting.

そうすれば、targetの名前にも特殊なハイライトは付かない。

秘密ロール

Sometimes, you don't want to see any output from the macro - maybe you just want it to show some text, and do the math in the background, without revealing everything. In those cases, you would replace the "r:" or "e:" in the above examples with an "h:", like in the example below:

[h:myHP = 30]
[h:Bloodied = myHP / 2]

My bloodied value is [Bloodied].

時には、自分のマクロの出力内容を他の人に見られたくない場合がある。マクロにはあるテキストだけ表示させて、バックグラウンドで計算をさせ、その全てが分かってしまわないようにする、などだ。こうした場合、上の例にある"r:"や"e:"を"h:"に置き換えればいい。こんな具合に:

[h:myHP = 30]
[h:Bloodied = myHP / 2]

私の流血度は [Bloodied]です

The example above is a very simple illustration of how the hidden roll is useful. In that macro, we're doing three things:
  1. Setting the value of the variable myHP to 30, but telling MapTool to hide this calculation
  2. Setting the value of the variable Bloodied to the value of myHP divided by 2, but telling MapTool to hide this calculation too
  3. Displaying some text, and inserting the value of Bloodied in at the end of the text output.

上の例は秘密ロールが役に立つとても簡単な例を挙げてみたものだ。このマクロの中では以下のことをやっている:

  1. 変数myHPに30を入れるが、MapToolにはこれを表示させないようにする。
  2. 変数Bloodiedに変数myHPを2で割った値を入れるが、この計算も表示しないようにする。
  3. 変数Bloodiedの値に置き換えてテキスト出力する

If you run this macro, the output will look like:

My bloodied value is 15

このマクロを実行すると、その出力はこういう風になるはずだ:

[h:myHP = 30]
[h:Bloodied = myHP / 2]

私の流血度は 15 です

However, if you don't use the hidden roll option, the output would look like:

30 15 My bloodied value is 15

もし、秘密ロールのオプションを使わないなら、表示はこういう風になるはずだ:

30 15 私の流血度は 15です

The extra numbers come from the two calculations before the line of text. You don't need to see those, so, conveniently, you can hide them!

余計な数値が2つ表示されているが、これはテキストを出力するよりも前の行で行われている計算によるものだ。表示させたくないなら、隠せばいい。便利だね。

HTMLフォーマット

MapTool macros support formatting using some basic HTML tags. Let's say you wanted to put the name of your target as one line, the attack roll you're making as another, and as a third line, you wanted to add a dice roll for damage. You might edit your Attack Roll macro to look like this:

I make an attack roll!<br>
<b>Target</b>: [r:target]<br>
<b>Attack</b>: [1d20+7]<br>
<b>Damage</b>: [1d8+5]

MapToolのマクロでは基本的なHTMLタグを使ったフォーマットにも対応している。例えば、標的の名前、攻撃ロール、ダメージ用のロール結果をそれぞれ別にして三行で表示したいのであれば、例の攻撃ロール・マクロをこんな風に編集すればいい:

攻撃ロールをするよ!<br>
<b>標的</b>: [r:target]<br>
<b>攻撃</b>: [1d20+7]<br>
<b>ダメージ</b>: [1d8+5]

When you run that macro, your output in chat will look like:

I make an attack roll!
Target: Nasty Orcses
Attack: 15
Damage: 7

このマクロを実行すると、出力はこういう風になる:

I make an attack roll!
標的: Nasty Orcses
攻撃: 15
ダメージ: 7

That's just simple formatting - you could put the output in a table, change the font and background colors, change its size...many options are available!

とても単純なフォーマットだ。必要なら、テーブルにもできるし、背景色を変えたり、文字サイズを変えたりもできる。たくさんのオプションが使えるんだ。

NOTE: If you're handy with HTML, be aware that MapTool supports HTML 3.2 - so things like the <br> tag should not be closed - it's <br>, not <br/>. Additionally, MapTool supports a subset of CSS 1 in the form of in-line styles, and also style sheets in certain instances. More information on the supported CSS tags can be found at Supported CSS Styles.


注意: あなたがHTMLを上手く使いこなせるのであれば、MapToolでサポートしているのは HTML 3.2 だということに注意して欲しい。つまり、<br>タグは閉じないということだ。<br/>ではなく、<br>と書く。さらに、CSS 1 のインラインstyleといくつかのスタイルシート・インスタンスに対応している。対応しているCSSタグについての情報はSupported CSS Stylesを参照して欲しい。

トークン・プロパティを使ってみる

So far, we've manipulated some variables that are entered ahead of time, or that MapTool will ask for when you run a macro. We've got a formatted attack macro that lists a target, an attack, and a damage roll. However, we're still either hardcoding the values into the macro, or having the user put them in themselves every time they're needed. Since RPG characters are not all the same, we'll have to figure out a way to automate some of the numbers, so we can:
  1. Make one macro that many people or characters can use
  2. Minimize how much typing we have to do!

ここまで私たちが操作してきた変数は、あらかじめ値が代入されているか、実行時にMapToolが問い合わせをしてくるようなものだった。標的、攻撃、ダメージのロール結果を三行で出すようにしたフォーマット型攻撃マクロも作った。だが、変数の値をマクロの中にじかに書いていたり、必要になるたびにユーザーが入力しなければならなかった。だが、RPGのキャラクターはみんな同じものではないので、どうにかしてこれを自動化する方法を考えなければならない。そこでこうすることにする:

  1. マクロを複数の人やキャラクターに使えるものにする
  2. 入力の手間を最低限に減らす!
As discussed in the Introduction to Tokens, every token carries around with it a personal "character sheet" of sorts, in the form of the token's properties. These properties can be referenced by a macro - so you can, for instance, write a macro that says "Roll 1d20, and add my character's Dexterity to the roll." I'm sure you see how this might be useful.

Introduction to Tokensの中でも話したとおり、全てのトークンにはそれぞれの「キャラクターシート」のようなものがあり、それをトークンのプロパティとして持っている。このプロパティはマクロから参照できる。つまり、例えば「1d20を振ってそのキャラクターのDexterityと足した結果を出す」マクロを書くことができるということだ。これがどれだけ便利かは分かってもらえると思う。

プロパティをセットしてみる

Of course, for token properties to work, we've got to set them up. It's a good thing you read the Introduction to Properties and created a campaign file for the MapTool RPG Sample Ruleset!

当然のことだが、トークン・プロパティが上手く機能するためには、まず最初に設定をしなければならない。あらかじめIntroduction to Propertiesを読んで、MapTool RPGSample Ruleset用のキャンペーン・ファイルを作っておくといいだろう。

The first step is to open up the MTRPG.cmpgn file (or whatever name you saved it as), and drag a token onto the map (if you don't already have one on there). If you've got no idea what that means, check out the Introduction to Mapping to learn about making maps and putting tokens on them. Now, follow these steps:

最初のステップは、MTRPG.cmpgn(もしくは、あなたが以前にセーブしたファイル名)ファイルを開いて、(もしまだマップ上にトークンがないのなら、)マップ上にトークンをドラッグしてくることだ。何のことだか分からないというのであれば、Introduction to Mappingを読んで、マップの作成と、その上にトークンを置く方法について調べて欲しい。さて、それでは以下のステップに従う:

1. Double click on a token to open the Edit Token dialog.

1. トークンをダブルクリックして、Edit Tokenダイアログを開く

2. Go to the tab marked Properties.

2. Propertiesタグを開く

3. You'll see a spreadsheet-style list of all the properties in the token that you can edit directly (tokens have other properties that can be edited only with macros, but for now, let's not worry about them!). You should see (if you're using the MTRPG.cmpgn file we set up in Introduction to Properties):

3. そこにはスプレッドシート形式の表があって、そのトークンのプロパティのうち、直接編集できるもののリストが載っているはずだ(トークンのプロパティには、他にもマクロでだけ編集できるものがあるが、今はそのことは心配しなくていい)。(もしあなたがIntroduction to Propertiesで設定したMTRPG.cmpgnを使っているのなら)そこには以下のものが並んでいるはずだ:

*Strength:1
*Dexterity:1
*Intelligence:1
*Endurance:1
*HitPoints(HP):{Endurance * 6}
*Armor(AR)
*Movement(MV):{Dexterity}

4. Click in the cell next to Strength. A cursor will appear, showing that you can type in that cell. Enter a number in that cell as the token's Strength value. I'm going to use 6.

4. Strength の隣にあるセルをクリックする。カーソルが現れて、セルに入力できるようになる。このセルの中に値を入れると、そのトークンのStrengthの値になる。私は6を入れることにする。

5. Repeat step 4 for Dexterity, Intelligence, and Endurance, choosing whatever number you like (I'm going to use 3, 2, and 6, respectively). Remember that HitPoints and Movement will be automatically calculated!

5. Dexterity、Intelligence、Enduranceについても同じようにステップ4を繰り返す。数字は好きに決めていい(私は順に3、2、6と入れることにする)。HitPointsMovementは自動的に計算されることに注意。

6. Click OK. You have just manually updated the token's properties. If you double-click on the token, and look at those properties again, you'll see that the numbers you entered are remembered.

6. OKをクリックする。これでトークンのプロパティを手作業で編集したことになる。トークンをダブルクリックして再びプロパティを表示してみると、あなたが入れた値が記憶されていることが分かる。

You'll also see that now, when you hover your mouse over the token, a little popup appears in the lower right corner of the map, showing the values for the properties you've entered. This popup is called the Statsheet, and is a quick way to look at the token's properties - it's basically a convenient quick-reference "character sheet."

さらに、そのトークンの上にマウスポインタを持ってくると、地図の右下に小さなポップアップが表示されて、その中にはあなたが入力したプロパティが出るはずだ。このポップアップはStatsheetと呼ばれるもので、トークンのプロパティを手早く調べることができる。これはそのトークンの「キャラクターシート」をさっと参照するのに便利だ。

マクロ内部でトークン・プロパティを参照する

Now that we've configured some token properties, let's use them in a macro. For our first macro, we're going to roll 1d20, and instead of adding 7, we're going to add the token's Strength.

さて、トークン・プロパティの設定もしたので、マクロからそれを利用してみよう。最初のマクロとして、1d20を振った後、それに7を足すのではなく、そのトークンのStrengthを足すことにしよう。

1. Open up your Attack Roll macro.

1. あなたの攻撃ロール・マクロを開く

2. In the lower left corner, make sure the box Apply to Selected Tokens is checked (otherwise, the macro won't know which token's Strength to use!)

2. 左下の隅にあるApply to Selected Tokensのチェックボックスをチェックしておく(そうでないと、どのトークンのStrengthを使っていいのか分からないからね)

3. Edit your macro to look like this:

I make an attack roll!<br>
<b>Target</b>: [r:target]<br>
<b>Attack</b>: [1d20+Strength]<br>
<b>Damage</b>: [1d8+5]

3. マクロを以下のように編集する:

攻撃ロールをするぞ!<br>
<b>標的</b>: [r:target]<br>
<b>攻撃</b>: [1d20+Strength]<br>
<b>ダメージ</b>: [1d8+5]

You'll note I replaced the 7 with the word "Strength." Since Strength is not in quotes, MapTool will know that you mean it to be a variable, and it will look on the current token (that is, the token that is selected) for a property called Strength. If it doesn't find it (or if the property has never been set), it will prompt you for it (just like you were prompted for the value of target). If it does find it, MapTool will put the value of Strength into the macro when it runs.

7を"Stregth"という単語で置き換えたのが分かるだろう。このStrengthは引用符で囲まれていないので、MapToolにはこれが変数であるということが理解でき、current token(つまり現在選択しているトークンのことだ)の中のStrengthという名前の変数を探してくれる。もし見つからなかったら(あるいはそのプロパティが一度も設定されていなければ)、MapToolは入力を要求してくるだろう(前にtargetの入力を求めてきたときのようにね)。もしその変数が見つかったら、マクロをを実行するときに、そのトークンのStrengthの値を入れてくれる。

4. Select your token, and run the macro by clicking the button. The output will look something like:

I make an attack roll!
Target: Nasty Orcses
Attack: 27
Damage: 6

4. トークンを選択してから、マクロのボタンをクリックして実行する。こういう具合に出力されるはずだ:

攻撃ロールをするぞ!
標的: Nasty Orcses
攻撃: 27
ダメージ: 6

The important thing to note is that if you hover over the attack roll result, the tooltip will now say something like « 1d20 + Strength = 17 + 10 » indicating that the value being plugged in to the dice roll is the property Strength.

マウスポインタをロールの結果の上に持ってくると、tooltipは« 1d20 + Strength = 17 + 10 »という表示になって、マクロがStrengthの値を取り出していることが分かる点に注意して欲しい。

マクロを使ってトークンのプロパティを変更する

Token properties can also be changed using a macro. Suppose we want to reduce the token's hit points after an enemy hit the character. You can manually edit the token and change the value in the HP property, or, you can create a macro that subtracts the amount of damage from the value of HP. Here's how:

トークンのプロパティはマクロを使って変更することもできる。例えば、敵の攻撃がキャラクターに命中した後で、そのトークンのヒットポイントを減らしたいと考えてみる。トークンを手で編集してそのHPプロパティの値を変えることもできる。だが、HPの値からダメージの値を引いてやるマクロを作ることもできる。以下はそのやり方だ:

1. Create a new macro on the Campaign panel.

1. Campaignパネルの上に新しいマクロを作る

2. In the Label field, enter "Damage".

2. Labelフィールドに"Damage"と入力する

3. In the Command field, enter:

Aarrgh! I'm hit! I have [HitPoints = HitPoints - damage] hit points left.

3. Commandフィールドに、以下のように入力する:

ぎゃーす! やられた! 俺のヒットポイントはもう [HitPoints = HitPoints - damage] よ

4. Check the box Apply to Selected Tokens (in the lower left corner).

4. Apply to Selected Tokensのチェックボックスをチェックする(左下の隅にある)

5. Click OK. When you run the macro, you will be prompted for a value to put in the variable damage. I put in the number 7. The output will look something like this:

Aarrgh! I'm hit! I have 23 hit points left

5. OKをクリックする。このマクロを実行すると、damageの値を入力するよう要求される。私は7と入れた。そうするとこういう出力が得られるはずだ:

ぎゃーす! やられた! 俺のヒットポイントはもう 23

And, if you double click on the token, you will see that the property HP is now 23. What this macro did was:

そして、このトークンをダブルクリックすると、そのプロパティHPの値が23になっていることが分かる。マクロはこんな風に動作している:

  1. Prompt the user for a value for damage (in this example, I entered 7)
  2. Retrieve the value of HitPoints from the token (in this example, the value is 30, because it is equal to Endurance * 6)
  3. Subtract the value of damage from the value of HitPoints (30 - 7, resulting in 23)
  4. Set the value of HitPoints (originally 30) to the newly calculated total (23)
  5. Output the text and the new value of HitPoints to chat
  1. ユーザーにdamageの値を入力させる(この例では、私は7を入れた)
  2. トークンのHitPoints値を取り出す(この例では30になっているが、これはEndurance*6 で求められているからだ)
  3. damageの値をHitPointsの値から引く (30-7で、23になる)
  4. トークンのHitPointsプロパティを、元の値(30)から計算後の新しい値(23)に書き換える
  5. テキストとHitPointsの新しい値をチャット・ウィンドウに表示する

文字列の連結

An essential ability to master when writing macros is the ability to assemble strings - that is, collections of alphanumeric characters that are then manipulated or sent to chat. Frequently, you'll want to construct a string from some text that is always the same ("hardcoded" text) and text that can change (text that is the value of a variable, in other words). The construction of a string is often called "concatenation," but it just means "building a long string out of multiple short pieces."

マクロを作成するときに必須となるのは、文字列、つまり英数字の連結したもの、を組み立てる能力だ。組み立てられた文字列には操作が行われたり、チャット・ウィンドウに送り込まれたりする。マクロを作る際には、変化しない(マクロ内に「埋め込まれている」テキスト)文字列や、変化する文字列(別の言い方をすると、変数の値となっているテキスト)を使うことが頻繁にあるだろう。文字列の組み立て作業のことをしばしば「連結」と呼ぶが、これは単に「より短い文字列から長い文字列を作りだす」という意味でしかない。

There are two ways to do this in a macro - outside of a macro command, and inside of a macro command.

マクロでこれを行うには二つの方法がある。マクロ・コマンドの外で行うものと、マクロ・コマンドの中で行う者だ。

コマンドの外で連結する

The basic way a macro works is this:

マクロは基本的に以下のように動作する:

  1. The parser reads through the whole macro, and separates the macro commands from the plain text
  2. The parser diverts those macro commands to the appropriate places to be processed (so, numbers are added up, dice are rolled, etc.)
  3. The processed commands are sent back to the parser, which substitutes the results of those commands in the place where each command was.
  4. The whole mess - plain text, and the results of the commands (now sitting in place of the actual commands) is sent to the chat window.
  1. パーザーがマクロ全体を読み込み、プレーンテキストとマクロ・コマンドとを切り分ける
  2. パーザーはそれぞれのマクロ・コマンドを適切な処理を行うべき場所に分岐させる(その先で、数値を合計したり、ダイスを振ったりする)
  3. 処理されたコマンドはパーザーへと送り返され、それぞれのマクロ・コマンドをその結果で置き換える
  4. プレーンテキストとコマンドの結果(もともとのコマンドの位置に置かれている)は一緒くたにされて、チャット・ウィンドウに送り込まれる
So, when you want to display the result of a command along with some text (for instance, you want to print the word "Attack:" and then next to it print the result of a 1d20 roll) in a macro, the easiest way is to just insert a command in the right place in your text, like so:
Attack: [1d20]

つまり、一つのマクロの中で、コマンドの結果とテキストとをいっしょに表示させたいのなら(例えば、"攻撃:"という単語の後に1d20の結果を表示するとか)、最も簡単な方法は、テキスト上の適切な位置にマクロを置けばいい。こんな具合に:

攻撃: [1d20]
The parser will read that whole thing, send off the command [1d20] to be processed, and when it gets that result back, plug it in in place of the command, and send it off to chat. The result will be something like "Attack: 17."

パーザーはこれ全体を読み込んで、コマンド[1d20]を実行させ、その結果を受け取って、コマンドのあった位置に突っ込んでから、チャットへ送り込む。結果はだいたい「攻撃: 17」みたいな感じになる。

That's the most straightforward way to send text to chat - just put the variables you want displayed in the right place in the text, and they will be shown in the chat window.

これはテキストをチャットに送り込むときの最も真っ正直なやり方だ。つまり、表示したい変数をテキスト上の表示したい位置に置く。するとそれがチャット・ウィンドウに表示される。

コマンドの中で連結する

Sometimes, though, you need to use strings inside of the square brackets. In that case, putting them together is a little different. First of all, within square brackets, you need to use single or double quotes to surround something you want to be treated as a string. Otherwise, MapTool will think you want each word to be a variable! For example:

とは言え、大カッコの内側で文字列を使わなければならないこともある。こうした場合、文字列の置き方が少し違ってくる。まず、大カッコの中では、文字列として扱われたいものはダブルクォートかシングルクォートで括らなければならない。そうしておかないと、MapToolはそれぞれの単語が変数なのだと思ってしまう。例えばこうだ:

Correct String

[string = "This is a string"]

Incorrect String

[string = This is a string]

正しい文字列

[string = "これは文字列です"]

誤った文字列

[string = これは文字列です]


Remember - outside of square brackets, no need for quotes. Inside? QUOTES.

覚えておこう。カッコの外側ではクォート不要。内側なら? クォート必須!。

So what if we need to build up a string dynamically? That is, what if we need to make a string that is partly "hardcoded," and partly based on user input? You can't guess what the user is going to say, so you can't write that part ahead of time. What you can do is concatenate the user input into your hardcoded string. The way to do that is to use the plus sign (+), which - when it's used with strings - will piece them together into a long string.

では、文字列を動的に作りたい場合にはどうしたらいいだろうか? つまり、文字列の一部は「埋め込み」で、別の一部は入力内容に基づいて作りたいといった場合は、どうしたらいいのか? ユーザーが何を言うかは分からないので、ユーザーが入力する部分の文字列を予め作っておくことはできない。これは、ユーザーの入力と埋め込み文字列とを連結することで可能だ。これを行うには、プラス(+)の符号を使う。これを文字列どうしに対して使うと、文字列を連結して一つの長い文字列にしてくれる。

Here's an example: suppose we want the user to enter the name of a skill, and we then want to put that skill name into an existing, hardcoded string, which will be stored in another variable. You would do that like this:

例を挙げよう: ユーザーに技能の名前を入れて欲しいとする。そしてその技能名の文字列を、予め埋め込まれている文字列と組み合わせて、別の変数に入れる。それはこんな風に実現できるだろう:

[h:existingString = "The skill name you entered is "]
[h:concatString = existingString+skill+"."]
[r:concatString]
[h:existingString = "あなたが入力した技能名は "]
[h:concatString = existingString+skill+"."]
[r:concatString]
What happens here is this:

ここで何が行われているかというと、こうなっている;

  • Line 1 sets the "hardcoded" portion of the output
  • Line 2 sets the concatenated string - concatString to equal the value of existingString plus the value of skill (which MapTool will prompt for). However, in this case, since MapTool knows that existingString is a string, it will not try to add them mathematically, but just append the value of skill after the value of existingString. To be grammatically correct, we concatenate another little string on the end, this time, the period. Remember - strings inside square brackets need to be in quotes (but variable names, of course, do not!)
  • Line 3 displays the final value of concatString, after skill has been appended to it. The output will look something like:
  • 1行目では出力文字列のうち、「埋め込み」部分をセットしている
  • 2行目では連結された文字列を変数にセットしている。concatStringexistingStringskill(ここでMapToolは入力を求めてくる)の値をプラスしたものを代入する。しかしこの場合、MapToolはexistingStringが文字列だと知っているので、数字として加算するのではなく、existingString 値の後にskillの値をくっつける。文法的に正しくするために、この文字列の最後に短い文字列を付け加える。今回はピリオドだ。注意して欲しいのは、大カッコの内側にある文字列はクォートで囲まなければならない、というところだ(ただしそれが変数なら話は別だ。囲んじゃだめだよ!)。
  • 3行目では、skillが連結された後の、concatStringの最終的な値を表示する。表示内容はこんな風になるはずだ:

The skill name you entered is Archery.

あなたが入力した技能名は Archery.

That's a very simple example, but it illustrates the essence of constructing strings - you "add" them together with a plus sign.

これはとてもシンプルな例だが、文字列連結の基本を解説したものだ。つまり、プラス符号を使って文字列同士を「加える」ということだ。

ここから先はどこへ行こうか?

This guide barely brushes the surface of the full potential of the macro language in MapTool. However, using just the basic techniques shown here, you can create a lot of very handy, convenient macros to make playing your game easier and more fun. In future guides, I'll cover more advanced macro commands and techniques.

このガイドでは、MapToolのマクロ言語のポテンシャルのほんの一部に軽く触れただけだ。しかし、ここに上げられている基本的な技法を使うだけでも、使いやすくて便利で、ゲームをもっと簡単に楽しく遊べるようなマクロを作り上げることができる。今後のガイドでは、高度なマクロ・コマンドや技法を紹介する予定だ。

Languages:  English  • Deutsch  • français  • italiano  • 日本語  • 한국어