Introduction to Tokens/de
BEGINNER
THIS IS A BEGINNER ARTICLE
Erstellung und Nutzung von Spielmarken (Tokens)
Wie schon in der Einführung ins Kartenzeichnen bemerkt, ist eine Token in MapTool ein technischer Begriff für einen optischen Marker, der auf eine Karte in MapTool gesetzt wird. Die eingängigste Verwendung für so einen Marker ist die einer Spielfigur, als Miniatur auf dem Spielfeld, die einen Charakter oder Spieler repräsentiert.
Voraussetzungen
Dieser Text geht davon aus, dass du bereits die Einführung ins Kartenzeichnen gelesen hast und weißt wie man:
- der Bibliothek neue Ordner hinzufügt und neue oder geänderte Bilder dort einfügt
- eine Karte in MapTool erzeugt
- Spielmarken auf die Karte setzt und bewegt
- die verschiedenen Namen von Spielmarken (Name, SL-Name, Sprechblase) anpasst
- die Größe einer Spielmarke ändert
- das Bild einer Spielmarke ändert
- eine Spielmarke von einer Ebene auf eine andere verschiebt
Wenn du diese Dinge nicht weißt, dann gehe bitte nochmal zurück und lies nochmal nach. Andernfalls könnte dieser Text ziemlich unerquicklich für dich werden - wir wollen doch beide, dass du Spaß hast ;-)
Noch ein Hinweis zum Verständnis: Dieser Text ist in erster Linie aus sicht der Spielleitung geschrieben; aus der Sicht einer Person also, die die volle Kontrolle über alle Elemente von MapTool (Tokens, Einstellungen und die Kampagne) hat. Spieler (also Menschen, die sich in der Rolle Spieler mit dem Server verbinden) haben deutlich eingeschränkte Rechte und werden vieles von dem, was hier erläutert wird, nicht nachvollziehen können.
MapTools Ebenen
Auch wenn die meisten Anwender von MapTool unter einem "Token" ein Bild verstehen, das einen Charakter oder eine Kreatur auf der Karte repräsentiert, umfasst der Begriff tatsächlich jede Bilddatei die auf der Karte abgelegt wird. Welche Möglichkeiten die jeweilige Datei dann bietet, ist von der Ebene abhängig, auf der Sie abgelegt ist (und eventuell auch vom vergebenen Namen: s. Library Token). Im Folgenden soll es deshalb um die verschiedenen Ebenen und ihr Funktion für die Tokens gehen.
- Dinge, die auf der Spielmarkenebene (engl. Token) abgelegt werden verstehen die meisten als Tokens - sie stellen meist Charaktere, NPCs, Monster dar - die Leute und Kreaturen, die die Spielwelt bevölkern.
- Auf der Objekt-Ebene sstellen dagegen normalerweise Gegenstände wie Möbel, Truhen oder andere Dinge in der Spielwelt dar, mit denen die Personen dieser Welt umgehen oder sie nutzen können. Für MapTool sind natürlich auch das Tokens (wie praktisch alles auf der Karte für MapTool Tokens sind - MapTool ist da sehr zielstrebig) aber um der Klarheit willen nennen wir sie hier Objekte um sie von den Tokens zu unterscheiden die Charaktere darstellen.
- Dinge, die auf den Hintergrund abgelegt werden sind üblicherweise Teile der Karte: Wände, Kliffs, Schmutz oder Gras. Es kann sich um einzigartige Dinge handeln (wie eine Götterstatue im Tempel), in den meisten Fällen sind es aber sich wiederholende "Stempel" oder "Kacheln" aus denen eine Wiese oder der Boden eines Raumes besteht, eine Mauer sich erstreckt oder etwas ähnliches.
Die Versteckte Ebene
Du hast vielleicht bemerkt, dass ich die Versteckt-Ebene ausgelassen habe. Das liegt daran, dass diese Ebene eine ganz andersartige Funktion hat.
Während die Spielmarke-, Objekt- und Hintergrund-Ebene eine recht klar verständliche Funktion in Bezug darauf hat, wie die Welt so funktioniert
- Ich bin eine Person oder Kreatur, das da drüben ist ein Objekt und drumrum ist der Hintergrund als Kulisse -
ist die Versteckte Ebene all das, was wir nicht sehen ("Twilightzone"). Alles, was auf dieser Ebene liegt, ist nur für die Spielleitung sichtbar bis sie entscheidet, es auf eine andere Ebene zu verschieben.
Allgemein wirst du vielleicht Charaktere oder Objekte auf dieser Ebene ablegen, Hintergrund-Kacheln wahrscheinlich eher nicht... auch wenn dir bestimmt gerade ein bis drei Gründe einfallen, sowas tun zu wollen.
Es ist wohl überflüssig darauf hinzuweisen, dass man beim Ablegen von Tokens darauf achten sollte, welche Ebene man gewählt hat bzw. dass es die richtige ist. MapTool verhält sich bei der Ablage aber auch verschieden, je nach Ebene, was Fehler noch etwas unwahrscheinlicher macht.
Ein neues Token erstellen
Einen Token zu erstellen ist ganz einfach: man zieht einfach ein Bild aus der Bibliothek auf die Token-Ebene der Karte. Neben ein paar wenigen Standard-Tokens, die schon mit der Installation von MapTool mitkommen, kann man aus einer großen Auswahl frei verfügbarer Bilder in der RPTools Bibliothek wählen, die man über Ressource aus zur Bibliothek hinzufügen... kann, wenn man dort den untersten Reiter wählt. Daneben gibt es natürlich die beiden anderen Reiter zum Import von Bildern aus dem Laufwerk oder dem Internet im genannten Dialog.
Und wie kannst du für dich passende Tokens für dein Spiel selbst machen oder finden? Auch dafür gibt es verschiedene Möglichkeiten.
Ein Bild herunterladen
MapTools Community hat eine reichhaltige Auswahl an Tokens erstellt, die du nutzen kannst. Besuche die RPTools Foren oder sieh dich in den angepinnten #artwork Channels auf unserem MapTool Discord Server um. Da findest du Hunderte von Bildern für Tokens aller Art.
Tokens mit TokenTool
Es gibt auch ein Programm von RPTools namens TokenTool das, wie der Name schon sagt, speziell für die Erstellung von Tokens gemacht ist.
Ein Token mit Tokentool zu erstellen funktioniert so:
1. TokenTool herunterladen und mit einem Doppelklich auf die Datei mit der Endung .jar (das ist die Endung von Anwendungsdateien, die mit JAVA laufen).
2. Finde ein Bild, aus dem du gerne ein Token machen würdest; sei dabei aber bitte vorsichtig mit dem Copyright bzw. Urheberrecht.Ziehe dein Bild auf die linke Fensterseite von Tokentool mit dem kleinen grünen Ring und dem schwarzen Hintergrund.
3. Wenn das Bild im Fenster erscheint, positioniere es so in dem grünen Ring, dass genau der richtige Ausschnitt deines Bildes dort liegt. Rechts oben wird dir eine Vorschau des Tokens angezeigt.
- Tipp: Du kannst das Mausrad oder die Zoom-Schaltflächen verwenden, um die Größe an deine Wünsche anzupassen.
- Tipp: Du kannst das Aussehen und die Farbe des Rahmens, die endgültige Größe des ganzen Tokens und und viele weitere Einstellungen mit den Drop-Down-Menüs auf der rechten Seite anpassen.
4. Sobald du es so eingerichtet hast, wie es dir gefällt, kannst du den neuen Token mit Datei > Token speichern in dein Laufwerk speichern.. am besten in einen Ordner, den du bereits in deine MapTool Bibliothek integriert hast.Beachte, dass die Datei als PNG gespeichert wird (das ist gut, denn dieses Format kann mit Transparenz umgehen ud dein Rahmen zerfasert nicht am Rand).
5. Jetzt kannst du in MapTool deine Bibliothek neu laden und dein neues Token auf der Karte verwenden.
Eins selber malen
Du kannst natürlich auch ein Bild für ein Token in einem Bildbearbeitungsprogramm deienr Wahl komplett eigenständig erstellen. Speichere es danach einfach als PNG oder JPG in einem Ordner deines Laufwerkes, der entweder schon in die MapTool Bibliothek integriert ist oder in einen, den du danach in die Bibliothek integrieren willst. PNG ist das empfohlene Dateiformat, weil es mit Transparenz umgehen kann und, grundsätzlich, weils am Besten aussieht.
Du kannst natürlich auch TokenTool verwenden, um deine selbstgestalteten Bilder in eine hübsche Form zu bringen.
Ein Token verändern
Einen Token zu verändern meint hier, die im Spiel mit ihm verknüpften Eigenschaften und Fähigkeiten zu beeinflussen, zu denen auch das Bild aber eben bei weitem nicht allen das gehört. Die Änderung von Bild und den verschiedenen Namen erläutert bereits die Einführung ins Kartenzeichnen.
Die folgenden Abschnitte beschäftigen sich mit den vielen verschiedenen Optionen, Reutern und Drop-Down-Feldern, aus denen der Bearbeiten-Dialog im Kontext-Menüs jedes Tokens besteht.der The following sections deal with the various options, tabs, and drop-down boxes in the Edit Token Dialog.
Token Type
Tokens have 2 possible types in MapTool: NPC and PC. These will be familiar to players of roleplaying games because they stand for "Player Character" and "Non-Player Character," and the most common use of this "type" setting is to distinguish between the two groups during actual play.
In general, tokens belonging to your players should have the type "PC." Tokens belonging to you should have the type "NPC".
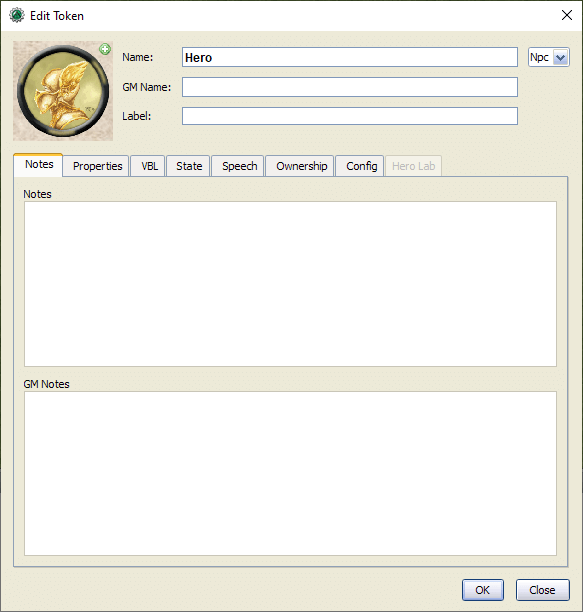
NOTE: The type of a token does not have any bearing on who may manipulate that token or view it's properties - instead, that power is granted to the owner or owners of a token. As GM, you are considered to have ownership of all tokens on all maps in the campaign. See Ownership, below, for more details.
To change the token type:
1. Double-click the token to open the Edit Token dialog.
2. In the upper-right corner, use the drop-down box to select PC or NPC.
3. Click OK.
Notes

The Notes tab presents two areas where you can enter notes about the token. These fields support basic HTML tags, so you can format the note.
The upper text field is there for notes that are available and visible to anyone who wishes to see. The lower field (titled GM Notes) is for notes that only the GM(s) should see.
Notes are a little tricky - MapTool has a way to display them in a nifty popup, but you have to do a couple things first.
- Enter information in the notes field of a token.
- Place that token on the Object Layer or the Background Layer by right-clicking and selecting Change To >
- Switch back to the Token Layer
Now, you'll notice that when you put your mouse cursor over the token, the cursor will change to a hand. If you double-click, instead of the normal Edit Token dialog, you'll see a small popup in the lower-left corner of the map, which will display the notes.
The major lesson is that -- while Token notes can be accessed in many ways -- one of the more common uses is to place notes and reminders on tokens and objects that will be on either the Object or Background layer.
Properties
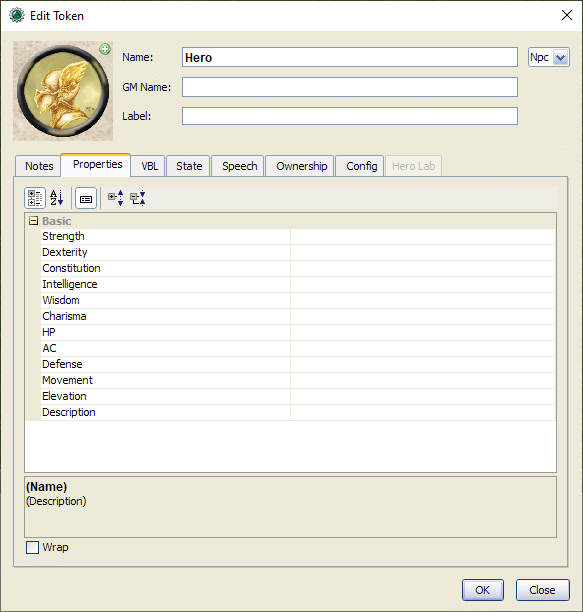
Properties are a topic that deserve their own guide, as they are heavily involved in the creation and use of token macros. This guide won't go into excruciating detail about properties, but will instead deal with only the most basic information about them.
Every token dropped onto a map in MapTool automatically gains a set of properties, which can basically be thought of as stats, characteristics, or traits (you know, the numbers on a character sheet). In effect, each token is carrying around it's own built-in character sheet. In programming terms, properties can thought of as variables that can be set to different values, and then used later by macros.
- Note: although people frequently refer to "token properties," the properties that are visible in the Edit Token dialog are only those properties that are set up for the specific campaign.
When you click on the Properties tab in the Edit Token dialog, you'll see a list of the properties that are currently set up for the Campaign you're using. If you've opened up a new campaign (or just started MapTool), you will see the default property set, which looks like:
- Strength
- Dexterity
- Constitution
- Intelligence
- Wisdom
- Charisma
- HP
- AC
- Defense
- Movement
- Elevation
- Description
For the rest of this guide, examples using properties will use the list above.
The property list you see is in a table (or spreadsheet) layout, with the property name on the left, and a blank space on the right. In the space on the right, you can enter the value you want to assign to that property. You can enter text, numbers, or in more advanced cases, macro statements as the value for a particular property.
Once you do that, and hit OK, that property on that token will be assigned the value you enter. Later on, if you write macros, you can refer to those properties to make calculations or roll dice.
Since properties are such a major topic on their own, check out the Introduction to Properties guide for detailed information.
VBL (Vision Blocking Layer)
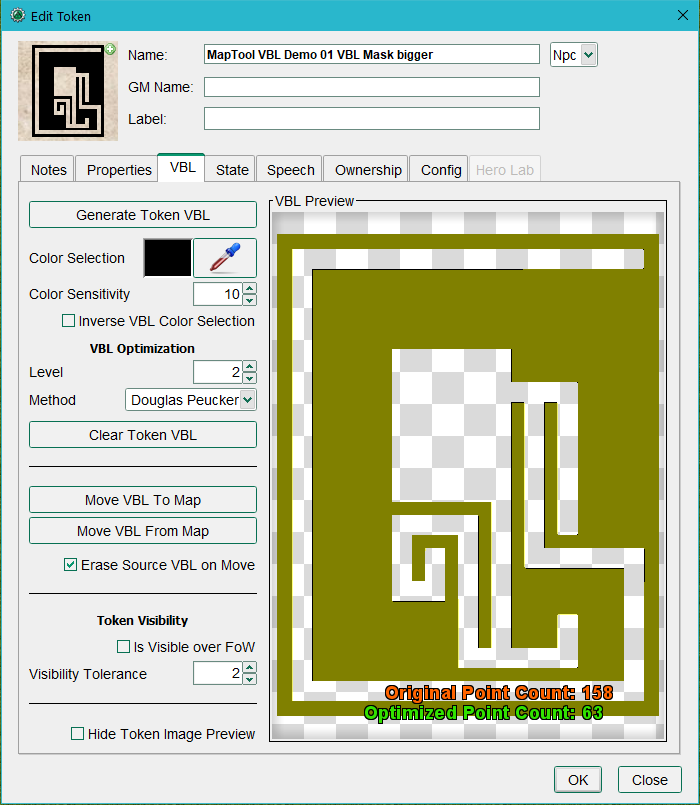
Tokens can have VBL applied to them so they can block lights and sight.
- Generate Token VBL: Creates VBL on the token automatically from the token's image. This totally regenerates the VBL every time it is clicked.
- Color Selection: Use the eye-dropper to pick a color in the image to be turned into VBL. Defaults to using transparent areas of the image.
- Color Sensitivity: Adjusts how closely to match the selected color or transparency.
- Inverse VBL Color Selection
VBL Optimization
- Level: The distance a line segment between two points can be from the edge of an image. A higher level will reduce the total number of points but may not follow as closely to cave walls and other irregular surfaces.
- Method: Choose between Douglas Peucker(default), Topology Preserving, VW Simplifier and No Optimization.
- Clear Token VBL: Resets the VBL on this token, totally clearing it.
- Move VBL To Map: Copies the Token VBL to the Map's VBL layer. If Erase Source VBL is ✓checked, this also clears the token's VBL.
- Move VBL From Map: The inverse, replacing any Token VBL with any VBL which overlaps the token's occupied square. If Erase Source VBL is ✓checked, this also clears the map VBL which was copied.
- Erase Source VBL: When ✓checked, clears source VBL in the above two operations.
Token Visibility
- Is Visible over FoW: Allows the whole token to render above Fog of War if some of it is visible (controlled by Visibility Tolerance). This is helpful for figure tokens on isometric maps, so they don't appear cut off at the waist when partially visible or up against VBL. Also useful on doors, pillars or other map objects that block line of sight but are difficult for players to spot if partially covered by Fog of War.
- Note: If Vision is Off on a map, this setting will always display the token over hard fog of war regardless of VBL, Token Sight, or Map Vision Distance. This can cause issues on maps with many 'Visible over FoW' doors, as all the doors will all appear over the hard fog which can spoil the map for players.
- Visibility Tolerance: How many of the 9 zones of the token need to be in Line of Sight of another token to be revealed to it. Has no effect if Vision on the map is set to 'Off'.
- Hide Token Image Preview: When ✓checked hides the token image preview and only shows the VBL in the preview area.
VBL Preview
Shows the token image with VBL if present. When generating VBL the Original Point Count will appear in red and the Optimized Point Count will appear in green.
State
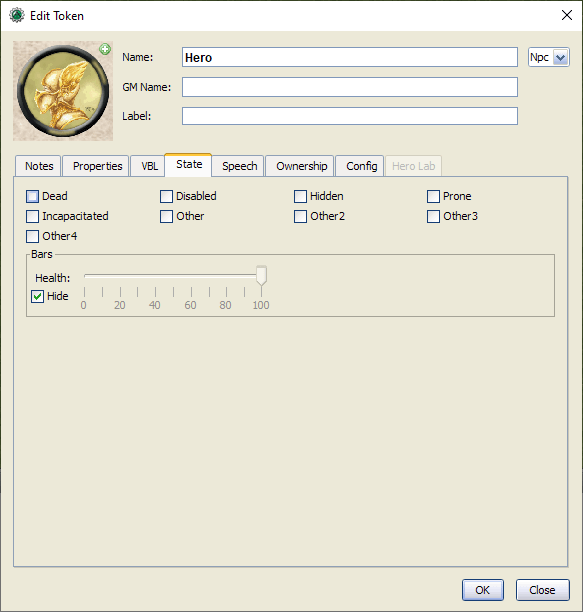
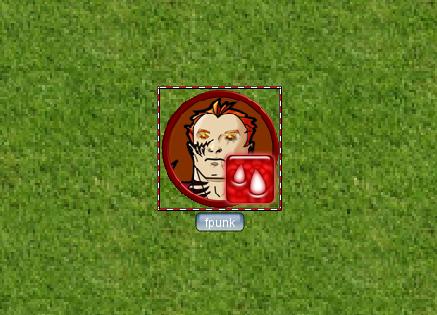
States are visual markers that can be applied to a token (typically appearing as an image superimposed on the token) that can be used for any sort of reminder that you might need in a game. For instance, if you want a marker that a particular NPC token is "dead", you can set the state "Dead" on the token, and whatever image you've selected to indicate "Dead" will appear on the token.
The default states that load when MapTool starts are:
- Dead
- Disabled
- Hidden
- Prone
- Incapacitated
- Other
- Other 2
- Other 3
- Other 4
Health Bar
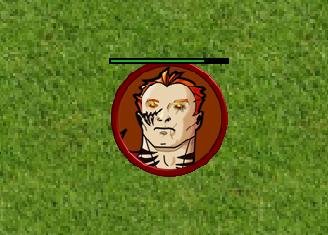
The State tab also contains the setting information for the Bars that the token displays or can display. These bars are shown superimposed over the token (at the top, bottom, or sides), and can be used to track things like health (or ammunition, magic, or anything that can be lost or expended).
Macros
As of MapTool version 1.3.b54, the Macros tab of the Edit Token dialog is no longer enabled. It has been replaced by the Selection window. Select one or more tokens with the Selection window open and the macros for those tokens will be shown. This tab originally held the token macros, but as macro capabilities became more advanced, this tab became less and less useful, until finally, it was removed. It is present in earlier versions, though, if you want to take a look.
Speech
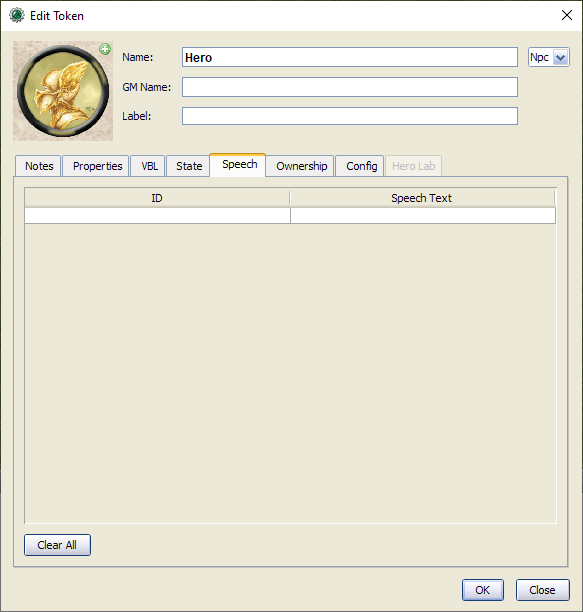
This tab contains the token's speech list. You can use this tab to configure sayings, aphorisms, battlecries, and anything you might want your token to "say" in chat. There are two fields for each speech item:
- ID: This field is the short identifier you assign to a speech item; the ID is used in chat to refer to the full text of the speech. It can be alphanumeric, so you could use number, or letters, or a mix. It cannot have any spaces in it, though!
- Speech Text: This is the actual text that will be displayed in the chat window.
To use a speech item, do the following:
- Select the token you want to have "say" something
- In the chat window, enter /tsay (ID), where "(ID)" is replaced by the actual ID of the speech item. So if you wanted to howl your battlecry - which you've cleverly given the ID "bcry" - you would select your token, and enter /tsay bcry in the chat window.
Ownership
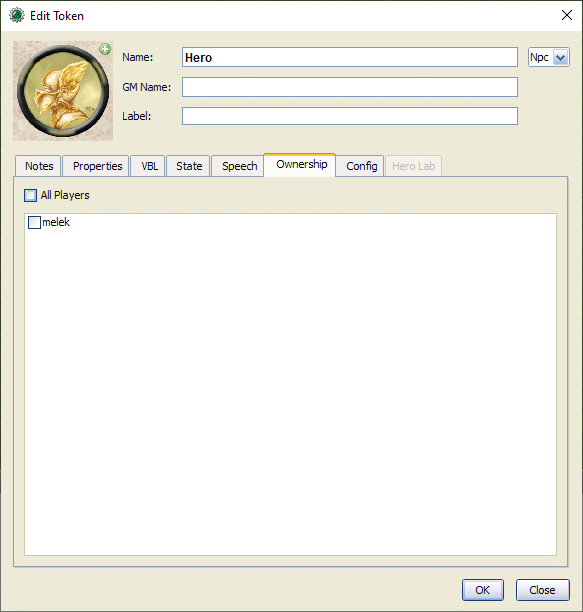
Token ownership determines who among the players connected to the game is allowed to select, move, or view the details of a given token.
If you are the owner of a token, you may select it, double-click on it to open and edit it, and move it around on the map. If you are not an owner of a particular token, you are limited to looking at it on the map -- you will not be able to select, move, or view its properties and configuration.
To set an owner, simply check the box next to that individual's name. The names shown in the box will be the names of each player (including the GM) connected to the game (so if you're looking at the Ownership tab when nobody else is connected, you'll see only your own name). If you want to give ownership to all players, just check All Players.
(Note that the selection of options when the server is started must include Strict token ownership if you want the functionality described above. See Introduction to Game Hosting#Starting Up a MapTool Server for details on server options.)
Config
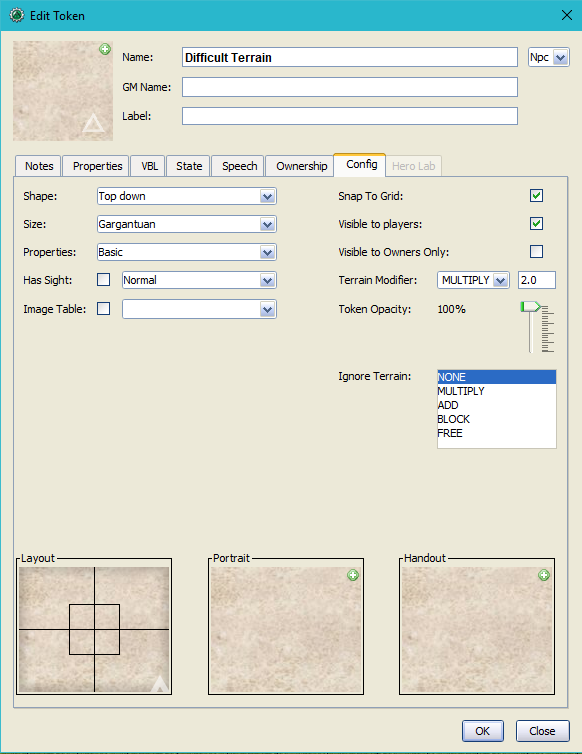
This tab contains a number of settings that affect how the token looks, moves, and interacts with MapTool.
Shape
Tokens can have four shapes in MapTool:
- Top Down: top-down tokens are usually hand-drawn or rendered images of creatures, objects, and people as if you were looking down from an aerial view. Setting the token shape to Top-down tells MapTool to allow the token image to rotate when you right-click on the token and select Change Facing (that way, your top-down token can turn to face its enemies!)
- Circle: circular tokens are like pogs or poker chips - round images that represent the creature or character. Because they are markers and not meant to be realistic "top-down" views of a creature, when you select Change Facing, instead of rotating the image - which would look bad - a small yellow arrow appears to indicate facing.
- Square: square tokens work like circular tokens, except that they are...wait for it...square.
- Figure: figure tokens have been introduced from Maptool 1.4 and like top-down tokens are usually images of creatures or people but this time designed to appear as though you are looking at a miniature figure on a table. Figure tokens are specifically designed so that if they are higher than they are wide, they will extend beyond the top of the cell.
Size
A token can be given a number of sizes, which scale the token image larger or smaller.
The available size depend on the map grid used when setting up a map. If you set a map with a grid (hexagonal or square), you will have the Free Size option (which lets you scale the token as you need), or a number of sizes from "Fine" to "Colossal" (if you play D&D, you'll probably recognize them).
If you do not set a grid when you create the map, you will be able to scale the token along a number scale, from -11 to +20.
Property Type
This field allows you to indicate which of the available property sets in the campaign this token has. The designer of a campaign can set up different sets of properties to be used by different tokens (for instance, a set of properties for player character tokens, and a different set of properties for non-player character tokens). This field lets you pick which property set to use.
Has Sight
This field allows you to indicate what kind of sight the token possesses. Sight settings allow the gamemaster to simulate darkness, light, hidden objects, and hiding enemies.
Image Table
Introduced in Maptool 1.4, this field allows you to link a table to the token. If the token is given a facing, then the facing value will be used to select an image from the table which will replace the normal image of the token. This is frequently combined with the "Figure" token shape on isometric maps to simulate a 3D effect.
Snap to Grid
This checkbox simply indicates that the token snaps to the existing grid when it is moved. If unchecked, the token does not pay any heed to the grid when it is dragged around on the map.
Visible to Players
This checkbox lets you designate a particular token as invisible to players - when checked, no player connected to the game will be able to see the token or interact with it in any way.
Visible to Owners Only
This checkbox makes a token visible only to players who are owners. (Gamemasters can always see it.)
Terrain Modifier
Drop down selection of Terrain Modifier Type and numeric field to enter Terrain Modifier Value. Note that tokens or objects must not be set to Free Size for the terrain modifier to apply to all grid cells it covers.
- NONE - No modifier is applied to movement into the grid cells covered by the associated token, object or stamp.
- MULTIPLY - Movement cost into the cell is multiplied by the value field. Values less than 1.0 enhance movement. Think escalator, moving walkway or a highway.
- ADD - Adds the value to the movement cost of entering a cell.
- BLOCK - Blocks movement entirely. See Ignore Terrain setting below.
Token Opacity
Set the opacity, i.e. transparency, of a token from 0 to 100% opaque (default).
Ignore Terrain
Tokens can be set to ignore zero or more Terrain Modifier Types (Ctrl-Click for multi-select).
Layout, Portrait, and Handout
There are three fields dealing with the token's visual appearance:
- Layout: this shows how the token will look on the map
- Portrait: this is a separate image that will appear in the lower left corner of the map screen when you hover over the token
- Handout: this lets you designate an image to appear when you right-click on the token and select Show Handout