Introduction to Tokens/fr
Introduction à la gestion des pions
Comme il est spécifié dans le guide Introduction à la création de carte, Un pion (token) est dans le jargon de MapTool un marqueur visuel placée sur une carte par l'intermédiaire du logiciel. L'utilisation la plus intuitive pour les pions est de leur faire représenter les personnages dans le jeu - en d'autres termes, les pions remplacent les figurines sur la table de jeu virtuelle.
Pré-requis
Ce guide suppose que vous avez déjà lu la partie Introduction à la création de carte, et que vous savez comment :
- Ajouter un répertoire à votre bibliothèque de ressources, mettre à jour/ajouter des images dans ces répertoires pour qu'ils apparaissent dans votre bibliothèque de ressources.
- Créer une carte dans MapTool.
- Placer des Pions (Token) sur une carte et les faire bouger.
- Modifier le nom, le nom MJ et le label d'un Pion.
- Modifier la taille d'un pion.
- Changer l'image d'un pion.
- Déplacer les pions d'une carte vers une autre.
Si vous ignorez comment faire ces choses, veuillez lire la section Introduction à la création de carte - sinon les informations qui suivent pourraient bien n'avoir aucun sens pour vous.
Enfin, ce guide est principalement dédié au Maître de Jeu (celui qui a le contrôle complet sur tous les pions et les propriétés de la campagne). Les possibilités de modifications des joueurs (ceux qui rejoignent la partie avec le rôle "Player") sont limitées pour tout ce qui se rapporte à la campagne en cours.
Les différents calques
Bien que la plupart des utilisateurs utilisent le terme "pion" ou "token" pour parler des images représentants les personnages et les monstres sur une carte, en réalité, cela peut s'appliquer à n'importe quel objet image déposé sur la carte. La manière dont un pion sera géré dépend du calque de carte sur lequel il est situé. Ces calques sont expliqués plus bas, car ils sont importants pour la compréhension du fonctionnement des pions.
- Les objets déposés sur le calque Token sont ce que nous appelons communément les pions - ils représentent les personnages, les monstres et les PNJ - les gens et les créatures du jeu.
- Les objets déposés sur le calque Object sont des images de matériels divers, coffres et autres "choses" dans le monde du jeu - quelque chose que les créatures peuvent manipuler ou utiliser. MapTool les considèrera toujours comme des pions (en fait, n'importe quoi est un pion dans l'esprit étroit de MapTool) mais pour plus de clarté, la plupart des utilisateurs les appellent Objets pour les distinguer des pions représentant les personnages.
- Les objets déposés sur le calque Background représentent ce qui fait le fond de la carte - murs, falaises, boue, herbe. Ils peuvent être uniques, mais sont plus souvent tamponnés un peu partout sur la carte soit à l'intérieur d'un dessin ou parce que vous utilisez plusieurs copies de la même image ( par exemple, utiliser plusieurs copie d'un mur permet de créer une pièce entière). A cause de cela, de nombreux utilisateurs appellent ces images des tampons.
Le calque caché (Hidden)
Vous aurez remarqué que le calque caché n'a pas été abordé au paragraphe précédent. C'est à cause de son utilité quelque peu différente.
Alors que les calques Token, Object, et Background ont une utilisation très naturelle dans la manière de concevoir le monde -- je suis une personne ou une créature, cet chose là est un objet, et nous sommes entourés par cet arrière-plan -- le calque Hidden représente tout ce que vous ne pouvez pas voir. Dans MapTool, tout ce qui est placé sur ce calque sera visible seulement pour le MJ, jusqu'à ce qu'il décide de le déplacer vers un autre calque.
Généralement, vous voudrez placer des personnages et des objets sur ce calque - il n'y a pas beaucoup de raisons de placer un élément de l'arrière-plan sur le calque caché, bien que je suis sûr que vous trouverez bien deux ou trois bonnes raisons.
Tout cela suffit pour dire que lorsque vous placez un pion sur une carte de MapTool, cela rapporte toujours de savoir sur quel calque vous l'avez mis !
Création d'un nouveau Pion
Créer un nouveau pion est aussi simple que déposer une image depuis votre bibliothèque de ressource sur le calque Token de votre carte (vous pouvez aussi le faire directement depuis l'explorateur Windows). Cependant comment créer d'abord une image adaptée? Il y a plusieurs options.
Télécharger une Image
La communauté d'utilisateur de MapTool a créé une grande quantité d'image de pion disponible pour votre usage. Allez sur le site RPTools Gallery pour voir les centaines d'images de pions déjà sortis.
Créer un pion via TokenTool
Une autre manière de faire consiste à utiliser TokenTool, un programme réalisé par les concepteurs de MapTool pour créer vos propres images de pions rapidement et facilement. Pour cela :
1. Télécharger TokenTool et lancez-le en double-cliquant sur le fichier comportant l'extension .jar (il s'agit d'un fichier "JAR" exécutable qui fonctionne avec l'environnement java).
2. Trouvez une image qui vous convient (attention aux droits d'auteur) et déposer la sur le panneau de gauche de le fenêtre de TokenTool (la partie avec un petit anneau vert et un fond noir).
3. Quand l'image apparaît, cliquez en maintenant le bouton gauche enfoncé sur votre image puis déplacez la de façon à faire apparaître votre pion à l'intérieur de l'anneau vert. Vous pouvez avoir un aperçu de ce à quoi votre pion ressemblera dans le coin supérieur droit la fenêtre TokenTool.
- Astuce: Vous pouvez utiliser la molette de votre souris ou les boutons de zoom pour ajuster la taille de votre image jusqu'à ce qu'elle ait l'aspect désiré.
- Astuce: Vous pouvez changer l'aspect, la couleur de la bordure, la taille finale de votre pion et beaucoup d'autres options en utilisant les menus déroulant à droite de la fenêtre TokenTool.
4. Lorsque vous êtes satisfait du résultat, allez dans File > Save Token, et sauvegardez le pion ainsi créé soit directement dans le répertoire de votre bibliothèque de ressources, soit dans un répertoire que vous avez prévu d'ajouter ultérieurement à celle-ci. Notez bien que le fichier sera sauvegardé au format PNG (ce qui est une bonne chose, puisque ce format gère la transparence ! Ainsi votre pion ne débordera pas du cadre).
5. Retournez dans Maptool pour mettre à jour votre bibliothèque de ressources et vous pourrez voir votre nouveau pion ! Déposer le sur la carte et vous serez prêt à commencer.
Dessinez votre pion vous-même
Vous pouvez créer une image de pion en utilisant un logiciel de dessin et en sauvegardant le fichier au format PNG ou JPG, dans le répertoire de votre bibliothèque de ressources ou à un autre endroit. Le format PNG est recommandé pour les pions car il gère la transparence et présente un meilleur aspect.
Vous pouvez aussi combiner vos propres création avec TokenTool pour obtenir de superbe pion au format approprié.
Editing a Token
Editing a token means changing any of the token's characteristics, be that its image, its name(s), or its configured settings. Changing token names, image, and size are covered in Introduction to Mapping.
The following sections deal with the various options, tabs, and drop-down boxes in the Edit Token Dialog.
Type de pion
Les pions sont de deux types possibles dans MapTool : PC (PJ) et NPC (PNJ). Les joueurs de jeux de rôles sont déjà familiers avec ceux-ci car ils signifient "Personnage Joueur" et "Personnage Non Joueur", et l'usage le plus courrant pour ces deux types est pour faire la distinction entre les deux groupes au cours d'une partie.
En général, les pions qui appartiennent à vos joueurs ont le type "PC". Ceux qui vous appartiennent devraient avoir le type "NPC".
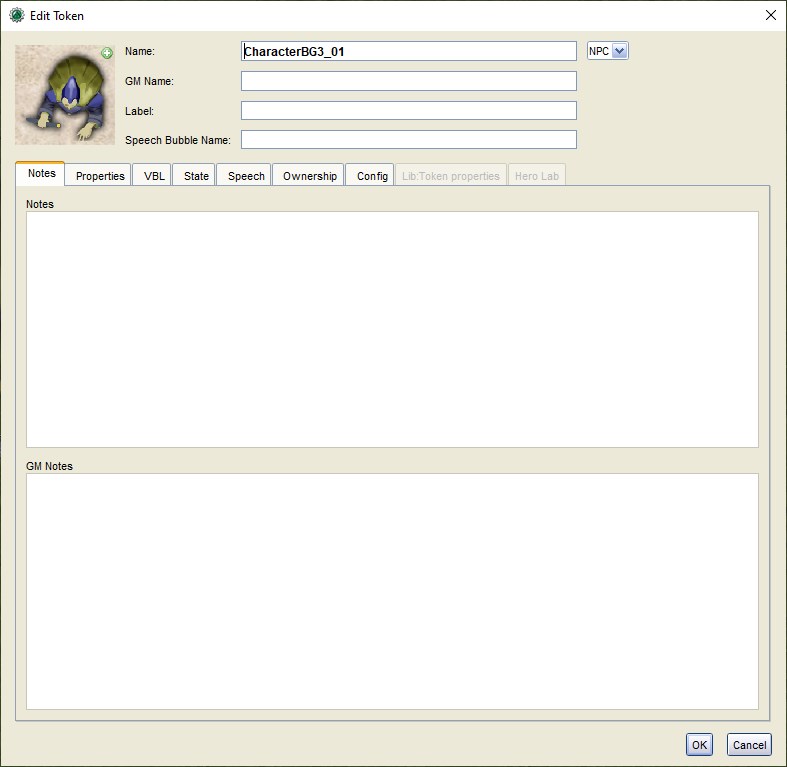
Remarque: Le type d'un pion n'a rien à voir avec qui peut manipuler ce pion ou voir ses propriétés - à l'inverse, ce pouvoir est conféré au owner (propriétaire) ou owners (propriétaires) du pion. En tant que MJ, on considère que vous avez autorité sur tous les pions de la campagne. Voir la section Ownership, plus bas, pour plus d'information.
Pour changer le type d'un Pion :
1. Double-cliquez sur le Pion pour ouvrir la boite de dialogue Edit Token.
2. Dans le coin supérieur droit, utiliser le menu déroulant pour choisir PC (PJ) ou NPC (PNJ).
3. Cliquez sur OK.
Notes
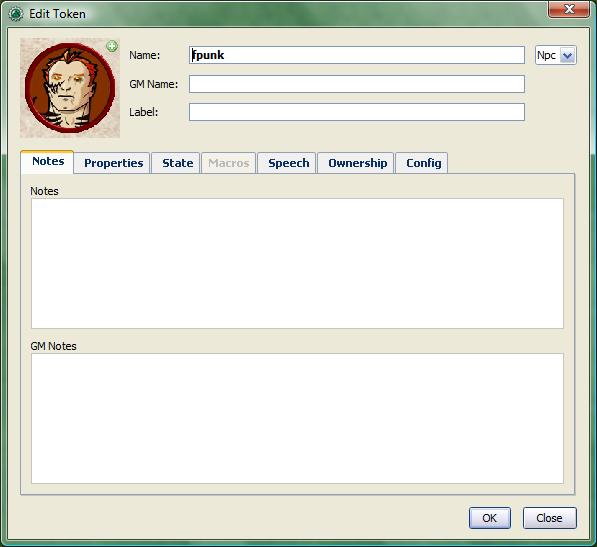
The Notes tab presents two areas where you can enter notes about the token. These fields support basic HTML tags, so you can format the note.
The upper text field is there for notes that are available and visible to anyone who wishes to see. The lower field (titled GM Notes) is for notes that only the GM(s) should see.
Notes are a little tricky - MapTool has a way to display them in a nifty popup, but you have to do a couple things first.
- Enter information in the notes field of a token.
- Place that token on the Object Layer or the Background Layer by right-clicking and selecting Change To >
- Switch back to the Token Layer
Now, you'll notice that when you put your mouse cursor over the token, the cursor will change to a hand. If you double-click, instead of the normal Edit Token dialog, you'll see a small popup in the lower-left corner of the map, which will display the notes.
The major lesson is that -- while Token notes can be accessed in many ways -- one of the more common uses is to place notes and reminders on tokens and objects that will be on either the Object or Background layer.
Properties

Properties are a topic that deserve their own guide, as they are heavily involved in the creation and use of token macros. This guide won't go into excruciating detail about properties, but will instead deal with only the most basic information about them.
Every token dropped onto a map in MapTool automatically gains a set of properties, which can basically be thought of as stats, characteristics, or traits (you know, the numbers on a character sheet). In effect, each token is carrying around it's own built-in character sheet. In programming terms, properties can thought of as variables that can be set to different values, and then used later by macros.
- Note: although people frequently refer to "token properties," the properties that are visible in the Edit Token dialog are only those properties that are set up for the specific campaign.
When you click on the Macros tab in the Edit Token dialog, you'll see a list of the properties that are currently set up for the Campaign you're using. If you've opened up a new campaign (or just started MapTool), you will see the default property set, which looks like:
- Strength
- Dexterity
- Constitution
- Intelligence
- Wisdom
- Charisma
- HP
- AC
- Defense
- Movement
- Elevation
- Description
For the rest of this guide, examples using properties will use the list above.
The property list you see is in a table (or spreadsheet) layout, with the property name on the left, and a blank space on the right. In the space on the right, you can enter the value you want to assign to that property. You can enter text, numbers, or in more advanced cases, macro statements as the value for a particular property.
Once you do that, and hit OK, that property on that token will be assigned the value you enter. Later on, if you write macros, you can refer to those properties to make calculations or roll dice.
Since properties are such a major topic on their own, check out the Introduction to Properties guide for detailed information.
State

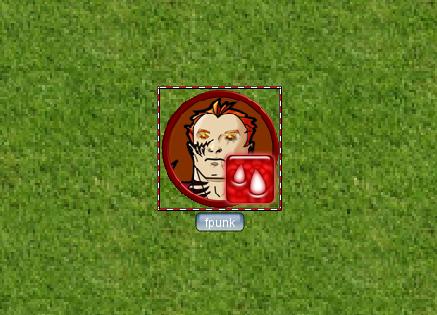
States are visual markers that can be applied to a token (typically appearing as an image superimposed on the token) that can be used for any sort of reminder that you might need in a game. For instance, if you want a marker that a particular NPC token is "dead", you can set the state "Dead" on the token, and whatever image you've selected to indicate "Dead" will appear on the token.
The default states that load when MapTool starts are:
- Dead
- Disabled
- Hidden
- Prone
- Incapacitated
- Other
- Other 2
- Other 3
- Other 4
Health Bar
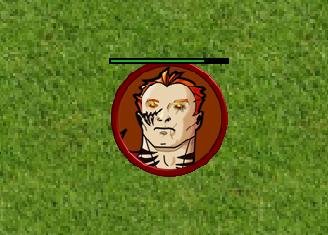
The State tab also contains the setting information for the bars that the token displays or can display. These bars are shown superimposed over the token (at the top, bottom, or sides), and can be used to track things like health (or ammunition, magic, or anything that can be lost or expended).
Macros
As of MapTool version 1.3.b54, the Macros tab is no longer enabled. This tab originally held the token macros, but as macro capabilities became more advanced, this tab became less and less useful, until finally, it was removed. It is present in earlier versions, though, if you want to take a look.
Speech
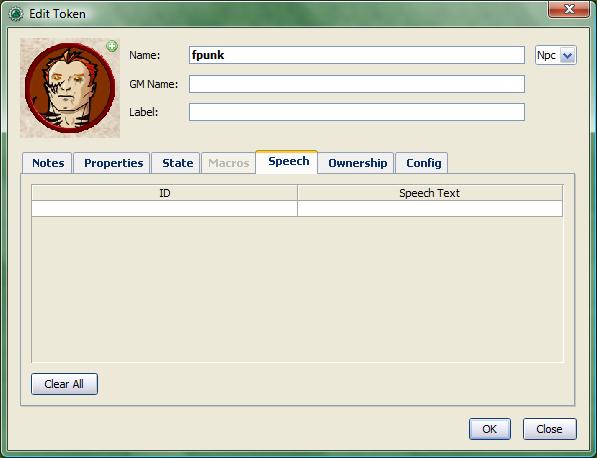
This tab contains the token's speech list. You can use this tab to configure sayings, aphorisms, battlecries, and anything you might want your token to "say" in chat. There are two fields for each speech item:
- ID: This field is the short identifier you assign to a speech item; the ID is used in chat to refer to the full text of the speech. It can be alphanumeric, so you could use number, or letters, or a mix. It cannot have any spaces in it, though!
- Speech Text: This is the actual text that will be displayed in the chat window.
To use a speech item, do the following:
- Select the token you want to have "say" something
- In the chat window, enter /tsay (ID), where "(ID)" is replaced by the actual ID of the speech item. So if you wanted to howl your battlecry - which you've cleverly given the ID "bcry" - you would select your token, and enter /tsay cry in the chat window.
Ownership
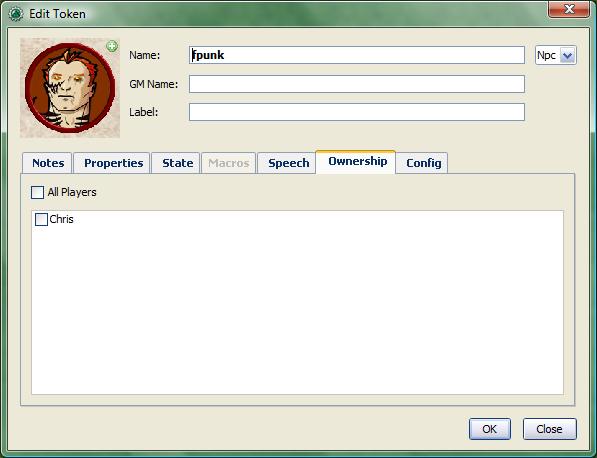
Token ownership determines who among the players connected to the game is allowed to select, move, or view the details of a given token.
If you are the owner of a token, you may select it, double-click on it to open and edit it, and move it around on the map. If you are not an owner of a particular token, you are limited to looking at it on the map -- you will not be able to select, move, or view its properties and configuration.
To set an owner, simply check the box next to that individual's name. The names shown in the box will be the names of each player (including the GM) connected to the game (so if you're looking at the Ownership tab when nobody else is connected, you'll see only your own name). If you want to give ownership to all players, just check All Players.
Config
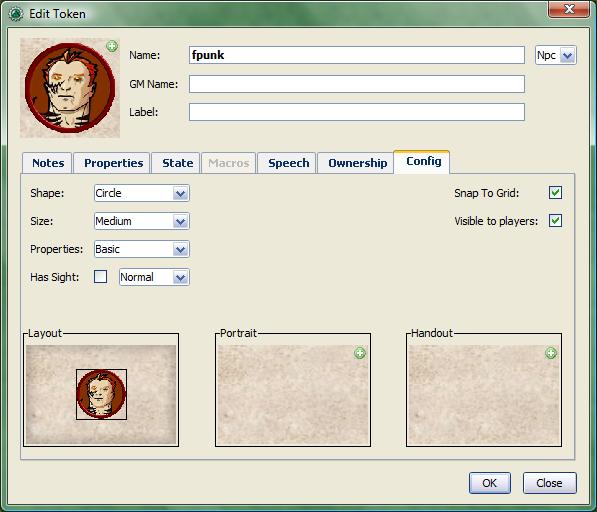
This tab contains a number of settings that affect how the token looks, moves, and interacts with MapTool.
Shape
Tokens can have three shapes in MapTool:
- Top Down: top-down tokens are usually hand-drawn or rendered images of creatures, objects, and people as if you were looking down from an aerial view. Setting the token shape to Top-down tells MapTool to allow the token image to rotate when you right-click on the token and select Change Facing (that way, your top-down token can turn to face its enemies!)
- Circle: circular tokens are like pogs or poker chips - round images that represent the creature or character. Because they are markers and not meant to be realistic "top-down" views of a creature, when you select Change Facing, instead of rotating the image - which would look bad - a small yellow arrow appears to indicate facing.
- Square: square tokens work like circular tokens, except that they are...wait for it...square.
Size
A token can be given a number of sizes, which scale the token image larger or smaller.
The available size depend on the map grid used when setting up a map. If you set a map with a grid (hexagonal or square), you will have the Free Size option (which lets you scale the token as you need), or a number of sizes from "Fine" to "Colossal" (if you play D&D, you'll probably recognize them).
If you do not set a grid when you create the map, you will be able to scale the token along a number scale, from -11 to +20.
Properties
This field allows you to indicate which of the available property sets in the campaign this token has. The designer of a campaign can set up different sets of properties to be used by different tokens (for instance, a set of properties for player character tokens, and a different set of properties for non-player character tokens). This field lets you pick which property set to use.
Has Sight
This field allows you to indicate what kind of vision the token possesses. Vision settings allow the gamemaster to simulate darkness, light, hidden objects, and hiding enemies.
Snap to Grid
This checkbox simply indicates that the token snaps to the existing grid when it is moved. If unchecked, the token does not pay any heed to the grid when it is dragged around on the map.
Visible to Players
This checkbox lets you designate a particular token as invisible to players - when checked, no player connected to the game will be able to see the token or interact with it in any way.
Layout, Portrait, and Handout
There are three fields dealing with the token's visual appearance:
- Layout: this shows how the token will look on the map
- Portrait: this is a separate image that will appear in the lower left corner of the map screen when you hover over the token
- Handout: this lets you designate an image to appear when you right-click on the token and select Show Handout
{{#customtitle:Introduction à la gestion des pions|Introduction à la gestion des pions}}