Introduction to Macro Writing/fr
BEGINNER
THIS IS A BEGINNER ARTICLE
Qu'est-ce qu'une Macro?
Une Macro est une méthode simple d'automatiser des actions dans MapTool. La plupart du temps, les macros sont des scripts lus par un analyseur syntaxique, qui les interprète et garantit que les différentes parties sont traitées de la bonne manière ( par exemple, en garantissant qu'une commande pour ajouter deux nombres entre eux et bien traitée comme une commande de Macro et pas comme du simple texte dans une fenêtre de discussion).
Les Macros ont commencé tout doucement dans MapTool, mais maintenant, le langage de script est devenu un ensemble très complet de commandes et de fonctions qui peuvent pratiquement exécuter toutes les opérations que vous pouvez imaginer !
Ce que vous devriez déjà connaître
Les Macros représentent le point à partir duquel nous commençons à approfondir les caractéristiques et les fonctionnalités les plus puissantes - et les plus compliquées - de MapTool. Même si ce guide se veut le plus accessible possible, il y a quelques points que vous êtes supposés avoir déjà acquis :
- Nous supposons que vous avez lu "Introduction à la création de carte (fr)", et que vous êtes maintenant familiarisé avec l'interface de MapTool, que vous savez comment créer une nouvelle carte, sauvegarder des fichiers et placer des Pions sur la carte.
- Vous devez également avoir lu "Introduction à la gestion des Pions (fr)", et avoir les connaissances de base pour manipuler les Pions, examiner leurs propriétés et tout ce qui s'y rapporte.
- Enfin, puisque les Macros sont intimement liées aux propriétés des Pions, vous devez avoir lu les étapes qui y sont consacrées dans "Introduction aux Propriétés (fr)"et vous devez avoir créé un nouveau fichier de campagne basé sur un exemple de règles de jeu créé pour permettre aux nouveaux joueurs de se familiariser avec MapTool. Si vous n'avez pas lu ce guide, faites-le - cela rendra la plupart des exemples suivants beaucoup plus compréhensible !
Conventions utilisées pour ce Guide
Le maximum sera fait pour conserver le langage et la terminologie les plus cohérents possible. Dans ce guide :
- Macro renvoie à une collection de commandes qui sont groupées ensemble pour exécuter automatiquement une tache.
- Commande Macro renvoie à toute commande individuelle particulière ou à toute fonction utilisée à l'intérieur d'une Macro.
- Le langage de Macro représente l'ensemble des commandes, fonctions et opérations que vous pouvez utiliser quand vous écrivez une Macro. Vous pouvez consulter la liste des fonctions disponibles ici.
De plus, Bien qu'il soit possible pour une Macro d'interagir avec une autre (on dit dans ce cas qu'elle "appelle" une autre Macro), dans ce guide, nous aborderons uniquement les Macros accessibles depuis l'onglet Macro et qui peuvent affecter uniquement les Pions auxquels elles sont associées.
Dans quels cas les utiliser ?
Il n'y a aucune obligation d'utiliser des Macros pour pouvoir utiliser MapTool. En effet, la fonction principale de MapTool est de partager une carte avec des amis et de pouvoir jouer à des jeux ( lisez Introduction à la création de carte (fr) et Introduction à l'hébergement de partie (fr) pour apprendre comment créer et partager des cartes avec votre groupe de joueurs), et MapTool fournit tout ce dont vous avez besoin pour cela : des cartes, des pions et un système de discussion (chat) pour vous permettre de dialoguer ou effectuer des jet de dés.
Toutefois, les possibilités sont beaucoup plus importantes, pour peu que vous souhaitiez en apprendre un petit plus sur les capacités des Macros. Par exemple, si vous voulez avoir un bouton qui en cliquant dessus vous permettra de lancer 1D20 et d'ajouter le modificateur automatiquement, c'est possible en créant une Macro pour cela. Si vous voulez modifier les points de vie après une blessure, vous pouvez écrire une Macro pour le faire. Ce guide va vous montrer comment.
Où trouver ces "Macros?"
Les Macros sont intégrées à différentes parties de l'interface de MapTool et aux objets à l'intérieur. Il ressort qu'une Macro peut "résider" à trois endroits :
Macros de Pion
L'endroit le plus naturel où trouver une Macro est un Pion. Les Macros de Pion sont liées au Pion sur lequel elles ont été créées le resteront tant que vous les y laisserez.
Les Macros de Pion (Token macros ) sont directement accessibles uniquement par les propriétaires du Pion, donc si vous ne possédez pas le Pion, vous ne pourrez pas interagir (ou même voir) les boutons de ces Macros.
Macros de Campagne
Les Macros de Campagne ne sont pas liées à un Pion en particulier, mais à la campagne toute entière. Ces Macros fonctionnent pratiquement comme une Macro de Pion, excepté ceci :
- Vous n'avez pas besoin de sélectionner. un Pion pour voir les Macros
- N'importe qui peut y accéder et les exécuter.
Les Macros de campagne sont particulièrement utiles au MJ et aux joueurs pour gérer des fonctions communes - en fait, si vous mettez en place une tache commune en tant que Macro de campagne, vous n'avez besoin que d'avoir une seule copie de celle-ci (au lieu d'une copie pour chaque Pion qui en aurait besoin).
Macros Globales
Les Macros globales se sont liées ni aux Pions, ni à une campagne - en fait, elles sont liées à votre exemplaire de MapTool. Ces Macros ne sont visibles de personne d'autre que vous, que vous soyez joueur ou MJ.
C'est un bon endroit pour ranger les Macros exécutant des tâches que vous ne voulez pas que les autres voient - comme des informations que vous voudriez montrer uniquement au moment où vous l'avez décidé; ou des tâches que vous voulez faire faire à vos PNJ mais que vous ne voulez pas que les PJ puissent faire.
Les fenetres de Macros

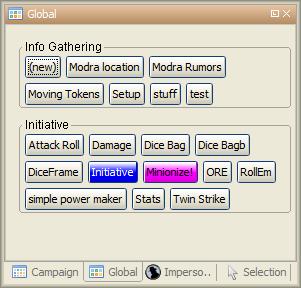
Avec toutes ces discussions autour des Macros et de leur localisation (plus spécialement des boutons de Macros), vous vous demandez probablement où trouver ces boutons ? Vous les trouverez dans une des quatre fenêtres de Macros qui sont disponibles dans MapTool. Si vous ne trouvez pas ces fenêtres ou qu'une d'entre elles est manquante, vous pouvez les faire apparaître en allant dans le menu Windows (Fenêtres) et en cochant les fenêtres suivantes en fonction de vos besoins :
- Selection (Sélection)
- Impersonated (Interprétation)
- Campaign (Campagne)
- Global (Globale)
Vous devriez voir ces fenêtres apparaître dans MapTool si elle n'étaient pas déjà là. Si vous regardez les copies d'écran sur la droite, vous verrez que la fenêtre Globale est remplie avec un tas de boutons. Chacun d'eux exécute une Macro; les boutons apparaissent lorsque vous créez une nouvelle Macro
Fenêtre Sélection et Interprétation
Il y a deux fenêtres qui traitent directement des Macros des Pions : Sélection (Selection et Impersonated)
La fenêtre Sélection montre les boutons de toutes les Macros actuellement associées au Pion que vous avez sélectionné. Chaque bouton lance une série particulière de commandes Macro.
La fenêtre Interprétation (Impersonated) montre les macros du Pion que vous avez choisi d'interpréter. Interpréter un Pion est un moyen de faire comme si vous étiez le Pion - lorsque vous discutez, le texte apparaît comme s'il avait été dit par le Pion. Il est possible d'interpréter un Pion tout en en sélectionnant un autre, alors faites attention à la fenêtre que vous êtes en train d'utiliser !
La fenêtre Campagne (Campaign)
Cette fenêtre affiche toutes les Macros actuellement disponibles pour la campagne. Souvenez-vous qu'elles sont visibles de tout le monde.
La fenêtre Globale
Cette fenêtre contient les Macros globales que vous avez créées. Souvenez-vous qu'elles ne sont visibles que de vous.
Ecrire des Macros
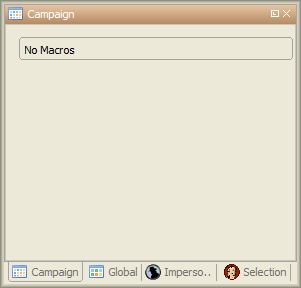
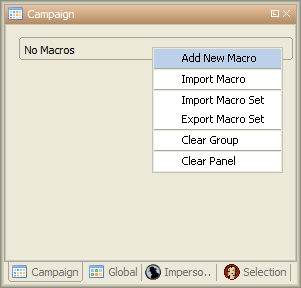
La création de Macros se fait en trois étapes (même si chaque étape peut en contenir une multitude!) :
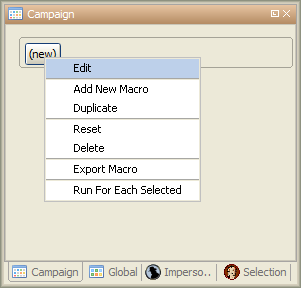
1. Faites un clic-droit sur la fenêtre où vous voulez voir la Macro apparaître (la fenêtre Pion (Token), Campagne (Campaign) ou Globale) et choisissez Add New Macro (Ajouter une nouvelle Macro). Un bouton gris avec l'étiquette (new) apparaîtra.
2. Faites un clic-droit sur le bouton et choisissez Edit (Editer)
3. Saisissez du code Macro, attribuez lui un nom et cliquez sur OK. Bien ! Vous avez créé une Macro
Un instant... que voulez vous dire par "code Macro" ?
Comme indiqué précédemment, ces trois étapes peuvent contenir une quantité énorme de détails, étapes, astuces, réussites, échecs, frustrations et parfois hurlements et grincements de dents. Donc, nous allons reculer d'une étape regarder quelque Macros très simples avec une approche très progressive. Si vous voulez voir quelques Macros plus complexes, il en existe des tonnes à lire à travers les tutoriels et les comment-faire sur ce wiki. Pour l'instant, nous nous contenterons d'écrire quelque Macros très simples mais très utiles.
Le Jet d'Initiative
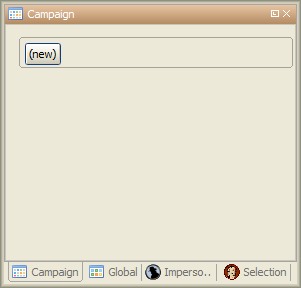
Les plus simples des Macros ne sont rien de plus que du texte qui est re-dirigée vers la fenêtre de discussion (Chat). En effet, une Macro contenant du texte (en fait toutes les Macros) envoie juste une ligne de commande à la fenêtre de discussion où elle est lue puis interprétée. La plupart des langages de programmation commencent avec le classique programme "Hello World!", donc ce guide ne fera pas cela. A la place, essayons de faire quelque chose de plus "rôlistique" : créons le redoutable message "Effectuez votre jet d'initiative !"
1. Sélectionnez la fenêtre Campagne.
2. Faites un clic-droit dessus et choisissez Add New Macro.
3. Faites un clic-droit sur la nouvelle Macro et cliquez sur Edit.
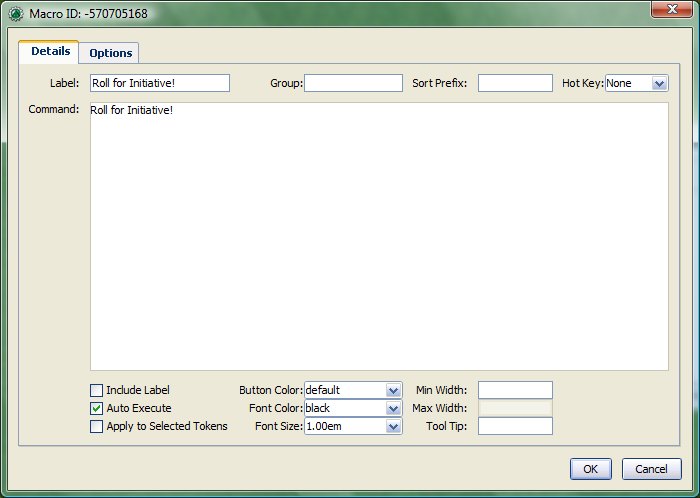
4. Dans le champ Label (Etiquette), saisissez "Jet d'initiative"
5. Laissez les champs Group et Sort Prefix vide.
6. Dans le champ Command, tapez
Effectuez votre jet d'initiative !
7. Cliquez sur OK.
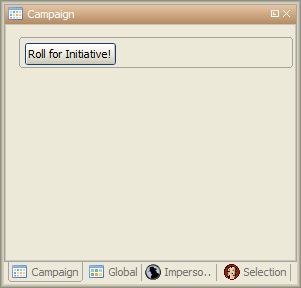
8. Vous voyez maintenant que votre bouton a changé - il est maintenant écrit dessus : Jet d'initiative, et lorsque vous cliquez dessus, ô merveilles, le texte "Effectuez votre jet d'initiative !" apparaît dans la fenêtre de discussion.
Ceci représente la base de l'écriture de Macros : vous saisissez du texte dans la Macro, puis, lorsque vous appuyez sur le bouton, ce texte est lu par l'analyseur syntaxique et envoyé à la fenêtre de discussion.
Toujours plus intéressant
Le "Jet d'initiative", tout effrayant qu'il soit lorsqu'il est demandé par votre MJ, n'est par ce qu'on peut trouver de plus intéressant en terme de Macro. Vous vous êtes probablement demandé "pourquoi ne pas le taper tout simplement dans la fenêtre de discussion ?" Et la réponse est "vous auriez sûrement mieux fait !" Alors essayons de faire quelque chose de plus intéressant, que nous voudrions garder au premier plan en utilisant MapTool (apres tout, nous ne sommes pas là pour écrire des programmes - nous sommes ici pour jouer) : nous allons ajouter quelques commandes Macros, en complément du simple texte. Les commandes Macros sont des instruction spéciales qui, lorsqu'elles sont lues par l'analyseur syntaxique, lui demandent de faire des choses en plus que simplement afficher du texte dans la fenêtre de discussion, comme lancer des dés ou calculer des valeurs.
Les commandes Macros doivent toujours être encadrées par des crochets ([commande Macro]) ou des accolades ({commande Macro}). Les encadrer de cette manière indique à l'analyseur syntaxique qu'une commande est en train d'arriver - autrement, il traitera la commande comme du simple texte et l'affichera dans la fenêtre de discussion.
Roll Some Dice
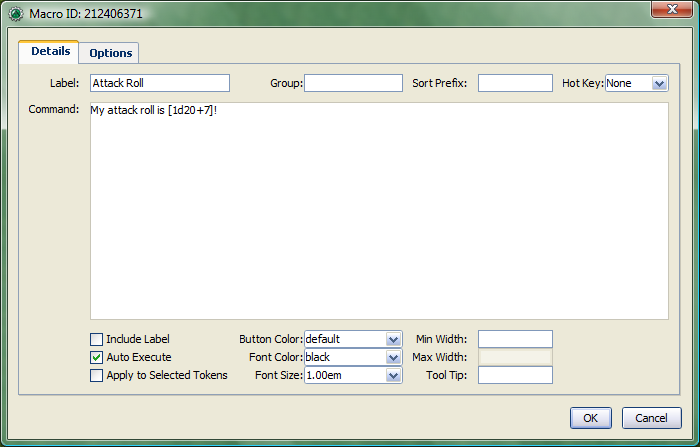
This is a simple macro that's going to automatically roll some dice, and add a number to that roll, before displaying the whole thing in the chat window.
1. Create a new macro (this can be created anywhere you like - on a token, in the campaign panel, or in the global panel), and open the edit dialog (remember, you do that by right-clicking on the button labeled (new)).
2. In the Label field, call the macro something like "Attack Roll" or "Dice Roll"
3. In the Command area, enter:
My attack roll is [1d20+7]!
4. Click OK. You should see a button labeled with whatever you chose in Step 2, above. When you click it, you'll see something like the following appear in chat:
Chris: My attack roll is 8!
What has happened is that MapTool read through the contents of the macro, and when it got to the section [1d20+7], it knew to:
- Roll a 20-sided die (or, in reality, choose a random number between 1 and 20), and
- Add 7 to that result, and
- Display the results in the chat window, inserted into the text in the right place
You'll see that the number 8 has a gray background. If you hover over that number, a "tooltip" will pop up showing how that number was reached. In this case, I managed to roll a 1 on the 1d20 (bummer! a critical fumble!) If you don't see this tooltip, check your MapTool Preferences#Chat settings, specifically Use ToolTips for Inline Rolls.
Also, you probably won't see the name "Chris", unless your name happens to be Chris. That part of the chat output is just indicates who "said" that particular bit of text; if it was a token, it would have the token's picture and name instead of boring old "Chris."
More than Just Numbers
Macro commands can work with numbers and with text -- you can manipulate strings (that is, collections of alphanumeric characters) as well using the MapTool macro language. Say, for instance, you wanted to roll your attack, but wanted to enter the name of your target so that it showed up in chat.
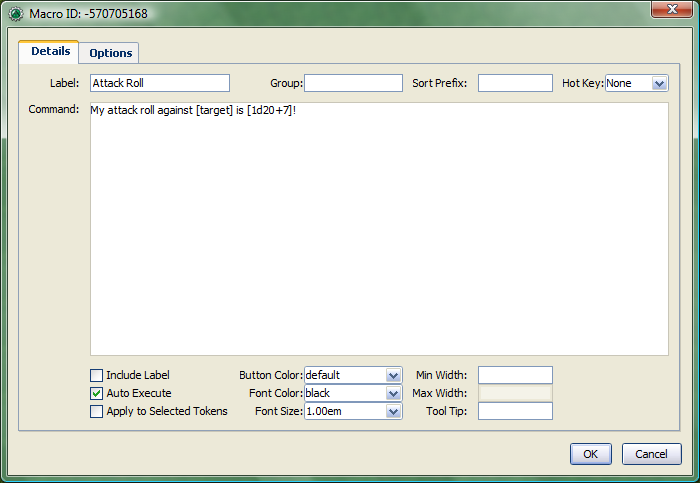
What you can do is edit your Attack Roll macro to look like this:
My attack roll against [target] is [1d20+7]!
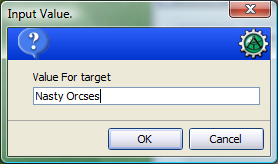
When you run this macro, though, suddenly a window pops up in your face demanding a "Value For target." What happened?
Well, when MapTool looked at that macro, it saw a macro command that just says [target]. MapTool assumes that any word inside a macro command that is not enclosed in quotes is actually the name of a variable (in other words, a value that might change).
MapTool also noted that nowhere in that macro do we say what the variable target happens to equal. Programming languages call this sort of situation an undeclared variable (in other words, you never declared what it equaled). Since MapTool has no way of knowing what target should be, it asks! If you type a name, number, or pretty much anything in that popup window, MapTool will take that information, assign it to the variable target, and finish the macro.
Go ahead and type "Nasty Orcses" (you can leave off the quotes) in the box, and hit OK. You should see in the chat window something like:
Chris: My attack roll against Nasty Orcses is 23!
Once again, the parser read through the text and macro commands you put inside the macro, and in the places where a macro command was indicated (by the square brackets, remember), MapTool substituted the appropriate information.
Using Variables in a Macro
We've seen in a couple of the examples some use of variables (like target in the example above) in a macro, but we haven't gone into the process too deeply yet. However, variables, and their use, is really the core of macro writing, so it would be remiss of me to leave it go.
What's a Variable?
If you're familiar with programming at all, you will know this already, but if you're just stepping into this stuff cold, the simple definition of a variable in terms of the macro language is:
- A variable is a value that might change (i.e., vary) based on a token property, a calculation, or another macro command
Since the value of a variable might change, we have to give it a name (which is called declaring the variable - you declare that "this variable exists!") in order to talk about it. Then, whenever we need to use whatever value the variable has at that time, we just put its name in the macro command, and MapTool will substitute the appropriate value at that time.
Think of it this way: if the value of a dice roll could be anything between 1 and 20, for example, you can't just enter 19 wherever you need to use that dice roll - it could be 19, or 2, or 7, or whatever. So instead, you'd want to say "whatever this dice roll is, put that number here."
- Note: that doesn't mean that MapTool will substitute the correct value for your needs; it means it will substitute the value corresponding to that variable at that time. So if your program has a mistake in it, the value might end up being wrong - but MapTool doesn't understand "wrong," it just understand "this is what it says right now."
Variable Assignments
When you want to give a variable a value, this is called "assigning" a value to the variable. The "asignment operator" in MapTool is the equals sign ( = ). That sounds fancy, but it just means that you use an equals sign to tell MapTool that a particular variable has a particular value. An example of a variable assignment is
[h:myHP = 30]
As you have probably figured out, what that line does is first declare a variable called myHP exists, and then assign it the value 30. That is variable assignment at its root - some variable equals some value.
You'll remember from the example where you were prompted for the name of a target that you can use a variable name without assigning a value to it. If you do that, you have declared that the variable exists, but no value is assigned, so MapTool asks you (or whoever runs that macro) for a value. The lesson learned is that a variable needs to have a value assigned to it for the macro to finish, but you don't always have to enter it ahead of time - sometimes you want to get input from the user.
When to Make an Assignment
MapTool processes each macro command in a macro in order, starting at the top. Therefore, unless you want MapTool to pop up a window asking for input from the user, you have to assign a value to a variable before you use it! For example, in the macro command:
The hit does [damage] [damageType] damage, leaving you with [remainingHP] hit points!
Unless you want MapTool to prompt the user for the variables damage, damageType, and remainingHP, you'll want to make sure to give them a value before you get to that line. Maybe something like:
[h:damage = 1d6+4]
[h:damageType = "fire"]
[h:remainingHP = 30 - damage]
The hit does [damage] [damageType] damage, leaving you with [remainingHP] hit points!
As you can see, we've made three variable assignments before the variables are used in the line about the hit. We've assigned the value of a dice roll of 1d6+4 to the variable damage, the value "fire" to the variable damageType, and the value of the operation 30 - damage to the variable remainingHP.
If you look carefully, you'll see that we've even used one variable in assigning a value to another variable: the value of the variable damage is used when we assign a value to remainingHP - so variables can be used to set and manipulate other variables.
Variable Rules
There are two rules to remember when making up variables:
- No spaces: variable names can't have spaces in them, so you can't use the variable
Hit Points- it has to beHitPoints. - Special Variables: there are several "special variables" that MapTool has reserved - which means you can't use them for other purposes than what MapTool already reserves them for. You can usually tell a special variable because it has a period it's name, like
roll.countormacro.args. We'll get into those in another guide, but for now, just know that you can't create a variable with the same name as any of the variables on the Special Variables page.
Stepping Up Our Game
The examples above show very basic macro use: printing text to the chat window at the click of a button; making a simple dice roll inside a macro; and even getting some simple input from the user in order to complete a macro.
Now, let's step it up: we'll play with some formatting options, change token properties, and look at some basic looping (doing the same thing over and over again) and branching (doing different things based on some condition or situation).
Formatting Options
Macro output (like any chat output) can be formatted using basic HTML tags, as well as some options built into MapTool. We'll first look at the HTML briefly, and then at a couple Display Roll Options.
Expanded Rolls
In MapTool 1.3.b54, the default way to output the result of a dice roll or calculation is just to print out the total or final value. So if you rolled 1d20+7, what will appear in chat is just the final result, with the tooltip (remember when you hovered your mouse over the number) showing the mathematical breakdown.
If you wish, you can instruct MapTool to print out the full math breakdown for a roll too, by using a Roll Formatting Option - specifically, the Expanded Roll.
Think of a formatting option as a switch telling MapTool how to treat the results of a roll. To get the expanded form, edit your attack roll macro to show:
My attack roll against [target] is [e:1d20+7]!
Then, when you run it, you'll get something like this in the chat:
My attack roll against Nasty Orcses is « 1d20+7 = 1 + 7 = 8 »
Now you can see the full breakdown of your roll.
Result-Only Rolls
But what if you don't want anyone to be able to see the breakdown? So far, both options still let everyone see the actual roll. For this, you use the Result Roll option. Edit your macro to look like this:
My attack roll against [target] is [r:1d20+7]!
And your output will look like this:
My attack roll against Nasty Orcses is 11!
Note that there's no gray background behind the number 11, and you can't get a tooltip if you hover over it. The Results Roll option strips out the special formatting, giving you just the plain text. If you wanted to get rid of the highlight behind the words "Nasty Orcses," you can just change the macro to:
My attack roll against [r:target] is [r:1d20+7]!
And the name of the target will be shown without any special highlighting.
Hidden Rolls
Sometimes, you don't want to see any output from the macro - maybe you just want it to show some text, and do the math in the background, without revealing everything. In those cases, you would replace the "r:" or "e:" in the above examples with an "h:", like in the example below:
[h:myHP = 30]
[h:Bloodied = myHP / 2]
My bloodied value is [Bloodied].
The example above is a very simple illustration of how the hidden roll is useful. In that macro, we're doing three things:
- Setting the value of the variable myHP to 30, but telling MapTool to hide this calculation
- Setting the value of the variable Bloodied to the value of myHP divided by 2, but telling MapTool to hide this calculation too
- Displaying some text, and inserting the value of Bloodied in at the end of the text output.
If you run this macro, the output will look like:
My bloodied value is 15
However, if you don't use the hidden roll option, the output would look like:
30 15 My bloodied value is 15
The extra numbers come from the two calculations before the line of text. You don't need to see those, so, conveniently, you can hide them!
HTML Formatting
MapTool macros support formatting using some basic HTML tags. Let's say you wanted to put the name of your target as one line, the attack roll you're making as another, and as a third line, you wanted to add a dice roll for damage. You might edit your Attack Roll macro to look like this:
I make an attack roll!<br>
<b>Target</b>: [r:target]<br>
<b>Attack</b>: [1d20+7]<br>
<b>Damage</b>: [1d8+5]
When you run that macro, your output in chat will look like:
I make an attack roll!
Target: Nasty Orcses
Attack: 15
Damage: 7
That's just simple formatting - you could put the output in a table, change the font and background colors, change its size...many options are available!
NOTE: If you're handy with HTML, be aware that MapTool supports HTML 3.2 - so things like the <br> tag should not be closed - it's <br>, not <br/>. Additionally, MapTool supports a subset of CSS 1 in the form of in-line styles, and also style sheets in certain instances. More information on the supported CSS tags can be found at Supported CSS Styles.
Using Token Properties
So far, we've manipulated some variables that are entered ahead of time, or that MapTool will ask for when you run a macro. We've got a formatted attack macro that lists a target, an attack, and a damage roll. However, we're still either hardcoding the values into the macro, or having the user put them in themselves every time they're needed. Since RPG characters are not all the same, we'll have to figure out a way to automate some of the numbers, so we can:
- Make one macro that many people or characters can use
- Minimize how much typing we have to do!
As discussed in the Introduction to Tokens, every token carries around with it a personal "character sheet" of sorts, in the form of the token's properties. These properties can be referenced by a macro - so you can, for instance, write a macro that says "Roll 1d20, and add my character's Dexterity to the roll." I'm sure you see how this might be useful.
Setting Some Sample Properties
Of course, for token properties to work, we've got to set them up. It's a good thing you read the Introduction to Properties and created a campaign file for the MapTool RPG Sample Ruleset!
The first step is to open up the MTRPG.cmpgn file (or whatever name you saved it as), and drag a token onto the map (if you don't already have one on there). If you've got no idea what that means, check out the Introduction to Mapping to learn about making maps and putting tokens on them. Now, follow these steps:
1. Double click on a token to open the Edit Token dialog.
2. Go to the tab marked Properties.
3. You'll see a spreadsheet-style list of all the properties in the token that you can edit directly (tokens have other properties that can be edited only with macros, but for now, let's not worry about them!). You should see (if you're using the MTRPG.cmpgn file we set up in Introduction to Properties):
*Strength:1
*Dexterity:1
*Intelligence:1
*Endurance:1
*HitPoints(HP):{Endurance * 6}
*Armor(AR)
*Movement(MV):{Dexterity}
4. Click in the cell next to Strength. A cursor will appear, showing that you can type in that cell. Enter a number in that cell as the token's Strength value. I'm going to use 6.
5. Repeat step 4 for Dexterity, Intelligence, and Endurance, choosing whatever number you like (I'm going to use 3, 2, and 6, respectively). Remember that HitPoints and Movement will be automatically calculated!
6. Click OK. You have just manually updated the token's properties. If you double-click on the token, and look at those properties again, you'll see that the numbers you entered are remembered.
You'll also see that now, when you hover your mouse over the token, a little popup appears in the lower right corner of the map, showing the values for the properties you've entered. This popup is called the Statsheet, and is a quick way to look at the token's properties - it's basically a convenient quick-reference "character sheet."
Referencing a Token Property in a Macro
Now that we've configured some token properties, let's use them in a macro. For our first macro, we're going to roll 1d20, and instead of adding 7, we're going to add the token's Strength.
1. Open up your Attack Roll macro.
2. In the lower left corner, make sure the box Apply to Selected Tokens is checked (otherwise, the macro won't know which token's Strength to use!)
3. Edit your macro to look like this:
I make an attack roll!<br>
<b>Target</b>: [r:target]<br>
<b>Attack</b>: [1d20+Strength]<br>
<b>Damage</b>: [1d8+5]
You'll note I replaced the 7 with the word "Strength." Since Strength is not in quotes, MapTool will know that you mean it to be a variable, and it will look on the current token (that is, the token that is selected) for a property called Strength. If it doesn't find it (or if the property has never been set), it will prompt you for it (just like you were prompted for the value of target). If it does find it, MapTool will put the value of Strength into the macro when it runs.
4. Select your token, and run the macro by clicking the button. The output will look something like:
I make an attack roll!
Target: Nasty Orcses
Attack: 27
Damage: 6
The important thing to note is that if you hover over the attack roll result, the tooltip will now say something like « 1d20 + Strength = 17 + 10 » indicating that the value being plugged in to the dice roll is the property Strength.
Changing a Property with a Macro
Token properties can also be changed using a macro. Suppose we want to reduce the token's hit points after an enemy hit the character. You can manually edit the token and change the value in the HP property, or, you can create a macro that subtracts the amount of damage from the value of HP. Here's how:
1. Create a new macro on the Campaign panel.
2. In the Label field, enter "Damage".
3. In the Command field, enter:
Aarrgh! I'm hit! I have [HitPoints = HitPoints - damage] hit points left.
4. Check the box Apply to Selected Tokens (in the lower left corner).
5. Click OK. When you run the macro, you will be prompted for a value to put in the variable damage. I put in the number 7. The output will look something like this:
Aarrgh! I'm hit! I have 23 hit points left
And, if you double click on the token, you will see that the property HP is now 23. What this macro did was:
- Prompt the user for a value for damage (in this example, I entered 7)
- Retrieve the value of HitPoints from the token (in this example, the value is 30, because it is equal to Endurance * 6)
- Subtract the value of damage from the value of HitPoints (30 - 7, resulting in 23)
- Set the value of HitPoints (originally 30) to the newly calculated total (23)
- Output the text and the new value of HitPoints to chat
String Concatenation
An essential ability to master when writing macros is the ability to assemble strings - that is, collections of alphanumeric characters that are then manipulated or sent to chat. Frequently, you'll want to construct a string from some text that is always the same ("hardcoded" text) and text that can change (text that is the value of a variable, in other words). The construction of a string is often called "concatenation," but it just means "building a long string out of multiple short pieces."
There are two ways to do this in a macro - outside of a macro command, and inside of a macro command.
Outside of a Command
The basic way a macro works is this:
- The parser reads through the whole macro, and separates the macro commands from the plain text
- The parser diverts those macro commands to the appropriate places to be processed (so, numbers are added up, dice are rolled, etc.)
- The processed commands are sent back to the parser, which substitutes the results of those commands in the place where each command was.
- The whole mess - plain text, and the results of the commands (now sitting in place of the actual commands) is sent to the chat window.
So, when you want to display the result of a command along with some text (for instance, you want to print the word "Attack:" and then next to it print the result of a 1d20 roll) in a macro, the easiest way is to just insert a command in the right place in your text, like so:
Attack: [1d20]
The parser will read that whole thing, send off the command [1d20] to be processed, and when it gets that result back, plug it in in place of the command, and send it off to chat. The result will be something like "Attack: 17."
That's the most straightforward way to send text to chat - just put the variables you want displayed in the right place in the text, and they will be shown in the chat window.
Inside of a Macro Command
Sometimes, though, you need to use strings inside of the square brackets. In that case, putting them together is a little different. First of all, within square brackets, you need to use single or double quotes to surround something you want to be treated as a string. Otherwise, MapTool will think you want each word to be a variable! For example:
Correct String
[string = "This is a string"]
Incorrect String
[string = This is a string]
Remember - outside of square brackets, no need for quotes. Inside? QUOTES.
So what if we need to build up a string dynamically? That is, what if we need to make a string that is partly "hardcoded," and partly based on user input? You can't guess what the user is going to say, so you can't write that part ahead of time. What you can do is concatenate the user input into your hardcoded string. The way to do that is to use the plus sign (+), which - when it's used with strings - will piece them together into a long string.
Here's an example: suppose we want the user to enter the name of a skill, and we then want to put that skill name into an existing, hardcoded string, which will be stored in another variable. You would do that like this:
[h:existingString = "The skill name you entered is "]
[h:concatString = existingString+skill+"."]
[r:concatString]
What happens here is this:
- Line 1 sets the "hardcoded" portion of the output
- Line 2 sets the concatenated string -
concatStringto equal the value ofexistingStringplus the value ofskill(which MapTool will prompt for). However, in this case, since MapTool knows thatexistingStringis a string, it will not try to add them mathematically, but just append the value ofskillafter the value ofexistingString. To be grammatically correct, we concatenate another little string on the end, this time, the period. Remember - strings inside square brackets need to be in quotes (but variable names, of course, do not!) - Line 3 displays the final value of
concatString, afterskillhas been appended to it. The output will look something like:
The skill name you entered is Archery.
That's a very simple example, but it illustrates the essence of constructing strings - you "add" them together with a plus sign.
Where do We Go From Here?
This guide barely brushes the surface of the full potential of the macro language in MapTool. However, using just the basic techniques shown here, you can create a lot of very handy, convenient macros to make playing your game easier and more fun. In future guides, I'll cover more advanced macro commands and techniques.
{{#customtitle:Introduction à l'écriture de Macro|Introduction à l'écriture de Macro}}