Introduction to Properties/ja
{{#customtitle:はじめてのプロパティ|はじめてのプロパティ}}
キャンペーンプロパティ(Campaign Properties)
One of the most useful features in MapTool is the capability of tokens to carry around a set of Properties, attached to that token, that can be manipulated by macros and can be used to create quick displays of information. Basically, token properties are like built-in character sheets.
MapTool の最も気の利いた機能の一つは、マクロで操作したり、情報のクイック表示を作成することが可能なプロパティの集まりをトークン自身に付属させ持ち歩かせることができることだ。基本的にトークンのプロパティは MapTool に組み込まれたキャラクター・シートのようなものだ。
However, because they are so useful, the MapTool developers have created many different ways to use them and manipulate them. This guide will address creating Campaign Property Sets, setting them to have default values, and using them to manipulate the Statsheet.
ではあるが、便利な機能であるため MapTool の開発陣はプロパティを使用したり操作したりする多くの異なる方法を作成してきた。このガイドでは、キャンペーンプロパティセット(Campaign Property Sets)を作ることに取り組む。今回の取組みでは、初期値を持つセットを設定し、ステータスシートを操作するセットを使用する。
サンプルルールセット、または MTRPG
In order to have useful examples as we move through this tutorial, several MapTool users and contributors developed the Sample Ruleset -- a simple roleplaying game system developed specifically to illustrate parts of MapTool. For this guide, we're going to call these rules the MapTool RPG - or MTRPG for short, and what we're going to do is create a new Campaign File and set up some campaign properties that correspond to attributes of the MTRPG.
このチュートリアルを案内する上で分かりやすい例を示すため、一部の MapTool ユーザーと開発者はサンプルルールセット(特にMapToolの重要な要素を説明するために開発された簡単なロールプレイング・ゲーム・システム)を作り上げた。このガイドでは、このルールを MapTool RPG(もしくは略してMTRPG)と呼び、新しいキャンペーンファイルを作成し、MTRPGの特性に合うキャンペーン・プロパティを設定していく。
キャンペーンプロパティウィンドウ
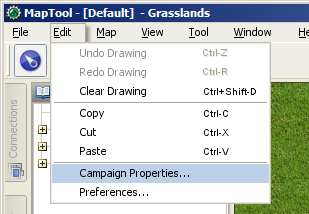
To get started with Campaign Properties, the first thing you'll need to do is go to Edit > Campaign Properties, and open the Campaign Properties window. In this window, you'll see several tabs and a whole lot of information.
まず、キャンペーンプロパティの作業を始めるために、Edit → Campaign Properties を選択し、キャンペーンプロパティウィンドウを開く。このウィンドウには、いくつかのタブと多くの情報がある。
When you open up the Campaign Properties window, you'll see it has six tabs. Briefly, they are:
キャンペーンプロパティのウインドウを開いときに6つのタブがあることに気付くだろう。それぞれのタブを簡単に説明しよう:
- Token Properties: this houses all the property sets that a token in the current campaign may have
- Repositories: this is where you can designate an online "repository" to hold campaign files, especially images, to improve load times and speed when you host or play an online game
- Sight: this tab is where you configure the settings for vision in the current campaign
- Light: this tab is where you configure light sources and auras for the current campaign
- States: this tab lets you configure token states for the current campaign
- Bars: this is where you configure token bars for the current campaign
- Token Properties:キャンペーンで利用可能な全てのプロパティ・セットが収録されている。
- Repositories:キャンペーン・ファイル(特に、オンラインでのゲームを楽しむために読み込み時間を短縮するために)を取り入れるため、オンラインの「リポジトリー」を指定することができる。
- Sight:このタブで、現行のキャンペーンで使用する視覚の設定を編集する。
- Light:このタブで、現行のキャンペーンで使用する光源とオーラの設定を編集する。
- States:このタブで、現行のキャンペーンで使用するトークン・ステータスを編集する。
- Bars:ここでは、現行のキャンペーンで使用するトークン・バーを編集する。
This guide will only address the first tab, Token Properties.
このガイドでは、最初のタブToken Propertiesだけに取り組む予定だ。
プロパティのタブ
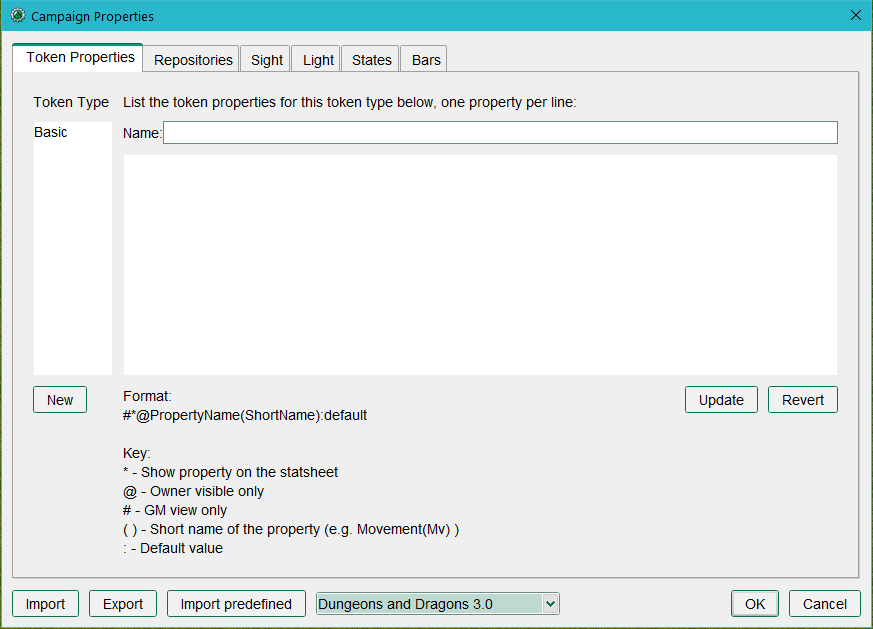
The first visible tab is the properties tab. This appears relatively uncomplicated, but it's home to some really nifty potential. There are 3 text fields in this tab:
最初に表示されるタブはプロパティのタブだ。ここに表示されているものは比較的単純なものであるが、出発点としてふさわしい要素を備えている。このタブには以下の3つのテキストフィールドが備わっている:
- Name: this is the name of the property set you're currently viewing. When you open the campaign properties window, this is blank.
- Type: this column on the left side is not editable, but it will list the names of all the available property sets in the current campaign. If you have no campaign loaded, the only entry will be Basic
- A large text area where you enter the properties for the current campaign. It will be blank when first loaded, but if you select a property set from the Token Type list on the left side, you will see the names and default values of the properties in that set.
- Name:現在表示しているプロパティ・セットの名称。キャンペーン・プロパティを開いたときは空白になっているはずだ。
- Type:この左の列にあるものは編集することができないが、現行キャンペーンで使用可能な全てのプロパティ・セットの一覧が表示される。まだキャンペーンをロードしていなければ、ここにはBasicだけが表示されている。
- 大きなテキストエリアは、現行キャンペーン用のプロパティを編集する場所だ。最初にロードしたとき、ここは空白であるが、左側の Token Type の一覧からプロパティ・セットを選択すると、そのセットの名前と初期値の一覧が表示されるであろう。
Type(種類)
In this field, you'll see the names of the different "Property Types" (you can think of them as property sets) that are configured in the current campaign. If you have no campaign loaded, the default property set will be called Basic. The Type field is not directly editable by the user.
このフィールドには現行キャンペーン用に作成した異なるいくつかのプロパティの種類(プロパティ・セットとみなして構わない)が並ぶことになる。まだキャンペーンをロードしていないのであれば、標準のプロパティ・セットはBasicと呼ばれる。Type フィールドはユーザーが直接編集することはできない。
Name(名称)
This is a simple text field where you can enter the name you want to give the property set. This name will, when you update the set, appear in the Type list to the left, and it becomes the name for that particular set of properties. Names can be anything you like; many users create sets called "NPC" for games where NPC stats and traits differ from those of player characters, for example.
これは単純なテキストフィールドであり、プロパティ・セットに付ける名称を入力することが可能だ。プロパティ・セットを更新する際、この名称が左側のTypeの一覧に表示され、プロパティ・セットの固有名称となる。名称は自由に決めれば良い。例えば、多くのユーザーは、NPCの状態や特徴がプレイヤー・キャラクターと異なるゲーム用に、NPCという名称を付けてプロパティ・セットを作っている。
Properties(プロパティ)
This is where it gets funky. In this text area, you can create any and every property you can think of, which can reflect every possible number or statistic an RPG character might have (and many properties that they don't have -- lots of users create properties that are useful for when they write macros, but wouldn't appear on any character sheet!).
こいつはなかなかイカしたものだ。このテキストエリアでは、君の思いつくあらゆるプロパティを作ることができ、RPGキャラクターで使用するような数値やデータを可能な限り再現することが可能だ。 (RPGキャラクターが持っていないプロパティを持つことも可能だ。ユーザーの多くは、マクロを記述するときに有用なプロパティを作るが、そういったプロパティはキャラクターシートには存在しないのが普通だ!)
プロパティの作成
初期値を持たないプロパティ
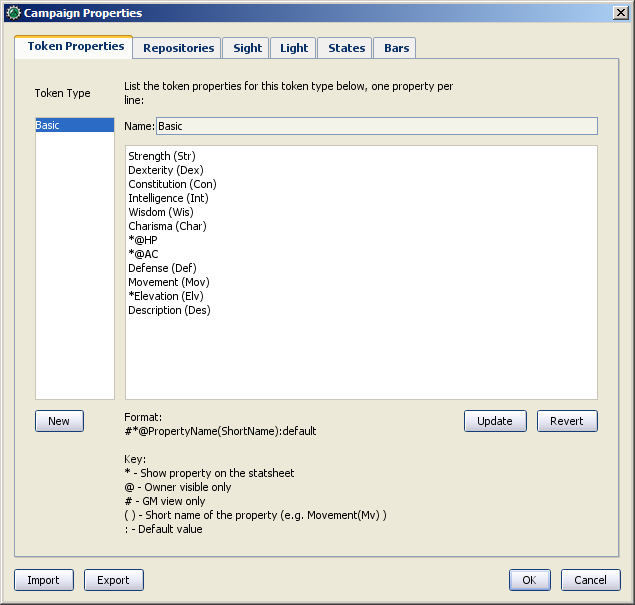
If you look at MTRPG's Primary Attributes, you will see that there are four separate attributes that are the basic attributes of a character: Strength, Dexterity, Intelligence, and Endurance. We're going to get rid of the default properties, and put new ones in their place.
MTRPG's Primary Attributes(MTRPG の主要な特性値)では、キャラクターの基本的な特性である4つに分類された特性値、「 Strength、Dexterity、Intelligence、Endurance」を見ることができる。では始めからあるプロパティを取り除き、新しいプロパティを作り上げていこう。
1. Go to Edit > Campaign Properties. You'll see in the left side, under Token Type, that the only entry is "Basic." We're going to create a new property set.
1. Edit → Campaign Properties を開く。左側にある Token Type の下に Basic の項目だけがあるが確認できるだろう。ここでは新しいプロパティ・セットを作っていく。
2. In the Token Type list on the left, select Basic. When you do this, you'll see a whole bunch of properties with all kinds of symbols like @, #, and so forth.
2. Token Type の一覧から Basic を選択する。すると、「@」や「#」などの記号を伴ったたくさんのプロパティが表示される。
3. In the text area with all the properties, use your mouse to highlight them all, and hit Delete on your keyboard. Go ahead - don't be shy!
3. テキストエリアのすべてのプロパティをマウスを使って選択し、キーボードの「Delete(削除)」を押す。遠慮は無用。やっちまえ!
4. Leave the Name field alone - MapTools must always have a Basic property set, so you can't change that name.
4. Name フィールドだけはそのまま残す。MapTool は Basic プロパティ・セットが必ず必要なので、この名称を変更することはできない。
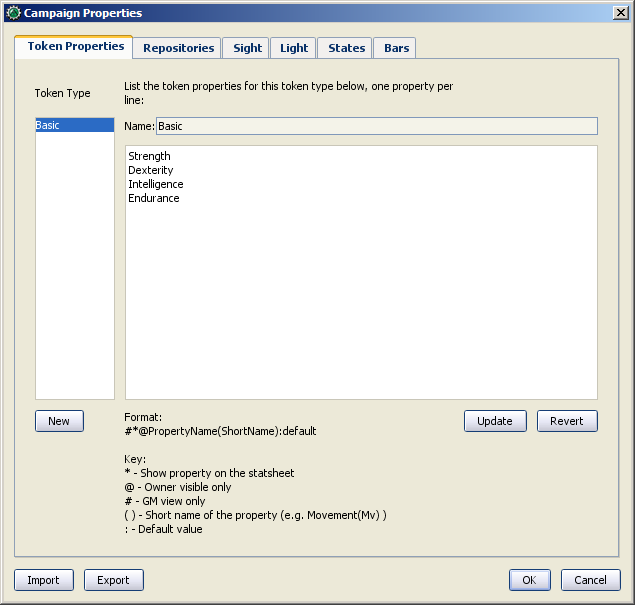
5. In the text area below the Name field, enter the name of each of the four Primary Attributes in MTRPG, like so:
5. Name フィールドの下にあるテキストエリアにMTRPGの4つの主要特性値を次のように入力する。
Strength
Dexterity
Intelligence
Endurance
When done, your properties window should look like the screenshot on the right.
入力を終えたら、君のプロパティ・ウィンドウは右のスクリーンショットのようになっているはずだ。
6. Once you've finished entering the properties you want, click the button labeled Update. Don't panic! The properties will disappear, but if you select the Basic list from the left, your properties will reappear in the main text area.
6. 必要なプロパティを入力し終えたなら、Update ボタンをクリック。おっと驚かなくても大丈夫!プロパティは消え去るが、左の一覧からBasic を選択すれば先程入力したプロパティが再びテキストエリアに表示される。
7. Click OK to confirm all of your changes and close the Campaign Properties window.
7. 編集結果の確認と'キャンペーン・プロパティウィンドウを閉じるためOKをクリックする。
8. Go to File > Save Campaign As and save your campaign as MTRPG.cmpgn. You've now created a new campaign file, with a new set of campaign properties.
8. File → Save Campaign Asを選択し、このキャンペーンを MTRPG.cmpgn として保存する。これで新しいキャンペーン・プロパティのセットを持つ、新しいキャンペーン・ファイルが出来上がった。
When you create properties like this -- just listing the values one after the other -- and then open a token, you will see that these properties have no value. That does not mean that they are equal to zero, or equal to a blank line - they literally have no value. This doesn't mean much for most purposes, but it is an important distinction in macro writing terms (in programming, there's a big difference between a blank string, and an actually empty variable!).
このようなプロパティ(順々に値が並んでいるような)を作りトークンを開くと、値がない同じプロパティを確認できる。値がないことはゼロや空白行ではなく、文字通り no value(値なし) という状態だ。これはほとんどの用途で意味を持たないが、マクロを記述するにあたり重要な違いとなる(プログラミングでは、空の文字列なのか、空の値なのかが大きな違いなんだ!)。
Once properties are updated, all of the tokens on the map will be updated with the new properties, and any new tokens you drop on the map will "inherit" the properties you set up.
プロパティを更新すると、マップ上のすべてのトークンは新しいプロパティに更新され、マップ上に新規に作られるトークンは君の作ったプロパティが「受け継がれて」いる。
NOTE: Property names cannot have spaces in them - so if you have a property called "Hit Points", you would need to enter it as HitPoints.
注:プロパティ名に空白を入れてはいけない。Hit Points というプロパティを作るのであれば、HitPointsと入力する必要がある。
訳注:日本語のプロパティ名も作れるようだが、マクロの利用などで問題がでる可能性がある。(未確認)
Creating Properties with Default Values
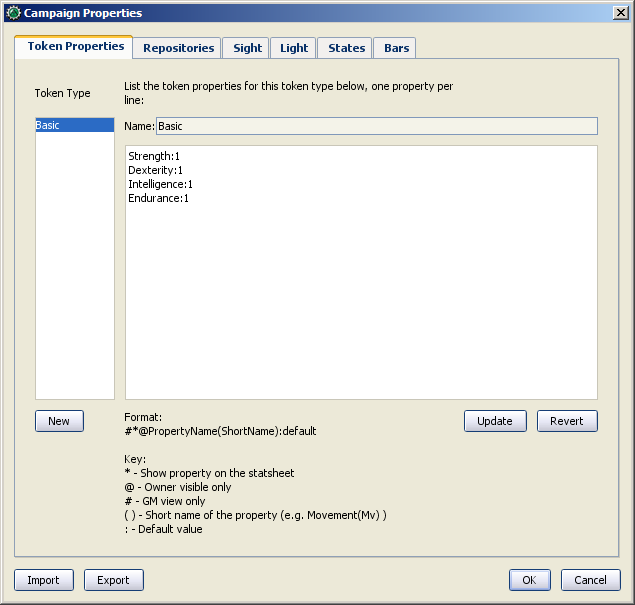
Now, in MTRPG, the minimum value an attribute can have is 1. So, it makes sense to set the default value of these properties to 1 (that way, every new token will at least have the minimum value an attribute can have). To do this:
1. Open the Campaign Properties window.
2. Select the Basic property set.
3. In the Basic Properties set, edit your properties so they now read (see the image, as well):
Strength:1
Dexterity:1
Intelligence:1
Endurance:1
4. Click Update.
By placing a colon at the end of the name of each attribute, and putting the number 1 after the colon, you have instructed MapTool that the default value for those properties is 1 (in other words, whatever value you put after the colon becomes the default value for that property). You'll note that at the bottom of the Token Properties tab there is a key describing the various options you can set on a property.
Now, if you drag a new token onto the map and look at its properties (double-click on the token and go to the Properties Tab in the Edit Token dialog), you will see that the new token has the default values.
By the way: don't worry about any tokens you may have already set the property values on - setting up or changing the default values will not override the properties you've already set. MapTool is smart enough to handle that.
Displaying Properties in the Statsheet
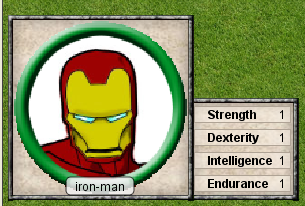
MapTool has a neat feature called the Statsheet, which is briefly mentioned in the Introduction to Tokens - basically, it is an automatic popup that appears in the lower left corner of the map, when you hover over a token.
You may be saying, "Wait...when I hover over my token, there's no statsheet! Where is it?" The reason you don't see it yet is that the Statsheet is governed by the Campaign Properties - it displays the token's properties (along with a larger version of the token's image) - but only when a couple requirements are met:
- The properties are set up to display on the statsheet; and
- The properties that are displayed actually have a value
Setting Properties to Display
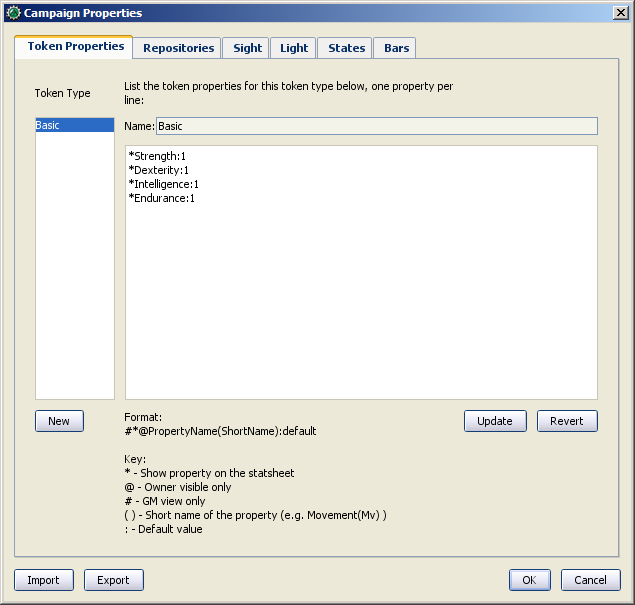
If you look at the bottom of the Token Properties tab in the Campaign Properties dialog, you'll see a key showing how to set up a property to display in the Statsheet. There are three display options, each of which is indicated by putting a symbol in front of the property name:
- *: an asterisk means "show this property on the statsheet"
- @: means "only show this property to the owner of the token (and the GM)"
- #: means "only show this property to the GM (not even the token owner can see it)"
The asterisk is required for any stat to display at all - if you don't have an asterisk first, it won't show no matter what else you put on there. The @ and # symbols, on the other hand, are optional.
So, for our new game, we're going to set all of the properties to be visible to everyone (by just using a star). To do this, open up your properties, and edit them to look like this:
*Strength:1
*Dexterity:1
*Intelligence:1
*Endurance:1
Now, when you hover over a token, you'll see the Statsheet pop up (see the screenshot, above) with the values in the Strength, Dexterity, Intelligence, and Endurance properties. Also, since even brand new tokens have a default value, the Statsheet will appear for all tokens.
Short Names
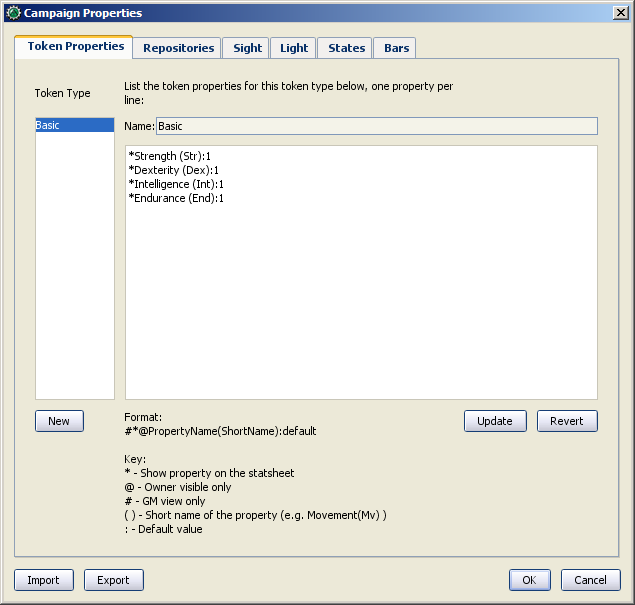
Sometimes, property names can get pretty long (or look unfriendly - no spaces, and all that). MapTool lets you put a Short Name in for each property. To do that, you just enter the short name in parentheses after the property name, like so:
*Strength(Str):1
*Dexterity(Dex):1
*Intelligence(Int):1
*Endurance(End):1
These short names are displayed in the Statsheet instead of the full name of the property
Short Names are for display purposes only - when referencing properties in macros, you must use the full property name.
Creating Derived Properties
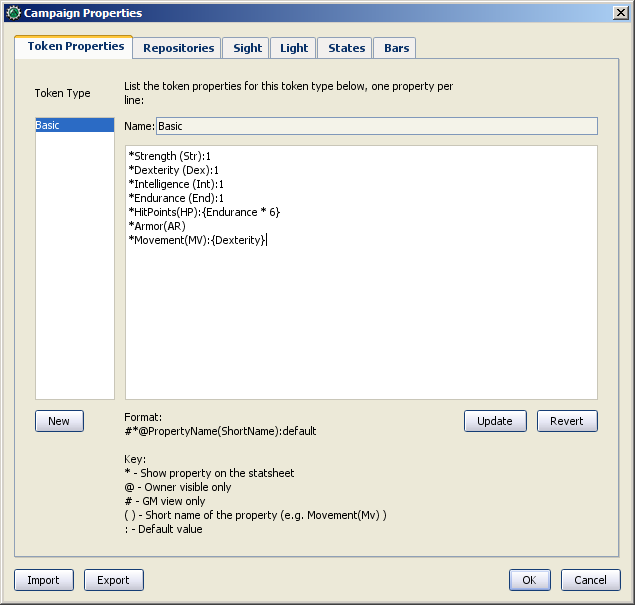
Okay, now let's do something pretty cool. In a lot of roleplaying games, there are character attributes that are derived from other stats - for instance, in the Savage Worlds rules, your "Parry" stat is based on your Fighting ability; likewise, in Dungeons & Dragons, your "Hit Points" are derived partly from your "Constitution" score.
Now, you could create these other derived attributes as separate properties and manually enter the values in when you make a new token - but how about we allow MapTool to calculate these derived values? That's right - MapTool's campaign properties can not only be numbers and text, but also calculations and equations based on other properties that the token has.
In MTRPG, there are three derived stats: Hit Points, Armor, and Movement. These stats have the short names "HP", "AR," and "MV." For this example, we're going to set up Hit Points and Movement to be calculated from existing properties. We'll leave Armor until later (it takes a bit more complex a calculation to figure out the armor value, and we're taking it slow).
First, we need to add properties for these three derived values:
1. Open up the Basic property set.
2. Beneath Endurance, enter the following:
*HitPoints(HP)
*Armor(AR)
*Movement(MV)
You'll notice at this point, we've set no default values. Don't hit Update just yet - let's enter some macro code to create a derived value.
We can see from the MTRPG rules that Hit Points is equal to the value of Endurance multiplied by 6. Replicating this calculation in the campaign properties is very simple. Edit the Hit Points property to read:
*HitPoints(HP):{Endurance * 6}
What we've done here is enter a default value for the property (remember, default values are whatever comes after the colon), and used some macro code to instruct MapTool to perform a calculation in order to find the value for the properties. Two thing are happening here:
- We've enclosed the calculations in { }, which warns MapTool that the text enclosed inside the brackets is to be handled like a macro, and not just plain text
- Inside the brackets, we've said, "Find the value of the Endurance property, multiply it by 6, and make that result the value of the Hit Points property"
Now, to handle the Movement attribute, our job is even simpler: we need to instruct MapTool to get the value of the Dexterity property, and assign that same value to the Movement property. To do so, edit the Movement property to read:
*Movement(MV):{Dexterity}
When you are finished, your full property set should look like:
*Strength:1
*Dexterity:1
*Intelligence:1
*Endurance:1
*HitPoints(HP):{Endurance * 6}
*Armor(AR)
*Movement(MV):{Dexterity}
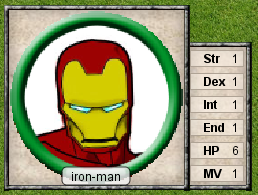
And when you hover your mouse over a token, the Statsheet should look like the screenshot to the right. Remember, even though we've said that Armor should be displayed on the statsheet, the statsheet only shows properties that have a value - Armor is still empty, so it won't show up until you give it a value.
Some Technical Details
A couple times in this guide and in other guides the token properties have been described as "those properties that are visible" in this campaign, or the properties set up "for this campaign." There's a reason for phrasing it like this.
See, a token - if you cut one open and looked at its inner workings - is an XML file that contains a ton of information. It has information about its image, its size, its vision, light, and shape, and - of course - its properties. What's important to understand here is that the token will remember not only the properties from the MTRPG, but if it was ever saved as an .rptok file or brought in from another campaign file, it will remember the properties from that campaign too. They won't be visible, but they're stored in the token even so.
So, in reality, a set of Campaign Properties really indicates those properties that:
- You can see if you open up a token by double-clicking on it, and
- You can directly edit by clicking in the cell next to them
This may sound like a recipe for disaster - what if you set up a property that was already set up but is hidden? Fortunately, MapTool will not, when running a macro, attempt to access any hidden properties unless you specifically instruct it to do so, using two special macro functions. So rest assured, you cannot accidentally access a property that's not set up in the Campaign Properties.
In summary, if a Property Type (such as the default Basic property type) has a property named HP, it will be stored in the token under the XML name HP. If another property type (such as a user-defined Pathfinder property type) also has a property named HP, they will both be referencing the same data on the token. Modifying the value of HP when the token is Basic and then changing the token Pathfinder will show the same value for HP.
Moving On from Here
MapTool supports very elaborate properties and derived properties, with a number of math functions and operations. A couple of the most common ones you might want to use are (the examples are not necessarily part of MTRPG; they're just examples):
- Basic math operators: addition (+), subtraction (-), multiplication (*), and division (/)
- Example: HitPoints: {Endurance * 6}
- Rounding: there are some functions to let you round numbers when you divide
- Floor: the floor() function rounds down. Example: HitPoints:{floor(Constitution / 2)} would divide Constitution by two, and round down
- Ceiling: the ceil() function works like floor(), but rounds up. Example: HitPoints:{ceil(Constitution/2)}