Introduction to Mapping/ja
{{#customtitle:はじめての地図作成|はじめての地図作成}}
BEGINNER
THIS IS A BEGINNER ARTICLE
はじめに
まずはじめに:MapToolとは何か?
おそらくMapToolがどのようなモノであるか理解していると思うが、MapToolの主要な目的をより確かに理解するため少し待ってほしい。
MapTool は『仮想的な卓』を仲間と共有することを助け、ゲームをプレイすることができるプログラムである。
これがMapToolの行うことであり、その機能は 目的を遂げるための一連の選択( 簡単なものから複雑なものからなる)を提供することを意図されている。
ここや他の案内に続くすべてのマクロやプロパティやテーブルについての会話によって、MapToolを調べている理由を見失ってはいけない。それは友人とゲームをプレイする方法だ。
この案内について
この案内の目的はマップツールのマクロ記述システム、照明効果、プロパティ、または 複雑なことの seamy underbelly(訳注:汚らしい弱点?)を徹底的に調べることではない。その代わり、この案内がロール・プレイング・ゲーム用の『地図作成』プログラムとしてのマップツールを使い方を授けるだろう。その他の案内では オンライン・ゲームをホストする、トークンの扱い、 視界と照明を準備する、マクロの書き方のような話題に取り組んでいる。
この後に続く説明が、マップツールを戦闘地図作成/通常地図作成用の道具として使えるようにします。ここでいくつか前提となることがある:
- 地図画像の作り方、又は入手方法を理解している。Web上にはテラバイトもの(エクサバイト!ヨタバイト!)地図画像がある。yottabytes!) of map images out there on the web. RPTools GalleryやRPGMapShareから大量にあるあらゆるクールな画像を持ち出してくれ。
- マップツールを自分のコンピューターで動かすことができる。マップツールは Java 1.5 が君の機械にインストールされている必要がある。この作業を見つけて執り行うのは君に任せた。
では始めようか。まず始めに、当然のことを:
- マップツールを http://rptools.net から手に入れろ。最新『ビルド』バージョンのマップツールは、いつもthis listの上部から見つけることができる。現在の最新ビルドは1.3.b56だ。注:ダウンロードしたりzipファイルを解凍することなく、Java WebStartからマップツールを起動することもできる。
- マップツールのzipファイルをダウンロードしたら、君のコンピューターの好きな場所に解凍して動作の確認をする。備え付けの.batファイルは起動時のパラメーター(メモリの確保などなど)が設定してある。.jarファイルをダブルクリックすれば起動するが、君に警告を出すだろう。さらにWindowsを使っているなら、さらに設定変更が簡単なWindows Lancherを使うことができる。
では、使いやすい地図作成に進もう。
入手した画像をマップツールの材料ライブラリに入れよう
マップツールの『材料ライブラリ』は、実際のところ、マップツールで使おうとしている画像を置いている君のコンピューター上のフォルダーへの『ポインタ』か『リンク』だ。マップツールは標準の画像集を備えているが、君の望むどんな画像でも(どの画像がマップツールで利用可能か管理して)追加することができる。
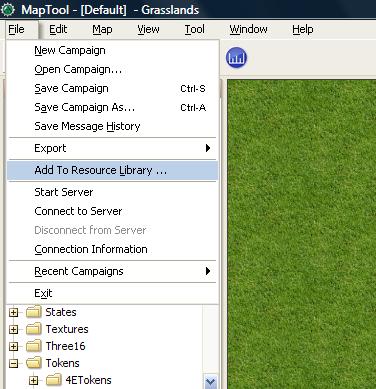
1. 画像(地図など)をどこからか手に入れる。画像はWebからダウンロードしてきたものでも、自分で作ったものでも構わない。それらを君が思い出せるディレクトリーに置く。このディレクトリーはステップ3で重要となる。
2. マップツールを開く。
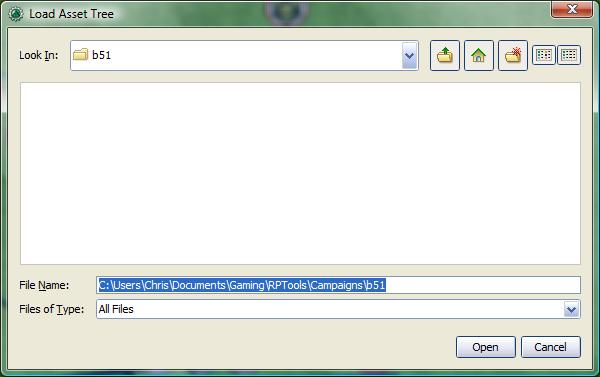
3. File -> Add to Resource Libraryを選択(下記の左を参照)。Load Asset Treeのダイアログが開くだろう。(本来のサイズの画像を表示するにはサムネールをクリック)
4. ダイアログの中で、君が追加したい地図画像を格納したフォルダーに行き、Openをクリックする。マップツールはディレクトリ内のイメージを処理し、新しいフォルダーをリソース・ライブラリ・ツリーに加える。
注:マップツールのリソースライブラリにおけるディレクトリの名前は、ステップ3で君が選んだディレクトリと同じ名前になるだろう。
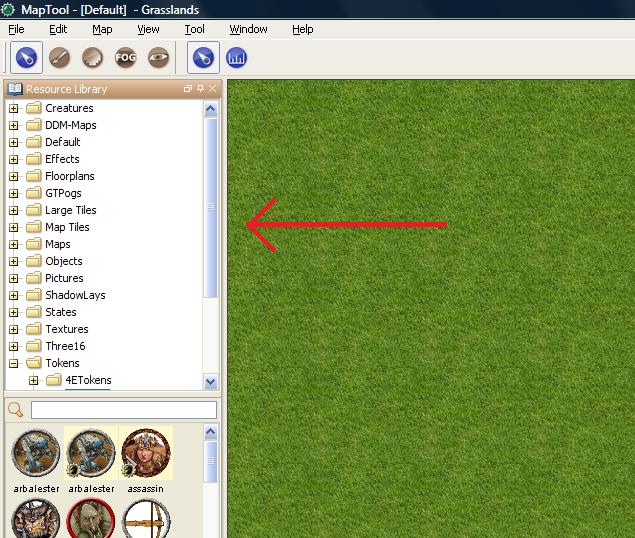
5. それ以後、リソースライブラリのフォルダーを選択した場合(下記画像のように)、そのフォルダーに含まれる画像のサムネールを確認できる。注:君のフォルダーにサブフォルダがある場合、フォルダーツリーを展開するには+をクリックする。また、MapToolは君が選択したディレクトリを憶えているので、同じものを再び追加する必要はない。
注:リソース・ライブラリに表示されているフォルダーは実際はハードディスクにあるフォルダーへのポインターであるから、マップツールがそれぞれのファイルをコピーすることを心配しなくても良い。リソース・ライブラリは、どこに画像があるかをマップツールに把握させる手段にすぎないのだ。
地図を作る
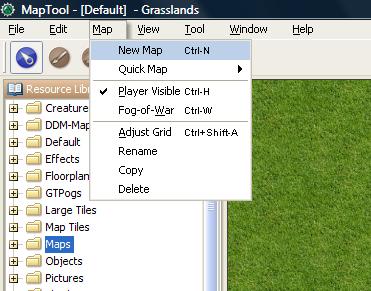
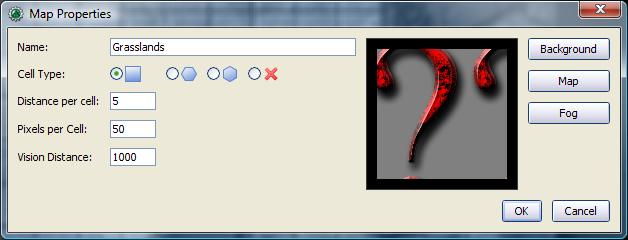
1. Map -> New Mapに進める。Map Propertiesダイアログが表示されるだろう。
2. Map Propertiesダイアログの左側に、いくつかの選択フィールドとテキスト・フィールドがあるはずだ。
- Name:これは地図のタイトルだ。地図の画像を選んだ場合、タイトルは画像のファイル名に設定しなおされることを憶えておこう。一番のお勧めは、xqmap2.jpgや他の名前の代わりにもともと呼ばれている名前を付けることだ。君の好きなように呼べばよい。* Cell Type:6角形または正方形の地図、またはグリッドなし。* Distance Per Cell:各セルごとにいくつの単位を割り当てるか(例:ダンジョンズ&ドラゴンズ第4版では、すべてマスとして数えられるので、1を設定すればよい)。(訳注:1マスを数えるときの単位。5を設定すると5→10→15と数える。)
- Pixels per cell:各セルがいくつのピクセルを占めるのか。標準は50。君がダウンロードした地図画像の縮尺を合わせることは最も大事なことだ。* Vision Distance:マップツールは視覚、fog-of-war、その他の機能を持つため、キャラクターが地図上を見渡せる距離の標準値を設定する。
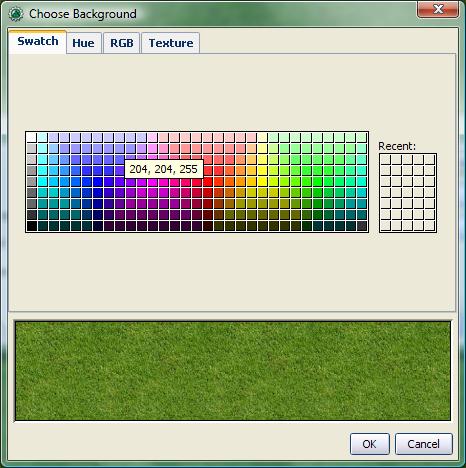
3. Backgroundボタンをクリック。いくつか選ぶことのできるポップアップ・ダイアログが表示されるはずだ。背景テクスチャと背景色は全ての方向にどこまでも繰り返し配置される。
- Swatch:一定の色を地図の背景として使用する。
- 警告: 最新バージョンの1.3.b53では、左上の色見本(白の色見本)を選択した場合、マップツールはエラーを生み出す。このエラーは、マップツールをクラッシュさせたりする原因ではないが、背景に白は設定されないだろう。代わりに、HueやRGBのタブを使って背景を白に設定できる。
- Hue/RGB:選択した色見本の代わりに色を指定する。
- Texture (私はたいていこれを使用する):リソース・ライブラリにアクセスし、背景として役立つテクスチャを選択できる。
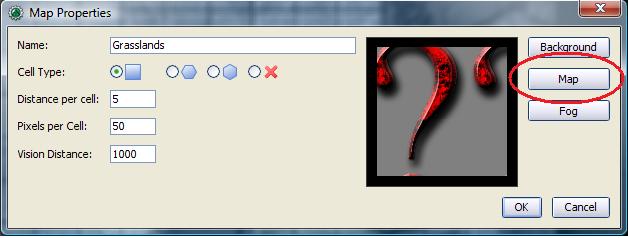
4. 君に地図画像の候補(ダウンロードしたものやフォトショップなどのソフトで作ったもの)があるならMapボタンをクリックしよう。If you have a map image in mind (like a downloaded one, or one you created in Photoshop or something like that), click the Map button. リソース・ライブラリが表示されているダイアログが現れるはずだ。使用したい画像を選択する。この画像は君がこれまでに選んだ背景の上に重ねられる。
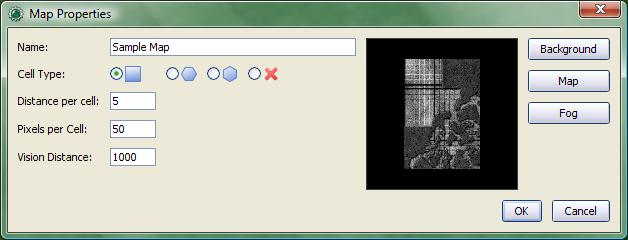
5. 背景と地図のできに納得したら(you have a map image in mind)、タイトルをつけてOKをクリックしよう。これで地図がマップツールのメイン・ウィンドウに読み込まれるはずだ。
一つのキャンペーンに複数の地図を作製する
マップツールには複数の地図を作成でき、すべての地図を一つのキャンペーンに入れることができる。この行程は非常に簡単だ:単に マップを作るのステップを繰り返して新しい地図を作り、新しい画像を選び、背景、タイトルを設定するだけだ。
作成した新しい地図は、それぞれ自動的に現在作業しているキャンペーンの中に作られる。(作成した新しい地図は自動的にキャンペーンに保存されないので、作業が終わったら 作業を保存するを行うように)
また、新しい地図を既に保存しているキャンペーンに追加することもできる。キャンペーンを開き(File > Open Campaignを選択)地図を作製するステップを行えばよい。
マップツールのメイン・ウィンドウ
マップツールのレイヤー

地図を開くと、地図ウィンドウ上にLayerとタイトルがついた小さなボックスがある。マップツールは4つのレイヤーを持つ:
- Background:画像、背景の地図、その他、移動しないものを置くレイヤーだ。
- Hidden:オンライン・ゲームでは、GMだけが見ることのできるレイヤーだ。
- Object:トークンのようなオブジェクト、移動する可能性のあるもの、プレイヤーが動かすことのできるもの(ランプ、テーブル、などなど)を置くレイヤーだ。
- Token:トークンを置くレイヤーだ(トークンとはキャラクターやNPCを表す小さな画像だ)。キャラクターと敵を地図上に追加するとき、Tokenレイヤーが選択されているか確認すること。
マップツールのレイヤーは、異なる4枚のアセテート・シートやトレーシング・ペーパーが順に重なったものと考えればよい。一番下のレイヤー(Background)には地図の基本的なパーツ(壁、床、木など)を描く。その次のトレーシング・ペーパー(Objects)には、キャラクターが使用したり、干渉したり、壊したりするものを描く。ドア、宝箱、テーブル、椅子、などなど。その上のレイヤー(Hidden)には、GMだけが見ることのできるものを置く。(概ね物体であろう。しかし隠れているキャラクターかも!)最後に、一番上のレイヤー(Tokenレイヤー)にはミニチュア(ゲームの世界のモンスターやキャラクター、またはNPCたち)を配置する。
トークンはマップツールの4つのレイヤーのうちどこにでも配置しても良い。そうするには、トークン画像の上で右クリックしてChange Toを選択。メニューから変更したいレイヤーを選択するとトークンが移動するはずだ。
地図を選ぶ
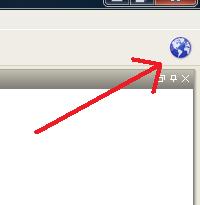
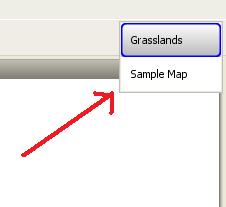
君がキャンペーンで地図を1つしか使っていないのなら、標準の地図として読み込まれ、その地図だけを見ることができる。
複数の地図を作成していたり、複数の地図からなるキャンペーンを扱っているなら、マップツール・ウィンドウの右上にある青くて丸いアイコンをクリックすると有効な地図の一覧が現れるので、その中から選べば良い。一つしか地図がない場合、青丸アイコンをクリックするとその地図の名前が表示されることに注意。
拡大縮小と移動
ホイール付きのマウスを使っているなら、ホイールを使って地図を拡大・縮小することができる。また、イコール(=)を使って拡大、マイナス(-)を使って縮小することができる。
プラス(+)を押すと拡大縮小が1:1に設定される。
右クリックからのドラッグで地図を移動することができる。あらゆる方向に地図がパンするだろう。
トークンの基本
マップツールのトークン(単にトークンと呼ぶ)は、マップツール内のさまざまなモノを視覚的に表現した小さな画像とことだ。もっとも一般的なトークンの使い方はPCとNPCを表現したものだろう。別のたとえをすれば、仮想地図上のミニチュアと呼べる。
トークン(その他もろもろ)はリソース・ライブラリにしまわれている画像ファイルから始まる。マップツールはいくつかの標準トークン(それとトークンを作成することができる素晴らしい独立したプログラム『トークンツール』)を搭載している。また、君が探してきたものを使うこともできる。
初めての地図作成のこのセクションではマップツールのトークンの使用方法のごく基本的な部分を扱う。トークンにはこのガイドに書ききれないほどの特徴や仕掛け、小粋な機能がたくさんある。
地図上にトークンを配置する
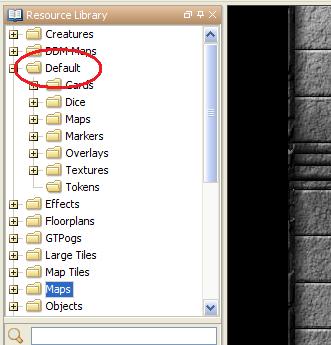
1. To see the default tokens mentioned above, go to the Default folder in your Resource Library, and click the + to expand it.
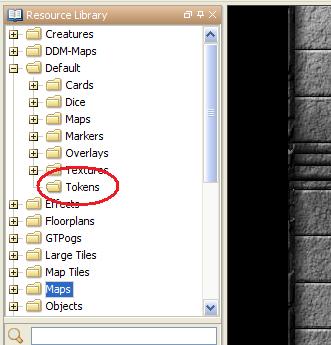
2. Select the Tokens folder.
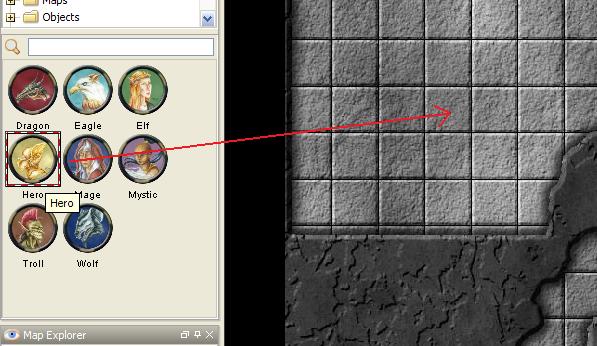
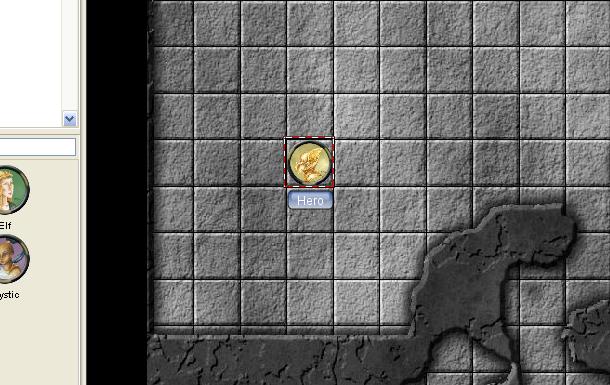
3. In the window below (where the thumbnails appear), use the mouse to drag a token onto the map. The cursor will change to a hand, and you just need to hold the token over the map somewhere and release the button.
When you release the mouse button, the token will appear on the map, as shown in the thumbnail.
Moving Tokens
Once a token is on the map, it can be dragged around using the mouse, or moved by selecting the token (clicking on it) and using the arrow keys to move the token, and pressing the D key to complete the move.
If you want to create a complex path, you can hit the space bar to make a waypoint in your path.
Changing a Token's Name, GM Name, and Label
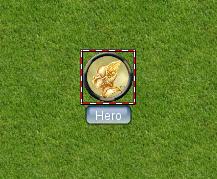
Tokens have three possible "names" you can assign to them. When a token is first dragged onto the map, it is given a default name (typically, the same as the token's filename on your computer, with the extension trimmed off). For example, the token shown in the image below was dragged from MapTool's default token set, and its default name is "Hero."
The three possible names a token can have are:
- Token Name: The name of the token that will appear to all users. This is not optional.
- NOTE: Make sure each token has a unique name!Otherwise, MapTool macros may behave unpredictably.
- GM Name: This name appears only to the person(s) currently connected to MapTool in the role of "GM."
- Label: This text appears below the Token Name, and is visible to all connected individuals.
To change a token's name, GM name, and/or label:
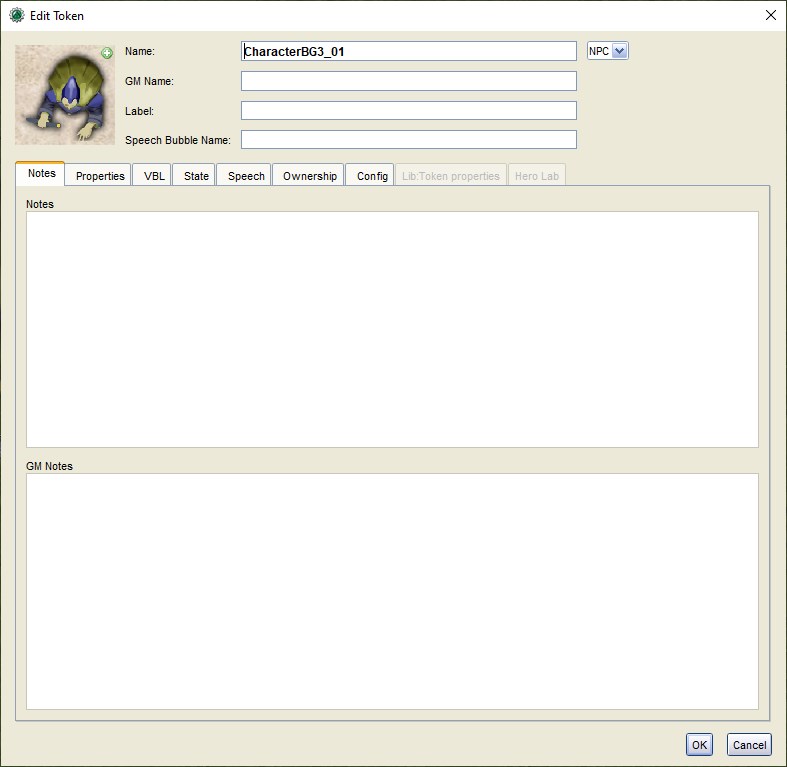
1. Double-click on the token image on the map. This will open the Edit Token dialog, as shown below.

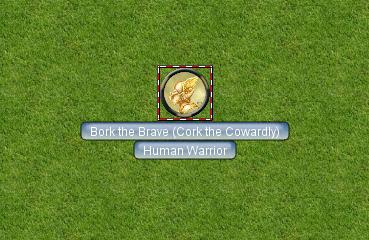
2. In the Name field, enter the name you'd like. For this example, I've entered "Bork the Brave"
3. In the GM Name field, enter a name. For this example, I've entered "Cork the Cowardly"
4. In the Label field, enter a Label. For this example, I've entered "Human Warrior".
5. Click OK to save your changes.
Once you've clicked okay, you'll see that the token has changed:
You can do this name changing process with any token you drop on the map.
Changing a Token's Image
Sometimes, when you create a new token, you will want to change the image on the token's face. Say, for instance, you find a cool new picture that you just have to use for your evil overlord, but you already have a token made up for him - you don't want to delete the whole token just to change the image, right?That's overkill. Instead, just change the token image using the following steps:

1. Make sure you have a new token image in PNG or JPG format, already available in your MapTool Resource Library. If you look at Getting Images Into your MapTool Resource Library section, above, it talks about how to get map images into your Resource Library: well, token images (in fact, any image) can be added to your resource library in exactly the same way.
2. Double-click on the token to open the Edit Token dialog.

3. In the upper-left of that dialog, click the small green plus sign.
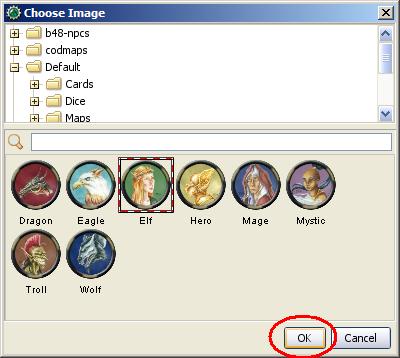
4. In the Choose Image dialog, select the Resource Library folder that has the new token image in it (a red-and-white border will indicate the image you've selected), and click OK.

5. Once you hit OK, you are taken back to the Edit Token dialog, and you will see that the token image has been changed to the one you selected.
Changing Token Size
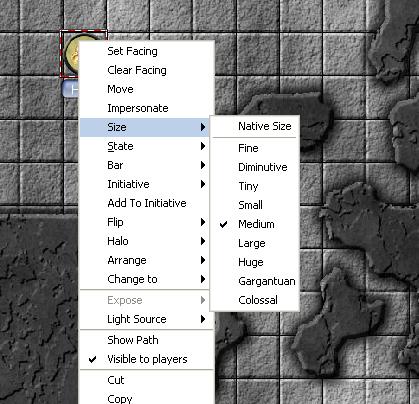
Tokens will default to the size of one grid square (note that by default, MapTool’s grid is 50x50 pixels). If you right-click on a token, the menu has a lot of options – one of which is Size. You can then set it using the size values there, so you can make large or huge or gargantuan creatures, and so forth. The image below illustrates the right-click menu for a token.
NOTE: these size values (large, huge, gargantuan, etc.) only apply to maps that have a grid (remember, when you create a map, you have the option to make a map with no grid). If you use a gridless map, the size values are more fine-grained.
Saving Your Work
MapTool's default "save" format is called a Campaign File. The Campaign File (which has the extension .cmpgn) contains the maps and tokens that you've set up. If you're interested in this sort of thing, the campaign file is actually a zipped XML file.
To save your work so far, choose File -> Save Campaign, give your campaign a name, and that’s all there is to it.
When you save a campaign, MapTool saves the locations of the tokens on all of the maps, so you can pick up right where you left off!
Exporting Map Images
MapTool can export your map images to an image file (PNG format). To export an image to a location of your choice:
1. Go to File->Export and select Screenshot As.
2. In the dialog that comes up, select a "View" (either GM view, where you can see everything, or Player View, where the only things visible are what players can see...I told you MapTool had some cool vision capabilities!)
3. Select the destination for your file using the Browse button (or, alternatively, send it to an FTP server)
4. Click Export.
Next Steps
Now that you can create a basic map and put some tokens on it, the next step is connecting up with some friends over the Internet (or face to face) and using it for a game session!This topic is covered in the Introduction to Game Hosting.