Introduction to Properties/de
BEGINNER
THIS IS A BEGINNER ARTICLE
Kampagneneigenschaften
Eine der mächtigsten Fähigkeiten in MapTool ist die von Spielmarken, einen eigenen Satz von Eigenschaften zu haben. Diese Eigenschaften können von Makros gelesen oder geändert werden und werden genutzt, um schnell Informationen zu einer Spielmarke zu liefern. Im Grunde sind diese Eigenschaften so etwas wie ein eingebauter Charakterbogen.
Weil sie so immens nützlich sind, haben die Entwickler von MapTools viele verschiedene Wege geschaffen auf diese Eigenschaftswerte zuzugreifen und sie zu verändern. In diesem Artikel werden wir sehen, wie man einen Satz von Kampagneneigenschaften erstellt, ihnen Standardwerte zuordnet und sie zur Veränderung des Werteblatt nutzt.
Das Beispiel-Regelwerk oder MTRPG
Um sinnvolle Beispiele für diesen Artikel zu zeigen, haben sich einige MapTool-Nutzer ein Beispiel-Regelwerk ausgedacht -- ein einfaches Rollenspielsystem speziell zur Darstellung der verschiedenen Funktionen von MapTool. Hier nennen wir dieses Regelwerk MTRPG (also MapTool Roleplaying game). Im Folgenden werden wir eine neue Kampagnendatei erstellen und hier neue Kampagneneigenschaften eintragen, die den Attributen (Charaktereigenschaften) unseres Rollenspieles entsprechen.
Das Fenster Kampagneneigenschaften
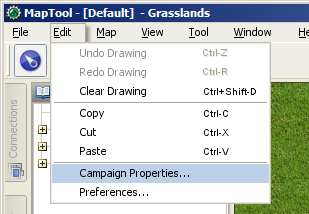
Wir beginnen, indem wir im Menü Bearbeiten > Kampagneneigenschaften aufrufen. In diesem Fenster gibt es sechs Reiter:
- Spielmarkeneigenschaften: Hier findest du alle Eigenschaftsgruppen, die in der Kampagne hinterlegt sind
- Ablagen: Hier kannst du einen oder mehrere Pfade zu Repositories, Speicherorten für Kampagnendateien, eintragen. Sie dienen einem schnelleren Download für die Spieler, die sich erstmalig auf dem Server für eine Kampagne anmelden. So werden Karten und Bilder schneller geladen und es kann gleich los gehen.
- Sicht: Hier wird festgelegt, welches Sichtmodell in der aktuellen Kampagne verwendet werden soll
- Licht: Hier können Lichtquellen und Auren definiert werden
- Zustände: Hier kannst du mögliche Zustände der Spielmarke festlegen
- Balken: Hier werden token bars festgelegt
Am unteren Ende des Fensters findest du Schaltflächen für Import, Export, und den Import von Vordefinitionen.
- Import: Hier können exportierte Kampagneneigenschaften importiert werden, die dann die aktuellen Werte ersetzen.Kampagneneigenschaften-Dateien haben die Endung .mtprops. Anmerkung: Besser immer erst die aktuellen Einstellungen exportieren, damit sie nicht komplett verloren gehen.
- Export: Hier können die aktuellen Kampagneneigenschaften in eine Datei gespeichert werden.
- Vordefinitionen importieren: Es wird eine Eigenschaftengruppe entsprechend dem rechts daneben gerade ausgewählten Spielsystem importiert und in die Eigenschaftengruppe "Basic" geschrieben. Aktuell vorhandene Eigenschaften werden gelöscht.[Seit Version 1.6.0]
In diesem Artikel beschäftigen wir uns nur mit dem ersten Reiter.
Der Reiter Token Eigenschaften
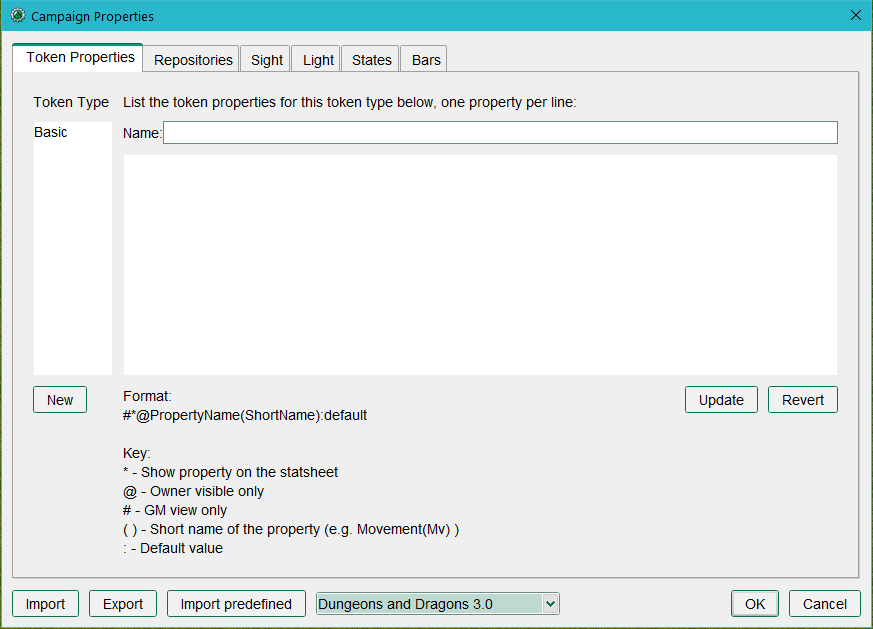
Der beim Öffnen des Fensters im Vordergrund stehende Reiter ist Spielmarkeneigenschaften. Er sieht relativ unkompliziert aus, beinhaltet aber wohl die komplexesten Anpassungsmöglichkeiten in MapTool. Es gibt drei Textfelder auf diesem Reiter:
- Name: Das ist die Benennung des Spielmarkentyps, die gerade im Feld darunter angezeigt wird. Beim Öffnen des Dialoges ist das Feld leer.
- Spielmarkentyp: Diese Spalte auf der linken Seite ist nicht direkt änderbar. Sie enthält die Namen der Eigenschaftengruppen bzw. Spielmarkentypen, die in der aktuell geladenen Kampagne vorhanden sind. Solange du keine Kampagne geladen hast enthält sie nur den Eintrag Basic
- Im großen Hauptfeld des Dialoges ist Platz für die Eigenschaften, die einem der Spielmarkentypen zugeordnet sind - eine Gruppe von Eigenschaften also, die diesen Spielmarkentypen ausmachen. Wählst du einen Spielmarkentypen auf der linken Seite, werden dir hier die Eigenschaften und ihre Standardwerte angezeigt.
Spielmarkentyp
In diesem Feld stehen die Namen der Eigenschaftengruppen, die in eienr Kampagne definiert sind. Eine dieser Gruppen kann jeweils einer Spielmarke zugeordnet werden. Entsprechend finden sich diese Namen dort (in der Konfiguration der Spielmarke wieder.
Name
Dieses einfache Textfeld dient der Vergabe eines sprechenden Namens für das jeweilige Eigenschaftenset, welches als Spielmarkentyp dann in der Auswahl des Tokens wieder unter eben diesem Namen erscheint. Häufig gewählte Namen sind deshalb SC oder NSC.
Eigenschaften
Hier nun wird es richtig verrückt! In diesem Textfeld werden die Eigenschaften eines Spielmarkentypen definiert. Diese Eigenschaften können statische Werte sein, es gibt aber auch viele andere Möglichkeiten. So kann ein Wert von einem (oder mehreren) anderen abgeleitet werden. Ein Wert kann durch ein Makro während des Spiels verändert werden. Werte können im Werteblatt erscheinen, müssen es aber nicht. Manche Werte sind nur dazu da, von Makros verwendet zu werden, tauchen aber sonst nirgends im Spiel offen auf. So vielfältig, wie die Möglichkeiten sind, so schwierig ist es deshalb, hier eine umfassende Beschreibung abzugeben. Nimm dieses Feld am Anfang also einfach mal als Liste der Attribute und Werte wie Trefferpunkte und Rüstungsklasse eines Charakters oder einer Kreatur. Weitere Einsatzmöglichkeiten lernst du später kennen.
Eigenschaften erstellen
Eigenschaften ohne Standardwert
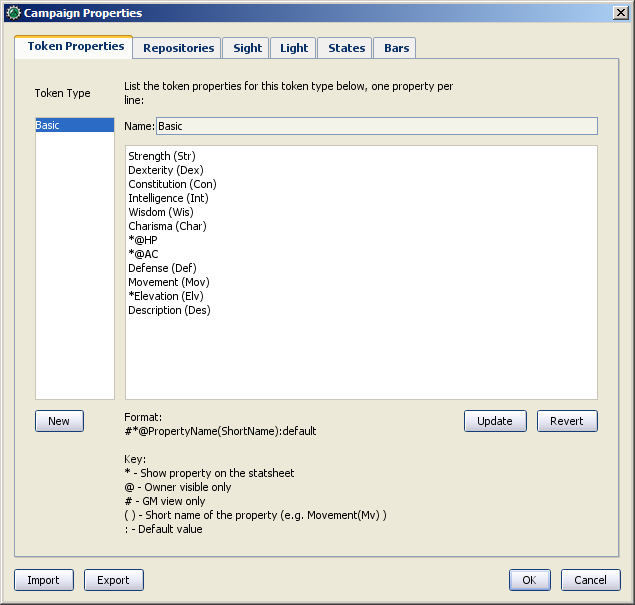
In den Regeln des MTRPG findest du MTRPG's Hauptattribute eines Charakters: Stärke, Geschick, Intelligenz und Ausdauer. Wir werden nun die Standardwerte los und tragen unsere eigenen hier ein.
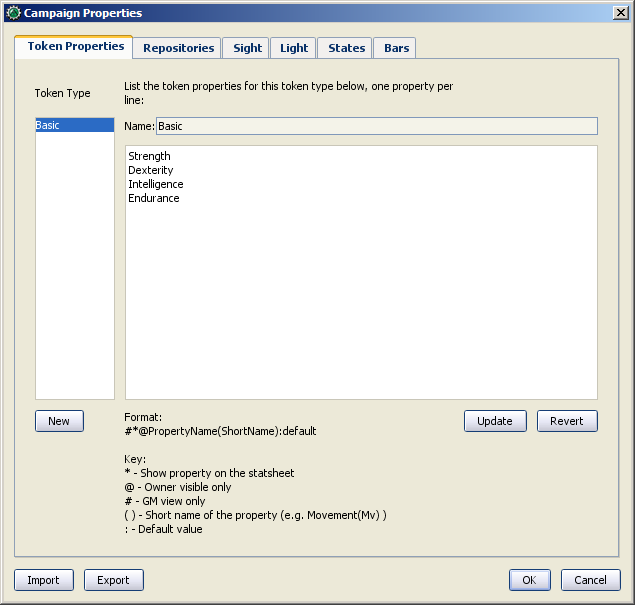
- Wähle im Menü Bearbeiten > Kampagneneigenschaften.... Auf der linken Seite unter Spielmarkentyp siehst den Eintrag "Basic".
- Wähle den Eintrag "Basic". Im Hauptfeld erscheinen nun eine ganze Reihe Eigenschaften mit allerlei Symbolen wie @, #, und so weiter.
- Markiere alle Eigenschaften und lösche sie aus dem Feld. Das Textfeld sollte nun komplett leer sein.
- Belasse das Feld Name wie es ist - MapTool braucht immer einen Eintrag "Basic", weshalb wir ihn nicht ändern dürfen.
- Im Feld für die Eigenschaften unter dem Namensfeld tragen wir nun die vier Hauptattribute des MTRPG ein, also:
Gut! Nun sollte dein Bildschirm ungefähr so aussehen wie der Screenshot "Die neuen Hauptattribute".Stärke
Geschick
Intelligenz
Ausdauer - Bist du mit den Eintragungen fertig, dann wähle die Schaltfläche Aktualisieren. Keine Angst, wenn jetzt alle Werte verschwinden! Sobald du wieder "Basic" wählst, sind sie wieder da.
- Wähle nun OK um die gemachten Änderungen zu bestätigen. Das Fenster "Kampagneneigenschaften" schließt sich.
- Gehe im Menü zu Datei > Speichere Kampagne unter... und speichere deine Kampagne unter dem Namen MTRPG.cmpgn. Du hast nun eine neues Kampagnendatei mit eigenen Kampagneneigenschaften erstellt.
Sobald die Eigenschaften aktualisiert wurden, haben nun alle Spielmarken auf der Karte diese Eigenschaften genauso, wie jede neue Spielmarke, die du auf die Karte ziehst. Das liegt daran, dass sie alle in den Spielmarkeneigenschaften den Typ "Basic" gewählt haben, da es ja bislang keinen anderen gab.
WICHTIG: Auch wenn Eigenschaften Leerzeichen haben können, sollte man sie vermeiden. Leerzeichen sind in Makros nur schwer zu verarbeiten und damit eine potentielle Fehlerquelle. Bei Eigenschaften wie "Hit Points" solltest du deshalb besser HitPoints ohne Leerzeichen schreiben.
Eigenschaften mit Standardwert
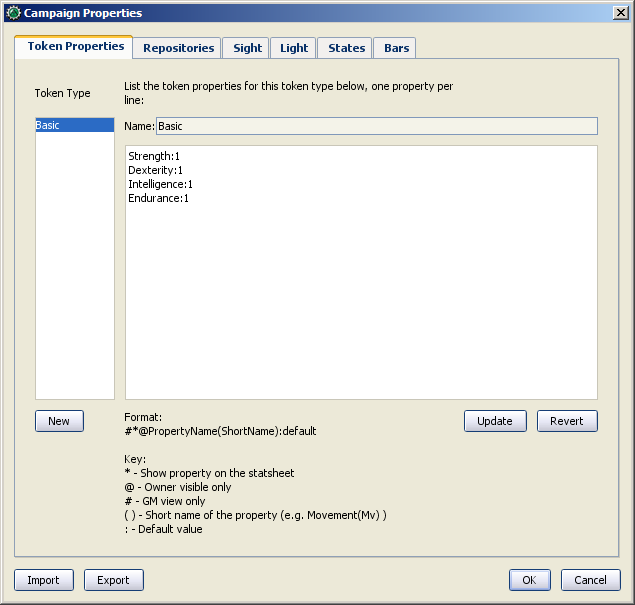
Wenn du deine Eigenschaften so einträgst wie wir es gerade getan haben, dann wirst du feststellen, dass eine neu erstellte Spielmarke zwar die Eigenschaften hat, diese aber keine zugeordneten Werte haben. Das bedeutet nicht, dass sie Null wären oder einen leeren Wert hätten; sie sind eigentlich gar nicht da, was beim Programmieren immer der schlechteste Fall ist.
In MTRPG ist der kleinste Wert, den unsere Hauptattribute haben können 1. Um gänzlich undefinierte Werte zu vermeiden macht es also Sinn, diesen Mindestwert jedem neuen Token zuzuweisen, den wir erstellen. Das geht so:
- Öffne die Kampagneneigenschaften (Bearbeiten > Kampagneneigenschaften...).
- Wähle den Spielmarkentyp Basic aus.
- Füge ans Ende jedes Hauptattributes ":1" (ohne Anführungszeichen) an. Dein Eintrag sollte dann so aussehen:
Stärke:1
Geschick:1
Intelligenz:1
Ausdauer:1 - Wähle wieder die Schaltfläche Aktualisieren.
Durch das Setzen eines Doppelpunktes und eines anschließenden Wertes teilst du MapTool mit, dass dieser Wert der Standardwert ist, der immer verwendet werden soll, wenn einer Spielmarke dieses Typs kein eigener Wert gegeben wurde.
Anmerkung: Auch ein Standardwert muss natürlich nicht zwingend eine Zahl sein. Hier kann ebensogut ein Symbol oder ein Test stehen.
Wenn du jetzt eine neue Spielmarke auf die Karte ziehst, siehst du in den Eigenschaften die nuen Eigenschaften und dass ihnen allen schon der Wert 1 zugeordnet ist. Keine Sorge: Hatte eine Spielmarke schon vorher einen zugeordneten Wert, so wird er nicht durch einen Standardwert überschrieben.
Eigenschaften im Werteblatt anzeigen
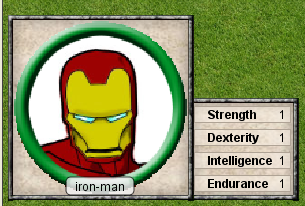
MapTool has a neat feature called the Statsheet, which is briefly mentioned in the Introduction to Tokens - basically, it is an automatic popup that appears in the lower left corner of the map, when you hover over a token.
You may be saying, "Wait...when I hover over my token, there's no statsheet! Where is it?" The reason you don't see it yet is that the Statsheet is governed by the Campaign Properties - it displays the token's properties (along with a larger version of the token's image) - but only when a couple requirements are met:
- The properties are set up to display on the statsheet; and
- The properties that are displayed actually have a value
Setting Properties to Display
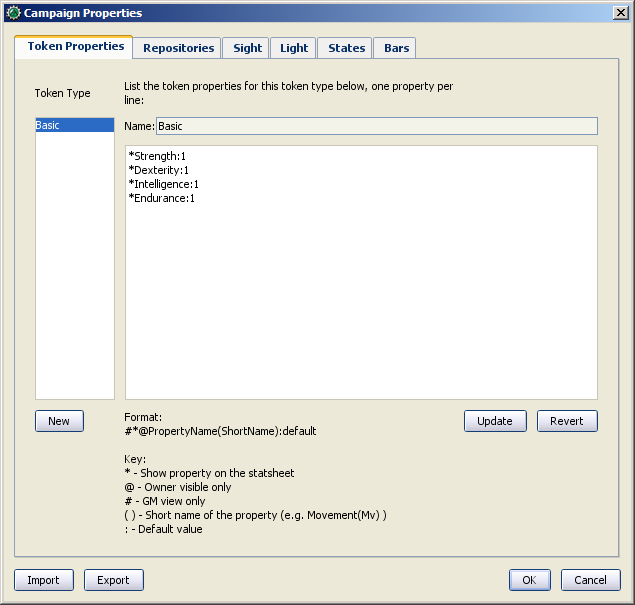
If you look at the bottom of the Token Properties tab in the Campaign Properties dialog, you'll see a key showing how to set up a property to display in the Statsheet. There are three display options, each of which is indicated by putting a symbol in front of the property name:
- *: an asterisk means "show this property on the statsheet"
- @: means "only show this property to the owner of the token (and the GM)"
- #: means "only show this property to the GM (not even the token owner can see it)"
The asterisk is required for any stat to display at all - if you don't have an asterisk first, it won't show no matter what else you put on there. The @ and # symbols, on the other hand, are optional.
So, for our new game, we're going to set all of the properties to be visible to everyone (by just using a star). To do this, open up your properties, and edit them to look like this:
*Strength:1
*Dexterity:1
*Intelligence:1
*Endurance:1
Now, when you hover over a token, you'll see the Statsheet pop up (see the screenshot, above) with the values in the Strength, Dexterity, Intelligence, and Endurance properties. Also, since even brand new tokens have a default value, the Statsheet will appear for all tokens.
Short Names
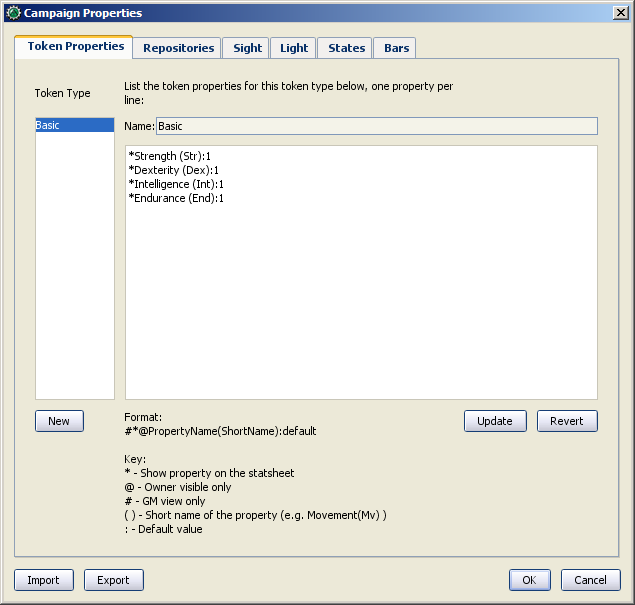
Sometimes, property names can get pretty long (or look unfriendly - no spaces, and all that). MapTool lets you put a Short Name in for each property. To do that, you just enter the short name in parentheses after the property name, like so:
*Strength(Str):1
*Dexterity(Dex):1
*Intelligence(Int):1
*Endurance(End):1
These short names are displayed in the Statsheet instead of the full name of the property. There is no limit on length of the Short Name but the purpose is to have a more presentable name on the Statsheet.
Short Names are for display purposes only - when referencing properties in macros, you must use the full property name.
Creating Derived Properties
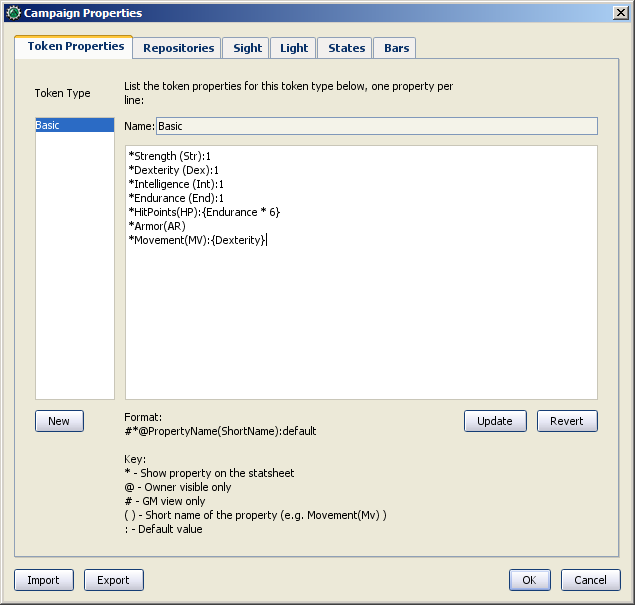
Okay, now let's do something pretty cool. In a lot of roleplaying games, there are character attributes that are derived from other stats - for instance, in the Savage Worlds rules, your "Parry" stat is based on your Fighting ability; likewise, in Dungeons & Dragons, your "Hit Points" are derived partly from your "Constitution" score.
Now, you could create these other derived attributes as separate properties and manually enter the values in when you make a new token - but how about we allow MapTool to calculate these derived values? That's right - MapTool's campaign properties can not only be numbers and text, but also calculations and equations based on other properties that the token has.
In MTRPG, there are three derived stats: Hit Points, Armor, and Movement. These stats have the short names "HP", "AR," and "MV." For this example, we're going to set up Hit Points and Movement to be calculated from existing properties. We'll leave Armor until later (it takes a bit more complex a calculation to figure out the armor value, and we're taking it slow).
First, we need to add properties for these three derived values:
1. Open up the Basic property set.
2. Beneath Endurance, enter the following:
*HitPoints(HP)
*Armor(AR)
*Movement(MV)
You'll notice at this point, we've set no default values. Don't hit Update just yet - let's enter some macro code to create a derived value.
We can see from the MTRPG rules that Hit Points is equal to the value of Endurance multiplied by 6. Replicating this calculation in the campaign properties is very simple. Edit the Hit Points property to read:
*HitPoints(HP):{Endurance * 6}
What we've done here is enter a default value for the property (remember, default values are whatever comes after the colon), and used some macro code to instruct MapTool to perform a calculation in order to find the value for the properties. Two thing are happening here:
- We've enclosed the calculations in { }, which warns MapTool that the text enclosed inside the brackets is to be handled like a macro, and not just plain text
- Inside the brackets, we've said, "Find the value of the Endurance property, multiply it by 6, and make that result the value of the Hit Points property"
Now, to handle the Movement attribute, our job is even simpler: we need to instruct MapTool to get the value of the Dexterity property, and assign that same value to the Movement property. To do so, edit the Movement property to read:
*Movement(MV):{Dexterity}
When you are finished, your full property set should look like:
*Strength:1
*Dexterity:1
*Intelligence:1
*Endurance:1
*HitPoints(HP):{Endurance * 6}
*Armor(AR)
*Movement(MV):{Dexterity}
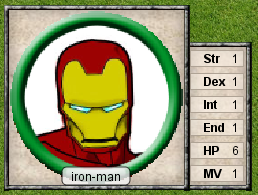
And when you hover your mouse over a token, the Statsheet should look like the screenshot to the right. Remember, even though we've said that Armor should be displayed on the statsheet, the statsheet only shows properties that have a value - Armor is still empty, so it won't show up until you give it a value.
Saving Your Campaign
At this point, you've created a bunch of campaign properties, placed a token on the map, and messed around with manipulation of the properties you made. You should probably save your work in a Campaign file. This will save the tokens, properties you created, and all the information you put into the campaign so far.
Also, this will let you work on the campaign further, trying tricks from the other MapTool tutorials.
To save your campaign:
- Go to File -> Save Campaign As...
- In the dialog, enter a file name. Something like MTRPG.cmpgn is good!
- Click OK
Your campaign will now be saved, and you can open it up whenever you feel like it, and work on it some more!
Please note that campaigns saved in one version of MapTool will not open properly in an older version of MapTool; however most campaign files created in an older version can be opened in the newest version (this isn't guaranteed, though...MapTool is evolving at all times!)
Some Technical Details
A couple of times in this guide and in other guides the token properties have been described as "those properties that are visible" in this campaign, or the properties set up "for this campaign." There's a reason for phrasing it like this.
See, a token - if you cut one open and looked at its inner workings - is an XML file that contains a ton of information. It has information about its image, its size, its vision, light, shape, and - of course - its properties. What's important to understand here is that the token will remember not only the properties from the MTRPG, but if it was ever saved as an .rptok file or brought in from another campaign file, it will remember the properties from that campaign too. They won't be visible, but they're stored in the token even so.
So, in reality, a set of Campaign Properties really indicates those properties that:
- You can see if you open up a token by double-clicking on it, and
- You can directly edit by clicking in the cell next to them
This may sound like a recipe for disaster - what if you set up a property that was already set up but is hidden? Fortunately, MapTool will not, when running a macro, attempt to access any hidden properties unless you specifically instruct it to do so, using two special macro functions. So rest assured, you cannot accidentally access a property that's not set up in the Campaign Properties.
In summary, if a Property Type (such as the default Basic property type) has a property named HP, it will be stored in the token under the XML name HP. If another property type (such as a user-defined Pathfinder property type) also has a property named HP, they will both be referencing the same data on the token. Modifying the value of HP when the token is Basic and then changing the token Pathfinder will show the same value for HP.
Moving On from Here
MapTool supports very elaborate properties and derived properties, with a number of math functions and operations. A couple of the most common ones you might want to use are (the examples are not necessarily part of MTRPG; they're just examples):
- Basic math operators: addition (+), subtraction (-), multiplication (*), and division (/)
- Example: HitPoints: {Endurance * 6}
- Rounding: there are some functions to let you round numbers when you divide
- Floor: the floor() function rounds down. Example: HitPoints:{floor(Constitution / 2)} would divide Constitution by two, and round down
- Ceiling: the ceil() function works like floor(), but rounds up. Example: HitPoints:{ceil(Constitution/2)}
You can execute macros from properties. However, if there is an error, then it is possible to get into a sort of "infinite loop", so be sure to save frequently if you're going to try that approach. You might want to have a macro that is called from the property definition. That lets you test the macro without using the property and thus avoid the above infinite loop. When it has been tested thoroughly, then you can invoke it from the property.