Introduction to Lights and Sights/de: Difference between revisions
(some more translation) |
(more translations - TODO: screenshots and translated cmpgn-file highlighting) |
||
| Line 1: | Line 1: | ||
{{Languages|Introduction to Lights and Sights}} | {{Languages|Introduction to Lights and Sights}} | ||
[[Category:MapTool]][[Category:Tutorial]]{{Beginner}} | [[Category:MapTool]][[Category:Tutorial]]{{Beginner}} | ||
= | =Sicht und Licht?= | ||
Ein Charakter ist in seinem Umfeld (Dungeon, Gebäude, Wald) in seiner Wahrnehmung eingeschränkt. Am Eingang eines Verlieses weiß die Figur nicht, wie der Grundriss aussieht, geschweige denn, was sich darin verbirgt. Am Spieltisch ist das schwer zu simulieren, am Rechner kann es aber sogar für jeden einzelnen Spieler an seinem PC dargestellt werden. MapTool bietet dafür drei Funktionen an, die dem Spieler ein "realistisches" und eindringliches Bild seiner Umgebung zu geben. Wir sprechen hier von der '''Sicht''' des Spielers, den '''Licht'''-Verhältnissen und dem '''Kriegsnebel'''. | Ein Charakter ist in seinem Umfeld (Dungeon, Gebäude, Wald) in seiner Wahrnehmung eingeschränkt. Am Eingang eines Verlieses weiß die Figur nicht, wie der Grundriss aussieht, geschweige denn, was sich darin verbirgt. Am Spieltisch ist das schwer zu simulieren, am Rechner kann es aber sogar für jeden einzelnen Spieler an seinem PC dargestellt werden. MapTool bietet dafür drei Funktionen an, die dem Spieler ein "realistisches" und eindringliches Bild seiner Umgebung zu geben. Wir sprechen hier von der '''Sicht''' des Spielers, den '''Licht'''-Verhältnissen und dem '''Kriegsnebel'''. | ||
| Line 9: | Line 9: | ||
Sicht ist die Fähigkeit, seine Umgebung visuell wahrzunehmen, also nicht blind zu sein. Darüber hinaus beschreibt Sicht auch, wie eine Figur sehen kann. Häufig gibt es in Fantasy-Settings oder in der SF z.B. Nachtsicht - durch Wände sehen dagegen ist eher selten. Auch die Entfernung stellt eine Beschränkung dar, die vom Charakter abhängt: ist er kurzsichtig oder hat er Adleraugen? | Sicht ist die Fähigkeit, seine Umgebung visuell wahrzunehmen, also nicht blind zu sein. Darüber hinaus beschreibt Sicht auch, wie eine Figur sehen kann. Häufig gibt es in Fantasy-Settings oder in der SF z.B. Nachtsicht - durch Wände sehen dagegen ist eher selten. Auch die Entfernung stellt eine Beschränkung dar, die vom Charakter abhängt: ist er kurzsichtig oder hat er Adleraugen? | ||
Neben den Eigenschaften des Charakters wird die Sicht auch von Bedingungen bestimmt, die nicht direkt mit dem Charakter verbunden sind: | Neben den Eigenschaften des Charakters wird die Sicht auch von Bedingungen bestimmt, die nicht direkt mit dem Charakter verbunden sind: | ||
* [[Introduction to Vision Blocking| | * [[Introduction to Vision Blocking|Sichthindernisse]]: Mauern, Bäume, andere Figuren, das Wetter und viele andere Dinge behindern die Wahrnehmung der eigenen Umgebung. | ||
* Licht: Ob es hier um Tageslicht, natürliche Lichtquellen oder magische Auren geht, um Infrarot strahlende Heizöfen oder einfach nur eine Fackel; ob das Licht einfach da ist, an eine Wand oder Decke montiert ist oder von einem Charakter herum getragen wird: Die Szene kann sich stark verändern, einfach nur wegen geänderter Lichtverhältnisse. ("OHH, ich glaub meine Fackel..." "Wer hat das gesagt?"). | * Licht: Ob es hier um Tageslicht, natürliche Lichtquellen oder magische Auren geht, um Infrarot strahlende Heizöfen oder einfach nur eine Fackel; ob das Licht einfach da ist, an eine Wand oder Decke montiert ist oder von einem Charakter herum getragen wird: Die Szene kann sich stark verändern, einfach nur wegen geänderter Lichtverhältnisse. ("OHH, ich glaub meine Fackel..." "Wer hat das gesagt?"). | ||
* Kriegsnebel: Ein (meist) schwarzer Schleier, der noch nicht erkundete oder nicht mehr sichtbare Bereiche verdeckt. | * Kriegsnebel: Ein (meist) schwarzer Schleier, der noch nicht erkundete oder nicht mehr sichtbare Bereiche verdeckt. | ||
| Line 26: | Line 26: | ||
Wenn eine Spielfigur einen Bereich zum ersten Mal sieht, der im völligen Kriegsnebel ("harter Nebel") lag, dann verschwindet der Nebel. Gerät dieser Bereich wieder außer Sicht, dann kehrt der Kriegsnebel dort als halbtransparenter, grauer Schleier ("weicher Nebel") zurück. So ist zu erkennen, dass die Spielfigur hier schon einmal war, aktuell aber nicht sieht, was hier vorgeht. Alle Spieler und Kreaturen, die dort unterwegs sind, sind in dem grauen Schleier verborgen. | Wenn eine Spielfigur einen Bereich zum ersten Mal sieht, der im völligen Kriegsnebel ("harter Nebel") lag, dann verschwindet der Nebel. Gerät dieser Bereich wieder außer Sicht, dann kehrt der Kriegsnebel dort als halbtransparenter, grauer Schleier ("weicher Nebel") zurück. So ist zu erkennen, dass die Spielfigur hier schon einmal war, aktuell aber nicht sieht, was hier vorgeht. Alle Spieler und Kreaturen, die dort unterwegs sind, sind in dem grauen Schleier verborgen. | ||
<p align="center">'''Beachte''': ''Kriegsnebel | <p align="center">'''Beachte''': ''Kriegsnebel zeigt an, welche Bereiche einer Karte der Spieler sieht oder schon gesehen hat.''</p> | ||
Kriegsnebel ist ein ausreichend kompliziertes Thema, um seinen eigenen Artikel zu verdienen, auch wenn er eng mit Licht und Sicht verbunden ist. In diesem [[Fog of War|Artikel über den Kriegsnebel]] findest du weitere Details und Hinweise zur Verwendung des Kriegsnebels in deinem Spiel. | Kriegsnebel ist ein ausreichend kompliziertes Thema, um seinen eigenen Artikel zu verdienen, auch wenn er eng mit Licht und Sicht verbunden ist. In diesem [[Fog of War|Artikel über den Kriegsnebel]] findest du weitere Details und Hinweise zur Verwendung des Kriegsnebels in deinem Spiel. | ||
| Line 32: | Line 32: | ||
=Das Beispiel-Verlies= | =Das Beispiel-Verlies= | ||
[[Image:Samp-dungeon.png|thumb| | [[Image:Samp-dungeon.png|thumb|Unser Beispiel-Verlies]] | ||
Das Thema "Licht und Sicht" soll im Folgenden an dem rechts abgebildeten Verlies dargestellt werden. Da unser Thema sehr eng mit [[Introduction to Vision Blocking|Sichthindernissen]] zusammen hängt, wird es auch dort verwendet. Um die unten dargestellten Zusammenhänge besser nachzustellen, kannst du dir die Karte auch in einer [[https://mtwiki.hyperbooks.com/repo/SampleDungeon.cmpgn Kampagnen-Datei]] herunterladen. Grundsätzlich verstehen wir Dinge besser, wenn wir sie selbst ausprobieren. | |||
= | =Sichttypen und Lichtquellen konfigurieren= | ||
Sowohl Sichttypen als auch Lichtquellen werden im Kampagnen-Dialog konfiguriert. Hier gibt es je einen eigenen Reiter für die beiden Themen. Das findest du über das Menü '''Bearbeiten > Kampagneneigenschaften...''' | |||
== | ==Sichttypen== | ||
[[Image:Cprops-sighttab.png|thumb| | [[Image:Cprops-sighttab.png|thumb|Der Reiter Sicht im Kampagnen-Dialog]] | ||
Im Reiter Sicht kannst du verschiedene Sichttypen anlegen, wie etwa "Normal"(e Sicht), "Dämmerung", "Nachtsicht", "Infrarot", "Ultraschall" oder ws du sonst noch für sinnvoll hältst. MapTool bringt beim ersten Öffnen des Programms bereits einige Standard-Sichttypen mit. Auf dem Reiter Sicht findest du deshalb folgende Einträge vor: | |||
Conic Vision: cone arc=120 | Conic Vision: cone arc=120 | ||
| Line 53: | Line 53: | ||
Normal: circle | Normal: circle | ||
Jede dieser Zeilen definiert einen '''Sichttyp'''. Zur Beschreibung eines Sichttyps ist eine bestimmte Struktur bei den Angaben einzuhalten: | |||
{{code:Normal: circle}} | |||
This simply says that "normal sight is circular." There is no limit to the range except the vision distance set on the ''Map itself'', which defaults to 1,000 units. You can set e.g. distance=10 to limit the sight, this can reflect a thick fog for example where the players wade through. | Diese einfache ngabe This simply says that "normal sight is circular." There is no limit to the range except the vision distance set on the ''Map itself'', which defaults to 1,000 units. You can set e.g. distance=10 to limit the sight, this can reflect a thick fog for example where the players wade through. | ||
A more complex entry is the one for "Lowlight" sight: | A more complex entry is the one for "Lowlight" sight: | ||
Revision as of 11:17, 28 July 2023
BEGINNER
THIS IS A BEGINNER ARTICLE
Sicht und Licht?
Ein Charakter ist in seinem Umfeld (Dungeon, Gebäude, Wald) in seiner Wahrnehmung eingeschränkt. Am Eingang eines Verlieses weiß die Figur nicht, wie der Grundriss aussieht, geschweige denn, was sich darin verbirgt. Am Spieltisch ist das schwer zu simulieren, am Rechner kann es aber sogar für jeden einzelnen Spieler an seinem PC dargestellt werden. MapTool bietet dafür drei Funktionen an, die dem Spieler ein "realistisches" und eindringliches Bild seiner Umgebung zu geben. Wir sprechen hier von der Sicht des Spielers, den Licht-Verhältnissen und dem Kriegsnebel.
Sicht
Sicht ist die Fähigkeit, seine Umgebung visuell wahrzunehmen, also nicht blind zu sein. Darüber hinaus beschreibt Sicht auch, wie eine Figur sehen kann. Häufig gibt es in Fantasy-Settings oder in der SF z.B. Nachtsicht - durch Wände sehen dagegen ist eher selten. Auch die Entfernung stellt eine Beschränkung dar, die vom Charakter abhängt: ist er kurzsichtig oder hat er Adleraugen? Neben den Eigenschaften des Charakters wird die Sicht auch von Bedingungen bestimmt, die nicht direkt mit dem Charakter verbunden sind:
- Sichthindernisse: Mauern, Bäume, andere Figuren, das Wetter und viele andere Dinge behindern die Wahrnehmung der eigenen Umgebung.
- Licht: Ob es hier um Tageslicht, natürliche Lichtquellen oder magische Auren geht, um Infrarot strahlende Heizöfen oder einfach nur eine Fackel; ob das Licht einfach da ist, an eine Wand oder Decke montiert ist oder von einem Charakter herum getragen wird: Die Szene kann sich stark verändern, einfach nur wegen geänderter Lichtverhältnisse. ("OHH, ich glaub meine Fackel..." "Wer hat das gesagt?").
- Kriegsnebel: Ein (meist) schwarzer Schleier, der noch nicht erkundete oder nicht mehr sichtbare Bereiche verdeckt.
Je realistischer dies dargestellt werden kann, desto eindrücklicher ist die Szene und umso einfacher kann der Spieler darauf reagieren.
Licht
Licht beschreibt die Fähigkeit voon Spielmarken oder Objekten, ihre Umgebung zu erhellen, also sichtbar zu machen. Fackeln können so kleine Bereiche in einem Verlies sichtbar machen und dort den Kriegsnebel vertreiben. Vorausgesetzt, dass der Charakter sehen kann, werden durch den Lichtschein der Fackeln die Form der Räume und die Dinge um ihn herum sichtbar, soweit nicht nicht Hindernisse den Blick versperren.
Licht ist also sehr wichtig, wenn eine Karte im Nacht-Modus ist, da der Charakter sonst im Stockdunklen steht und die Hand vor Augen nicht sieht.
Kriegsnebel
Kriegsnebel verwehrt den Blick auf Bereiche, in denen der Charakter noch nicht war (kompett verdeckt) und verschleiert die Bereiche, die er nicht mehr sieht (grau überlagert). Der Kriegsnebel sollte nicht mit Schatten oder Dunkelheit verwechselt werden. Kriegsnebel kann auch auf einer Karte vorkommen, die im Tageslicht liegt (Tages-Modus) oder bei der keine Sichteinstellung gewählt ist.
Wenn eine Spielfigur einen Bereich zum ersten Mal sieht, der im völligen Kriegsnebel ("harter Nebel") lag, dann verschwindet der Nebel. Gerät dieser Bereich wieder außer Sicht, dann kehrt der Kriegsnebel dort als halbtransparenter, grauer Schleier ("weicher Nebel") zurück. So ist zu erkennen, dass die Spielfigur hier schon einmal war, aktuell aber nicht sieht, was hier vorgeht. Alle Spieler und Kreaturen, die dort unterwegs sind, sind in dem grauen Schleier verborgen.
Beachte: Kriegsnebel zeigt an, welche Bereiche einer Karte der Spieler sieht oder schon gesehen hat.
Kriegsnebel ist ein ausreichend kompliziertes Thema, um seinen eigenen Artikel zu verdienen, auch wenn er eng mit Licht und Sicht verbunden ist. In diesem Artikel über den Kriegsnebel findest du weitere Details und Hinweise zur Verwendung des Kriegsnebels in deinem Spiel.
Das Beispiel-Verlies
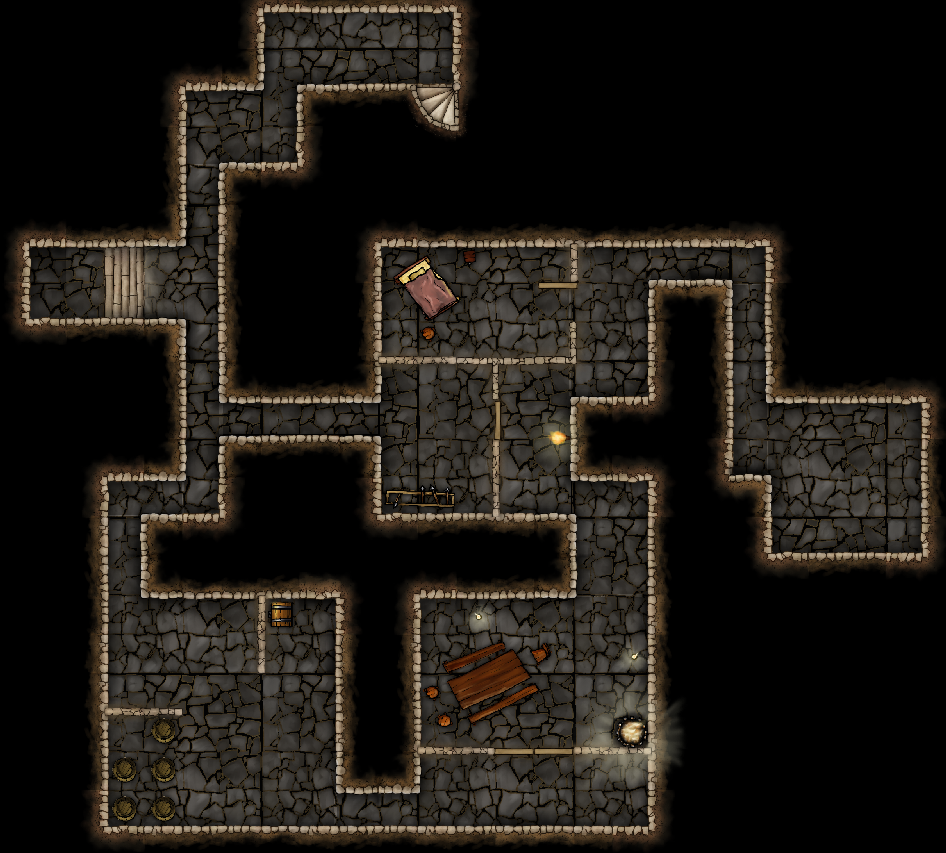
Das Thema "Licht und Sicht" soll im Folgenden an dem rechts abgebildeten Verlies dargestellt werden. Da unser Thema sehr eng mit Sichthindernissen zusammen hängt, wird es auch dort verwendet. Um die unten dargestellten Zusammenhänge besser nachzustellen, kannst du dir die Karte auch in einer [Kampagnen-Datei] herunterladen. Grundsätzlich verstehen wir Dinge besser, wenn wir sie selbst ausprobieren.
Sichttypen und Lichtquellen konfigurieren
Sowohl Sichttypen als auch Lichtquellen werden im Kampagnen-Dialog konfiguriert. Hier gibt es je einen eigenen Reiter für die beiden Themen. Das findest du über das Menü Bearbeiten > Kampagneneigenschaften...
Sichttypen
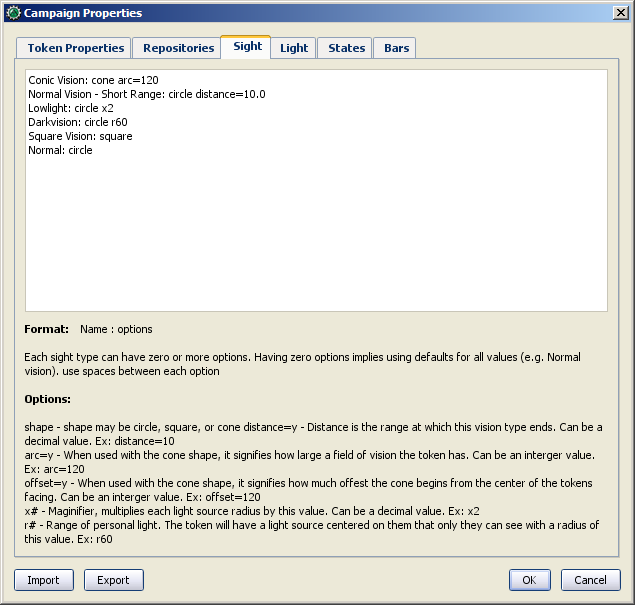
Im Reiter Sicht kannst du verschiedene Sichttypen anlegen, wie etwa "Normal"(e Sicht), "Dämmerung", "Nachtsicht", "Infrarot", "Ultraschall" oder ws du sonst noch für sinnvoll hältst. MapTool bringt beim ersten Öffnen des Programms bereits einige Standard-Sichttypen mit. Auf dem Reiter Sicht findest du deshalb folgende Einträge vor:
Conic Vision: cone arc=120
Normal Vision - Short Range: circle distance=10.0
Lowlight: circle x2
Darkvision: circle r60
Square Vision: square
Normal: circle
Jede dieser Zeilen definiert einen Sichttyp. Zur Beschreibung eines Sichttyps ist eine bestimmte Struktur bei den Angaben einzuhalten:
Diese einfache ngabe This simply says that "normal sight is circular." There is no limit to the range except the vision distance set on the Map itself, which defaults to 1,000 units. You can set e.g. distance=10 to limit the sight, this can reflect a thick fog for example where the players wade through.
A more complex entry is the one for "Lowlight" sight:
Lowlight: circle x2
In this case, the vision name is Lowlight, and the shape is circular. However, an additional option was added on the end - x2. This is an option that interacts with light sources, multiplying their effective radius by 2 for any token that has the Lowlight vision. So where a token with Normal vision might see 20 units when using a torch, a token with Lowlight vision can see 40 units.
Looking at an even more complex entry, consider the one for "Darkvision":
Darkvision: circle r60
In this entry, there are four components.
- Darkvision: this is, of course, the name of the Sight Type (you could call it "Thermographic Vision" if you like). This name appears in the token configuration dialog when you want to activate token sight.
- circle: this signifies the shape of the visual area, in this case, indicating that the visual area is circular; we've seen this before.
- r: this is a code that signifies that this sight type has a "personal" light source - in other words, it is effectively a light source only that token can see. This is what makes this "darkvision," for instance - the token can see just fine in the dark, but that token's allies might be completely blind.
- 60: this is the range of the sight type, starting from the center of the token's square, and counted in "map units" (so if your map is 5 units per cell, this will cover 12 map cells; if your map is 1 unit per square, this will cover 60 squares). Note that since range is measured from the center of the square or hex, many users add a fractional amount to the range so that the end of the range lines up nicely with a hex or square boundary.
Tip:you can use r0.5 in normal vision, this way when you turn on night mode, players that do not have a light source can at least still see there own token. This setting could look like: "Normal: circle r0.5", adding limited vision in the mix, this would become: "Normal Vision - Short Range: circle r0.5 distance=10.0 "
Configuring sight types is unique to the game being played, and so the specifics of it need to be left to the campaign designer. However, suffice it to say that Sight is a configurable option and offers a great deal of flexibility.
New in version 1.8, you can also add a lumens value for these "personal" light sources, creating sight types like:
Enhanced Darkvision: circle r60 lumens=120
Setting a lumens value will customize the light sources with negative lumens that this sight type can overcome. Tokens with the sight type in this example will see into any (anti-)light source with a lumens between -1 and -119. The default lumens value for personal light sources remains 100. See the #Lumens section under Light Sources for more details.
Sight Type Limitations
Flexible as it is, there are a few limitations on Token Sight.
- One sight type at a time: tokens can only have one kind of sight active at a time (a token cannot have Darkvision and Normal sight active simultaneously)
- Sight has no color: sight types do not have colors of their own. Any color visible to the players will be based on the color of the light source, not the sight type. There are two exceptions to this limitation.
- In MapTool Preferences, you can opt to have the vision color of the token match its Halo color.
- Personal light sources can be defined within a sight type, and can have a color which will illuminate fog and show color only for that token.
Light Sources
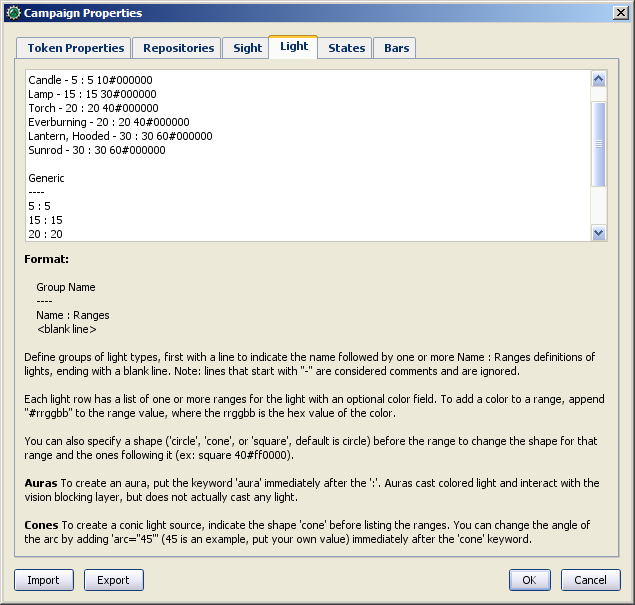
The Light tab provides an interface very similar to the Sight tab - a text window with a number of different items defined as a simple string of text. The default MapTool campaign properties show the following light sources:
D20
----
Candle - 5 : 5 10#000000
Lamp - 15 : 15 30#000000
Torch - 20 : 20 40#000000
Everburning - 20 : 20 40#000000
Lantern, Hooded - 30 : 30 60#000000
Sunrod - 30 : 30 60#000000
Generic
----
5 : 5
15 : 15
20 : 20
30 : 30
40 : 40
60 : 60
Groups
In the above default lights, there are two groups: D20 and Generic. A group is defined by typing its name, and placing beneath it four hyphens in a row: ----. Groups appear in the right-click menu on a token, and are basically a way for you, as GM, to organize the different light sources in your game.
Aura is not included by default and must be added manually.
Light Source Syntax
Beneath each group header are a list of light sources. The syntax for these is very similar to the syntax for Sight Types, with a couple of exceptions. Let's look at the entry for Sunrod:
Sunrod - 30: 30 60#000000
There are three elements shown here:
- Sunrod - 30: the name of the light source; this is what appears in the right-click menu on a token, under the appropriate Light Source group
- 30: this is a light source radius of 30 units; the "first" radius of the light
- 60#000000: this is a second radius to the light, and a hexadecimal color code.
- Light Source Radii: A light source can have one or more radii, each of which can be set to a different color. In the sunrod example, the first radius has no color (or rather, it has the default color of white, which means that the area it covers is completely illuminated). The second radius (60) has the color #000000, which, when rendered by MapTool, makes a "dim light" area (translucent gray) from 30 units to 60 units. The overall effect is that from the center of the light source out to 30 units, the light is "bright," and everything is fully illuminated. From 30 units to 60 units, the light is a bit darker, and items in that area are less brightly lit.
One element is left out here, which is the light source shape. Like Sight Types, light sources can have shapes. The default shape is circular, and so if you do not specify a shape, the light source will default to circle-shaped. The other shapes are:
- Cone: create a conic area with a user-defined arc. This projects the light along the current facing of the token.
- Arc=x (optional after cone): Defines the angle the cone covers. Defaults to 90 degrees.
- Offset=x (optional after cone): Rotates the center of the cone x degrees counter-clockwise from the 'facing' direction. Defaults to 0 degrees.
- Square: this creates a square light area
- Grid: this creates a light area that extends to fill the map's grid (if any). This follows diagonal movement rules, but ignores terrain modifiers.
- Note: 'Grid' lights and sights begin at the edge of a medium or smaller token, much like the
scalekeyword does for other shapes. However, thescaleoption doesn't actually work with grid shaped lights and sights. You may have to experiment to get grid lights and sights working with larger token sizes.
- Note: 'Grid' lights and sights begin at the edge of a medium or smaller token, much like the
- Aura: this is a special light source, because while it is blocked by VBL and can cast colored light, it does not actually illuminate anything (therefore, an aura will not reveal hidden areas to a player, but it does act as a way to see how far from a token its aura extends).
Lumens
Light sources can also be configured with a lumens value. This optional setting allows for the creation of "darkness sources" and lights that will overcome them. For example:
Darkness: 15 lumens=-100
Daylight: 60 120#000000 lumens=150
When lumens is set to a negative number, the light source will instead act as darkness and subtract its area from the Fog of War. Lights are processed in order of their absolute value of lumens, so the Darkness (anti-)light source in this example will cover any light with lumens <= 100 (including all of the light sources from earlier examples using the default lumens of 0), but the Daylight source with its 150 lumens will overcome the Darkness.
Personal Lights defined in the Sight types have a default lumens value of 100, so a typical sight defined for Darkvision will see through any (anti-)light sources with a lumens value between -1 and -99. To overcome Darkvision, use a lumens value <= -100.
Note: Light sources with negative lumens do NOT act as Vision Blocking, but only subtract their covered range out of any visible area. This means that a token with sufficient sight range will be able to see around an area of Darkness in a way that users may not expect.
Giving Tokens and Objects Sight and Light
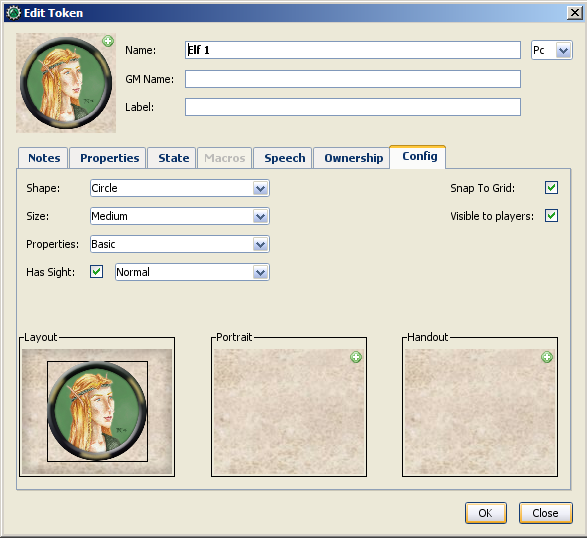
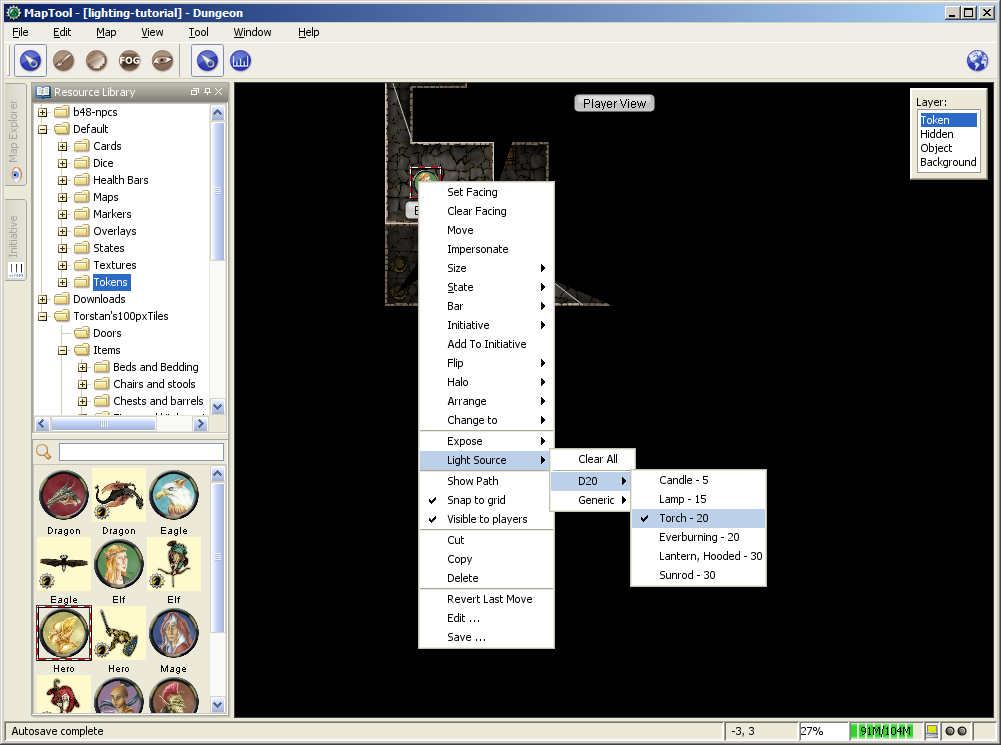
To give a token Sight and Light, do the following:
- Double-click on the token and go to the Config tab. There, check the Has Sight box, and select the appropriate sight type. Remember that a token can only have one type of sight active at a time.
- Click OK to save the sight settings.
- Right-click on the token, and go to Light Source. Navigate through the submenus until you can select a specific light source. The token now has a light source.
Vision Modes
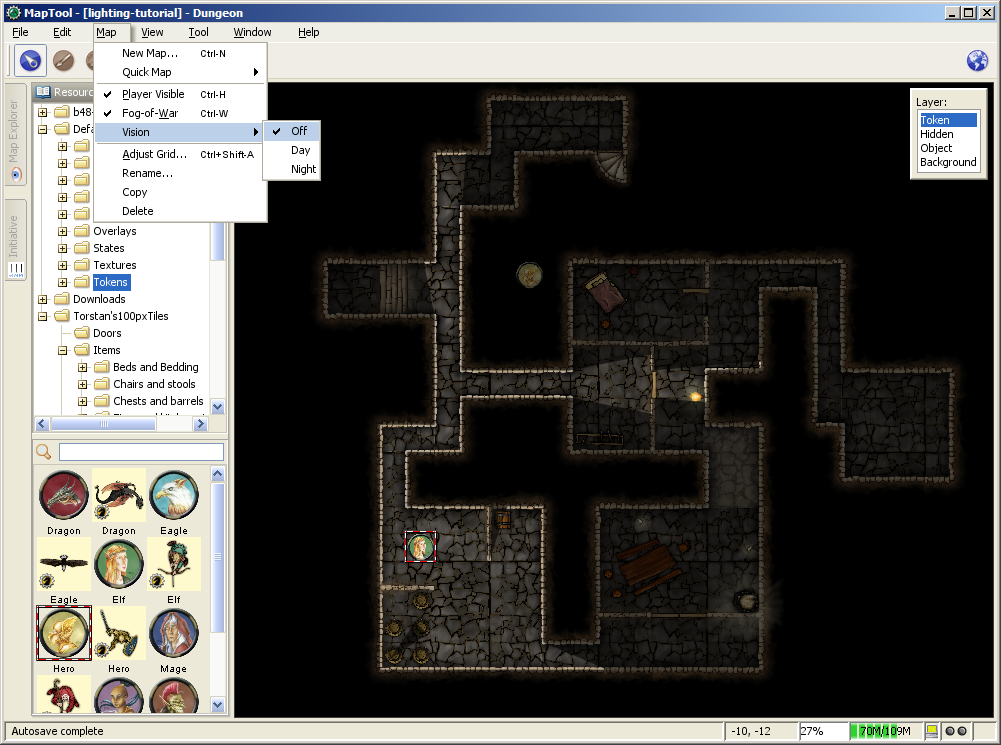
Recent builds of MapTool introduced the concept of Vision Modes, which let the GM dictate how vision and light will affect a given map. There are three Vision Modes: Off, Day, and Night, each of which alters the way in which light and vision interact for a token.
In the following discussion of vision modes, what is visible to the player as they move their token is based on what is visible to the token itself. Thus, if, under the proper settings, an enemy token is visible to the player's token, the player will see it on the Map. However, if that enemy token is not visible to the player's token, it will not appear on the player's instance of MapTool.
Off
When Map Vision is set to "Off," Token vision settings are not taken into account when displaying information to players: all things are visible at all times, unless hidden beneath Fog of War.
Day
In Day mode, light sources are not considered when evaluating token vision and what lies inside the tokens visual range. Furthermore, no part of the map is hidden from the players (that is, they will see the entire map - not necessarily all the tokens on a map, but they will see the layout of the entire dungeon, building, or area). Effectively, the Day mode assumes that a bright sun is shining down on everything, illuminating it all, and everything is visible unless blocked by VBL or covered by Fog of War.
Night
This mode incorporates Light Sources into the calculations, effectively assuming that it is "night" in the game, and that without a light source, the tokens are in a pitch-black environment and can see nothing. If Fog of War is used with Night Mode, light sources will reveal areas covered by Fog of War, assuming a token can see the light source and the area is not blocked by VBL.
Vision Modes and Fog of War
You can use Fog of War with any of the Vision modes: Off, Day, or Night.
- When Map Vision is Off, Fog is removed to the extent of the token's sight (set using the Token Properties dialog). Soft Fog does not appear when using Off Mode, as tokens do not actually "see" anything in this mode. VBL works normally.
- In Day Mode, the Fog will be removed out to the limit of the token's visual range (which, if you note when you create a map, defaults to 1,000 units), and token vision is blocked by VBL. In this mode, Fog of War has both Hard and Soft Fog, as token vision is active.
- In Night Mode, Fog of War (when removed) is cleared to the maximum radius of a token's light source (remember, though - the token must a) have sight, and b) have a light source - without a light source, the token can't see at all!). Thus, when using Fog of War and Night mode for vision, the fog will be removed only where the light source illuminates it. Soft Fog works in this mode just as it works in Day mode.
Using Sight and Light in a Game
Sight, Light, and Fog interact in a number of ways in-play. To start, let's look at using Sight without Light or Fog of War. The examples below will use the sample dungeon shown to the right. Note that the sample dungeon uses Vision Blocking, a feature of MapTool that blocks the line of sight of a token (meaning you can use it to indicate the placement of walls, pillars, and similar objects that would obstruct a character's vision).
Vision Range
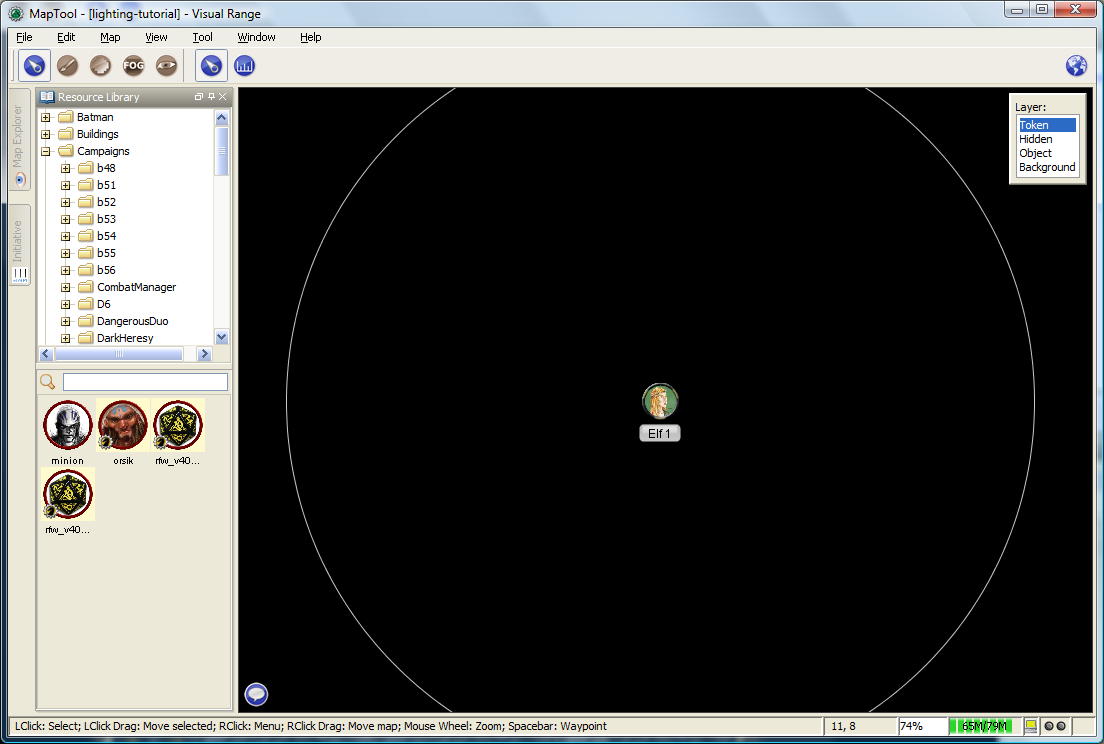
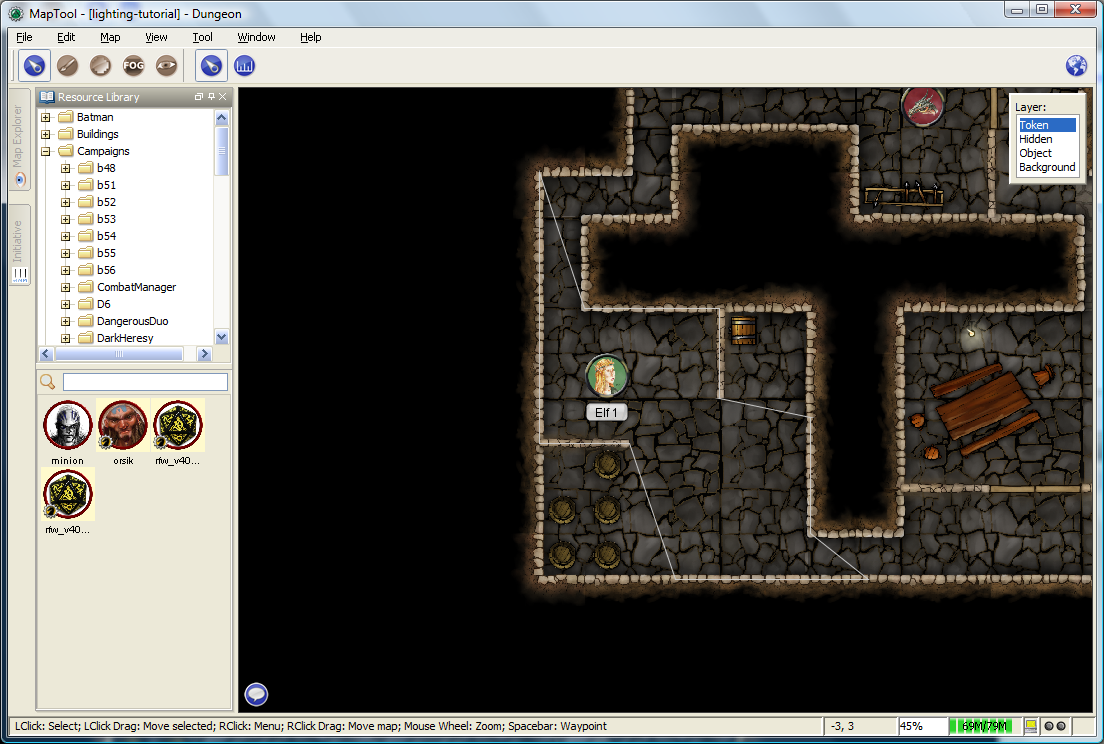
When you configure a token to have sight, if you hover your mouse over the token then MapTool will illustrate the limit of the token's visual range with a white border (a circle if the sight type is circular, or square if square, or a cone if it's cone shaped, etc.). The screenshot to the right shows a PC token with the sight type "Normal - Short Range" configured. Note the white circle indicating the boundary of the token's vision.
In the first screenshot to the right, there is no VBL on the map, so the token's visual range is unaffected. For a more practical illustration of the "line of sight" boundary, consider the second screenshot, taken using the same token, but on the dungeon map, which employs VBL along the the walls of the dungeon. If you look closely, you'll see the white boundary - however, instead of being circular, it is blocked in certain areas by the VBL of the map, and thus has an irregular shape.
Vision Modes and Sight
As mentioned above, there are three vision modes - Off, Day, and Night. Each setting affects how token vision is evaluated by MapTool.
Sight when Vision is "Off"
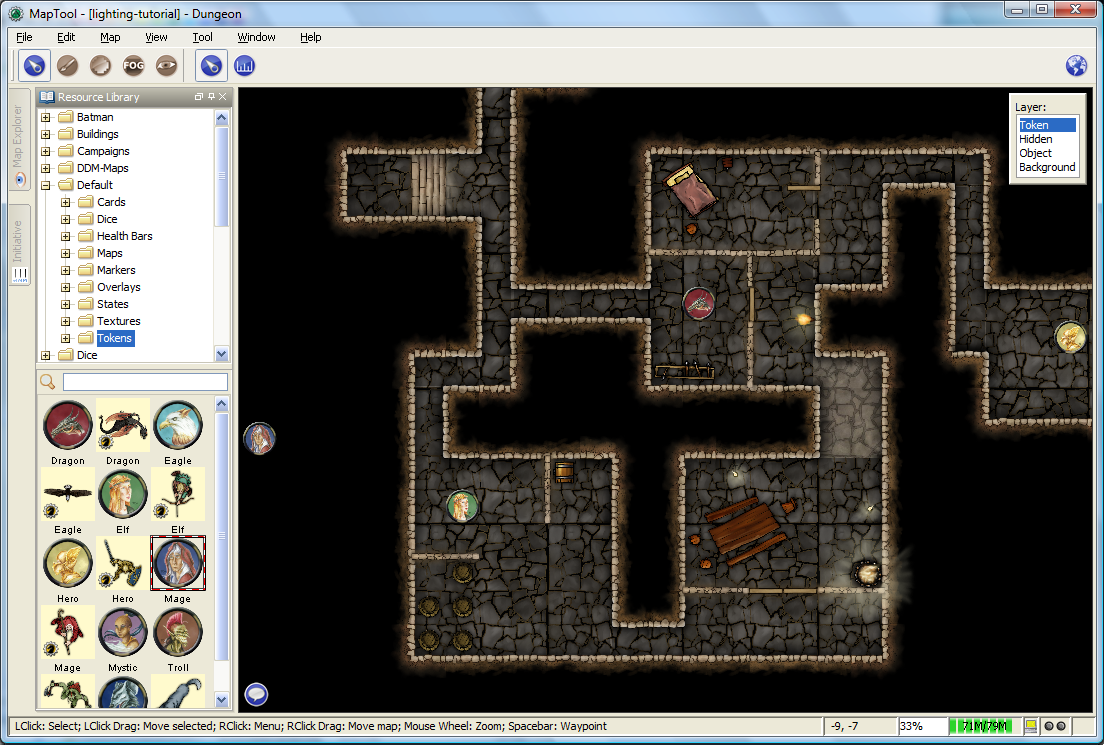
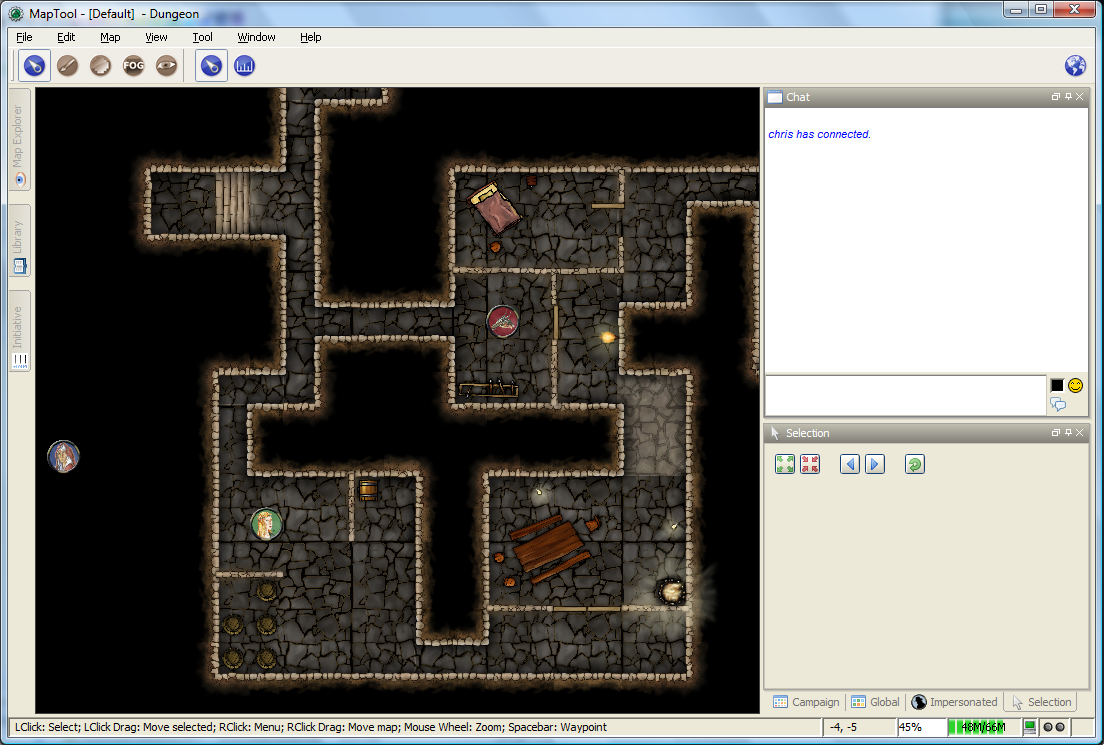
When Vision is set to Off, the token's sight settings are not taken into account when deciding what to display to the player. Instead, the player can look at all of the items and backgrounds on the map. VBL will still block the "visual boundary", but it won't actually block vision in any way - something on the far side of VBL from a token is still visible on the player's screen.
The two screenshots to the right illustrate this: the top screenshot is the GM's view of the screen, while the shot on the bottom is the Player's view of the same map - note that they both see the same items. The only items a player will not see are those items on the Hidden layer, or those items that the GM has explicitly flagged as invisible to players.
Sight when Vision is "Day"
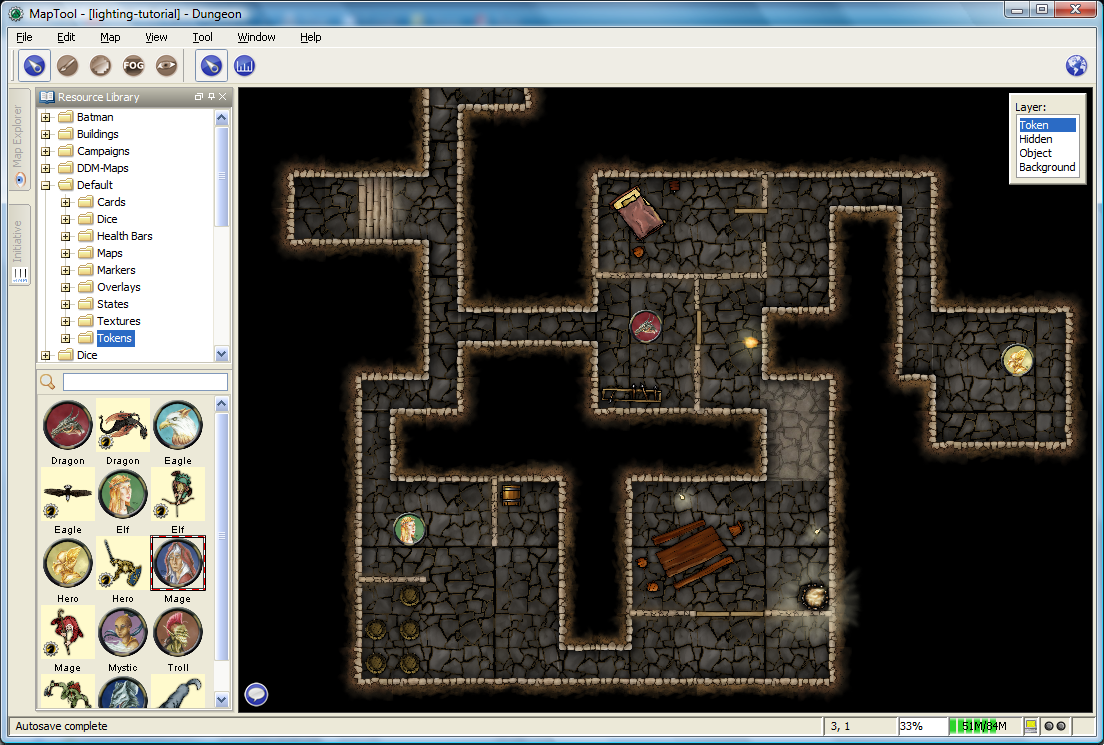
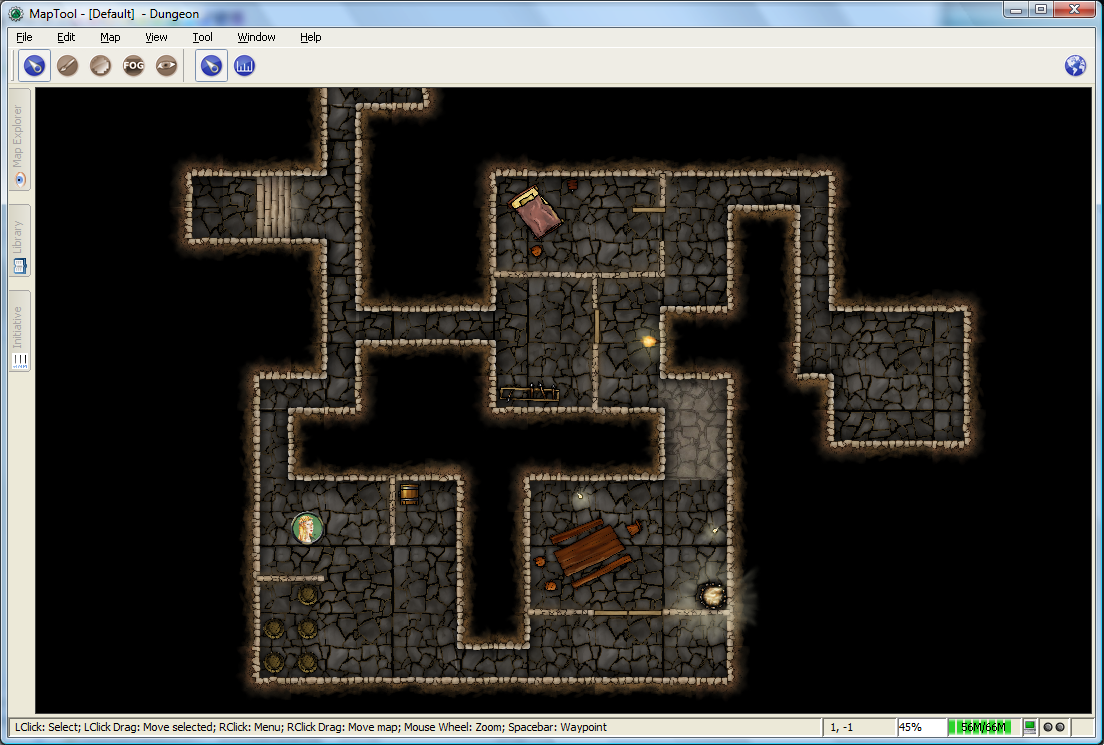
When Vision is set to Day, the token's sight settings are take into account when determining what objects and other tokens are visible to the player. Light source settings are not taken into account. If an object or token lies outside the player's token's vision, it will not be visible to the player. Likewise, if an object or token lies beyond VBL from the player token, it will not be visible.
The screenshots to the right show this (again, the top is the GM's view, and the bottom is the Player view). Note that in the player view, the Dragon and Hero token are not visible to the Elf token (the player token), because they are hidden by VBL.
Sight when Vision is "Night"
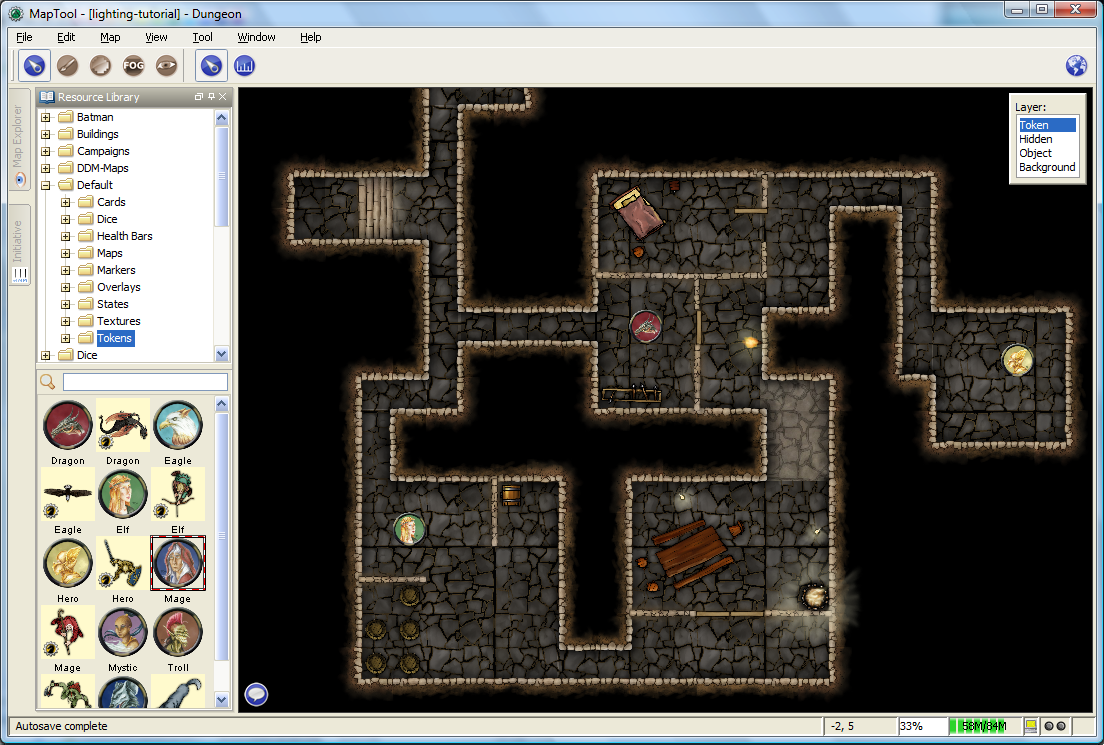
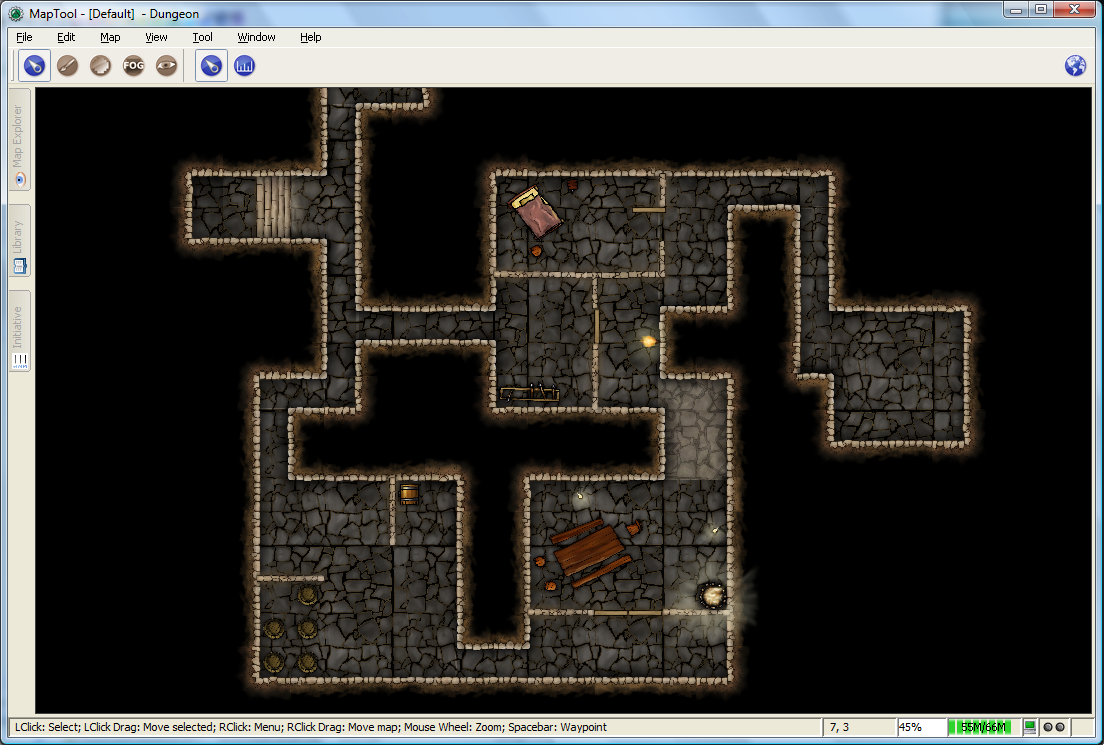
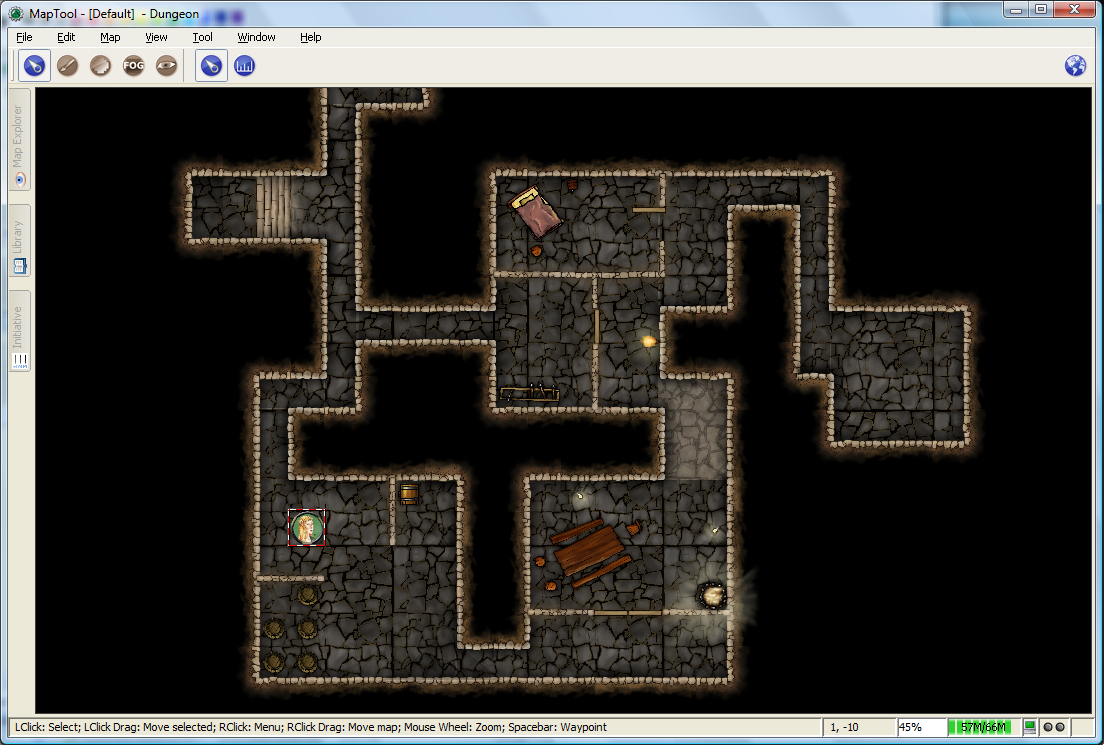
When vision is set to Night, both the token's sight settings and the token's light source setting is taken into account when determining what the token is able to see. If a token lacks a light source, it will be unable to see anything unless it has a sight type that indicates personal light (in other words, a sight type like the "Darkvision" type discussed previously) - in fact, the token itself will not be visible to the player!
The screenshots to the right show Night-mode vision in effect. The top screenshot is the GM view; the second two show the Player view without a light source on the player's Elf token, and then with the "Candle - 5" light source selected. There are several things to note about this:
- "Night" mode vision does not add "darkness" to the map in any visual way - it simply means that without a light source, tokens cannot see other tokens, objects, or themselves.
- In the first Player screenshot, the player's Elf token is not visible in the lower left room of the dungeon - that's because the player's token doesn't have a light source, so it can't see - and therefore, the player can't see anything but the map background.
- In the second Player screenshot, the Elf is now visible because it has a light source active. This light source means that the player can see out to the limit of its light source's area.
Individual Views Server Setting
Be default, all connected players automatically see the full vision of all 'PC' type tokens on maps with Vision - even if they are not owned by any players. Players can then use the white outline shown when hovering the cursor over their token to determine individual tokens' vision. NPC tokens provide no vision in this scenario, even if they are owned by the player. But in some games, players shouldn't see eachother's views - such as a player vs. player scenario or stealth-based game where players must describe what they see verbally. Selecting an owned token will narrow the display to just that token's vision and deselecting all tokens will show a composite of all PC tokens' vision.
You can separate player views like this when hosting a game by checking Individual Views. With this setting ✓checked, players only view the map through tokens they have ownership of. Unlike the default view, 'NPC' type tokens also share their vision with players which own them when this setting is enabled.
For games where individual vision is important and with many tokens owned collectively and by individual players, distinguishing vision can get a bit confusing when no token is selected. To help with this, a set of filter buttons on the right hand side of the toolbar toggle the default view between different sets of tokens.
- ME: Show only tokens owned explicitly by you
- All: Show tokens owned by you OR with Owned by All ✓checked
- PC: Show tokens owned by you OR Owned by All that are PC tokens
- NPC: Show tokens owned by you OR Owned by All that are NPC tokens