Introduction to Lights and Sights/ja
{{#customtitle:はじめての照明と視界|はじめての照明と視界}}
BEGINNER
THIS IS A BEGINNER ARTICLE
照明とは、視界とは
MapTool はキャラクターが環境の中で冒険するとき、それを再現するのに役立つ3つの機能を提供する。キャラクターは必ずしも世界を見渡す「神の目」を持って要るとは限らない。彼らは壁を透視することはできず、曲がり角の先や暗闇の洞窟の深部を見通すこともできない。このことをテーブルの上で再現することは難しいが、コンピューターを使用すればキャラクターが実際に見ているであろう視覚を正確に再現することが可能になる。それゆえに、ゲームのより高い緊張感と集中力を得ることになるであろう。MapTool の提供する3つの機能とは、視界、照明、そして不明領域のことだ。
視界(Sight)
視界とはトークンが周囲を見渡す能力のことだ。この場合、「トークンの周囲を見る能力」というのは、そのトークンを扱うプレイヤーの MapTool 上に表示されるということである(GMは常にマップ上の全ての物を見ることができる。一方のプレイヤーは遮光域レイヤー、照明、不明領域などにより限られた範囲しか見ることができない)。このことはゲームにより高い臨場感をもたらし、プレイヤー達も「曲がり角の先には何があるのだろう?」、「松明よ、燃え尽きないで…ダンジョンは真っ暗なんだ!」と驚きもひとしおだろう。
照明(Light)
照明とは、トークンやオブジェクトに周囲を照らす「光」を与える機能のことだ。壁に掲げられた松明はダンジョンの一部を照らし(灯りの照らす範囲の不明領域を取り除く)、その場所はプレイヤーに見えるようになる(つまり、プレイヤーのトークンが視界を持っており、遮光域が光を阻まないのであれば、光源に照らされた範囲をプレイヤーが見ることが可能になる)。
照明は、マップの視覚モードを「夜」にした場合、非常に重要な物となる。照明が無ければ真っ暗闇の中で途方に暮れるしかない。
不明領域(Fog of War)
不明領域とは、マップ上を探索する中でトークンが目にしてきたマップの一部や状況を再現するシステムだ。不明領域は影や暗部と違う物なので混同しないように。不明領域は照明や視覚モードを無効にしているマップに使用できる。
不明領域のある部分をトークンが「見た」とき、その部分を覆っていた不明領域が取り払われて、隠されていたマップの一部がプレイヤーに見えるようになる。一度不明領域が取り払われたが、その後トークンが去って今は直接見ていない部分は、完全な不明領域(Hard Fog)ではなく半透明の不明領域(Soft Fog)に置き換える。これはプレイヤーが既に見た部分を覚えておくためのもので、今見ているわけではない。半透明の不明領域内にいるトークンは、完全な不明領域にいるトークンと同じようにキャラクターからは見えなくなっている。
Remember: Fog of War simply indicates what area of the maps have been directly seen by a token.
大事なこと:不明領域とはトークンが直接目にしていないマップの範囲のことを指す。(訳注:未踏か探索済みかは関係ないということ)
不明領域とてもややこしく、「照明と視界」に深く関わっているが独立したチュートリアルがあるべきだろう。不明領域をゲームに取り入れるために詳しい内容を Introduction to Fog of War から学ぶと良いだろう。
サンプル・ダンジョン
サンプル・ダンジョンは、このチュートリアルのスクリーンショットと実例で使うものだ(はじめての遮光域でも使っている)。サンプル・ダンジョンのスクリーンショットは右にある。またここからこのダンジョンのキャンペーンファイルをダウンロードすることもできる。
視界の種類と光源を設定する
視界の種類と光源は、いずれもキャンペーンプロパティ・ウィンドウの Sight(視界)タブと Light(光源)タブのもとで設定する。キャンペーンプロパティのダイアログを表示するには Edit → Campaign Properties を選択する。
視界の種類
視界の種類のタブではさまざまな種類の「視界」を設定できる(夜目、暗視、赤外線視覚、通常の視覚などなど)。MapTool では始めからいくつかの視界を用意してある。Sight タブには下記と同じものが用意されている:
Conic Vision: cone arc=120
Normal Vision - Short Range: circle distance=10.0
Lowlight: circle x2
Darkvision: circle r60
Square Vision: square
Normal: circle
各項目が Sight Type(視界タイプ)の定義だ。視界タイプはキャンペーンプロパティ・ウィンドウ下部で説明されている専用の書式で記述する。最も基本的な設定は、次のように形だけを記述する:
Normal: circle
この記述は「通常の視界を円形に設定」ということだ。視界の届く距離は MapTool で設定されている距離制限までだ(初期値は 1,000 単位)。
「Lowlight」の項目はもう少し複雑だ:
Lowlight: circle x2
この場合は、視覚の名前は Lowlight で、形は円形。しかし行末に 「x2」 が書き加えられている。これは light sources(光源) に関連するオプションであり、夜目を持つトークンに対する照明は2倍の輝きを持つようになる。通常の資格を持つトークンが松明(torch)を灯すと20単位の距離を見通せるが、夜目を持つトークンは40単位を見通す。
「Darkvision」の項目はさらに複雑になる:
Darkvision: circle r60
この記述は4つの部品で成り立っている。
- Darkvision: this is, of course, the name of the Sight Type (you could call it "Thermographic Vision" if you like). This name appears in the token configuration dialog when you want to activate token sight.
- circle: this signifies the shape of the visual area, in this case, indicating that the visual area is circular; we've seen this before.
- r: this is a code that signifies that this sight type has a "personal" light source - in other words, it is effectively a light source only that token can see. This is what makes this "darkvision," for instance - the token can see just fine in the dark, but that token's allies might be completely blind.
- 60: this is the range of the sight type, starting from the center of the token's square, and counted in "map units" (so if your map is 5 units per cell, this will cover 12 map cells; if your map is 1 unit per square, this will cover 60 squares). Note that since range is measured from the center of the square or hex, many users add a fractional amount to the range so that the end of the range lines up nicely with a hex or square boundary.
- Darkvision:これまでと同じように、視界タイプの名前だ(サーモビジョンと名付けることもできる)。ここでつけた名称は、トークンの視覚を有効にしたときにトークンの設定ダイアログに表示される。
- circle:前述の通り、視覚が届く範囲の形状であり、この場合は円形の範囲であることを表している。
- r:この視界が「個人的な」光源を持つことを表す符号。つまり、このトークンだけが見ることのできる光源を持つということだ。「Darkvision」を持つと、仲間達が真っ暗闇の中で何も見えないときでも、このトークン自身は問題なく見通せるようになる。
- 60:この視界タイプの有効距離。トークンの中心から「マップで使用している単位」で測る(マス目ごとに5単位を設定しているのであれば、12マスになる)。多くのユーザーは、マス目やヘックスの中心から距離を測るので、範囲を示す円がぴったりとマス目にくっつくように割り算した値を足している。
Configuring sight types is unique to the game being played, and so the specifics of it need to be left to the campaign designer. However, suffice it to say that Sight is a configurable option and offers a great deal of flexibility.
視界タイプの編集は使用するゲームのルールごとに異なるので、キャンペーンを構成するには視界の仕様が必要になるが、視界は柔軟に設定できる多くのオプションを備えているので問題なく構成できるだろう。
視界タイプの制限
トークンの視界は柔軟ではあるが、いくつかの制限もある。
- One sight type at a time: tokens can only have one kind of sight active at a time (a token cannot have Darkvision and Normal sight active simultaneously)
- Sight has no color: sight types do not have colors of their own. Any color visible to the players will be based on the color of the light source, not the sight type (there is one exception to this, however: in MapTool Preferences, you can opt to have the vision color of the token match its Halo color)
- 1度に1視界タイプ:トークンが同時に持てる視界は1種類だけ(トークンは暗視と通常の視覚を同時有効にできない)。
- 視界は無色:視界は色を持たない。プレイヤーが見ている色は、光源の色であり、視界タイプの色ではない(MapTool の設定でトークンのHaloの色と同じ色を視覚の範囲に着色できるオプションがある。これを設定している場合は例外である)。
光源
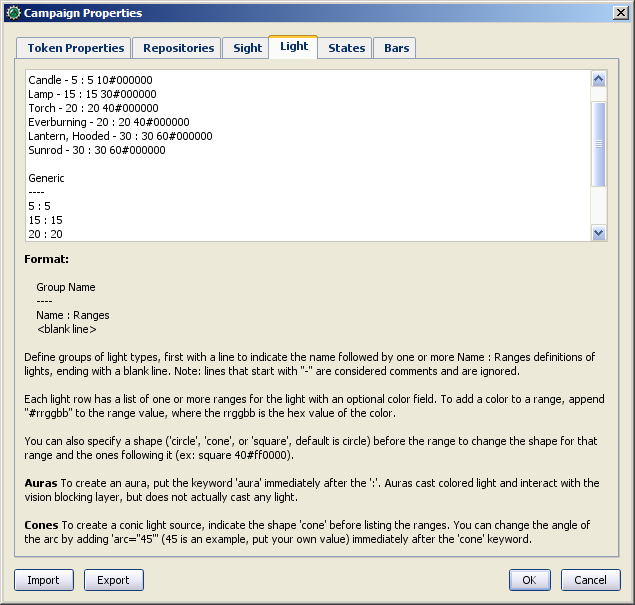
照明のタブは、視界のタブと同じような、いくつかの項目がテキストで定義されているテキストエリアがある。MapTool のキャンペーンプロパティの初期設定では光源は次のようになっている:
D20
----
Candle - 5 : 5 10#000000
Lamp - 15 : 15 30#000000
Torch - 20 : 20 40#000000
Everburning - 20 : 20 40#000000
Lantern, Hooded - 30 : 30 60#000000
Sunrod - 30 : 30 60#000000
Generic
----
5 : 5
15 : 15
20 : 20
30 : 30
40 : 40
60 : 60
グループ
----. Groups appear in the right-click menu on a token, and are basically a way for you, as GM, to organize the different light sources in your game.上記の標準の照明設定では、D20 と Generic の二つのグループがある。グループを定義するには、まずグループの名称を書き、そのすぐ下の行に----のように4つのハイフンを書く。グループは基本的には異なる光源を分かりやすく分類するために使うもので、トークンの右クリックメニューに表示される。
Aura is not included by default and must be added manually.
Aura は標準では含まれていないので自分で追加する必要がある。
光源の書式
Beneath each group header are a list of light sources. The syntax for these is very similar to the syntax for Sight Types, with a couple exceptions. Let's look at the entry for Sunrod:
グループ見出しの次の行には、光源の一覧がある。この書式は例外はあるが視界タイプの書式とよく似ている。Sunrod(陽光棒)を例に解説してみよう:
Sunrod - 30: 30 60#000000
この項目は次の3つの要素から成り立つ:
- Sunrod - 30: the name of the light source; this is what appears in the right-click menu on a token, under the appropriate Light Source group
- 30: this is a light source radius of 30 units; the "first" radius of the light
- 60#000000: this is a second radius to the light, and a hexadecimal color code.
- Light Source Radii: A light source can have one or more radii, each of which can be set to a different color. In the sunrod example, the first radius has no color (or rather, it has the default color of white, which means that the area it covers is completely illuminated). The second radius (60) has the color #000000, which, when rendered by MapTool, makes a "dim light" area (translucent gray) from 30 units to 60 units. The overall effect is that from the center of the light source out to 30 units, the light is "bright," and everything is fully illuminated. From 30 units to 60 units, the light is a big darker, and items in that area are less brightly lit.
- Sunrod - 30:光源の名称。この名称はトークンの右クリックメニューの中の、所属する光源グ ループの下に表示される。
- 30:この数字は光源の半径が30単位であることを示す。照明の「最初」の半径だ。
- 60#000000:これは照明の「二つ目」の半径と16進数の色コードだ。
- 光源の複数の半径:光源には複数の半径を持たせることができ、それぞれ異なる色を指定できる。こ の例では、最初の半径は色がない(厳密にいえば、標準色の白であり、照明がカバーする範囲は完全に照られるということだ)。二つ目の半径「60」は色コー ド「#000000」 を持ち、MapTool は30単位から60単位までを「薄暗い照明」の範囲(半透明の灰色)として描画する。全体の効果は光源の中心より30単位の「明るい光」が占め、そこにあ るものはすべて照らされる。30単位から60単位の範囲では、照明がかなり暗くなるので薄暗く照らされる。
上記に加えて、形状の要素がある。視界タイプと同じように、光源も形を選べる。標準の形状は円形なので、形状を指定しなけば円形になる。他の形状は次のとおり:
- Cone: create a conic area with a user-defined arc. This projects the light along the current facing of the token.
- Square: this creates a square light area
- Aura: this is a special light source, because while it is blocked by VBL and can cast colored light, it does not actually illuminate anything (therefore, an aura will not reveal hidden areas to a player, but it does act as a way to see how far from a token its aura extends).
- Cone:ユーザーが定義した形状で、円錐状の範囲を作る。トークンの向いている方向に 光を放つ。
- Square:正方形の照明を作る。
- Aura: これは特殊な光源であり、通常の照明と同じように遮光域に阻まれ、色をつけることができるが、実際には何も照らさない(そのため、auraは隠されている部分を明らかにすることはないが、トークンが放つオーラが どこまで伸びているかを視覚的に表すことができる)。
トークンやオブジェクトに視界と照明を設定する
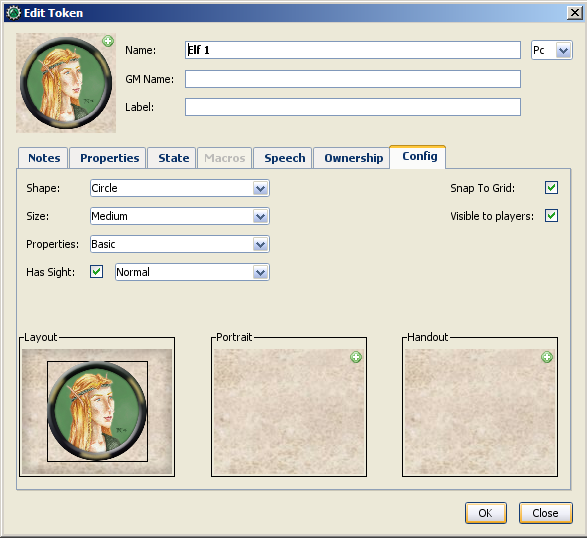
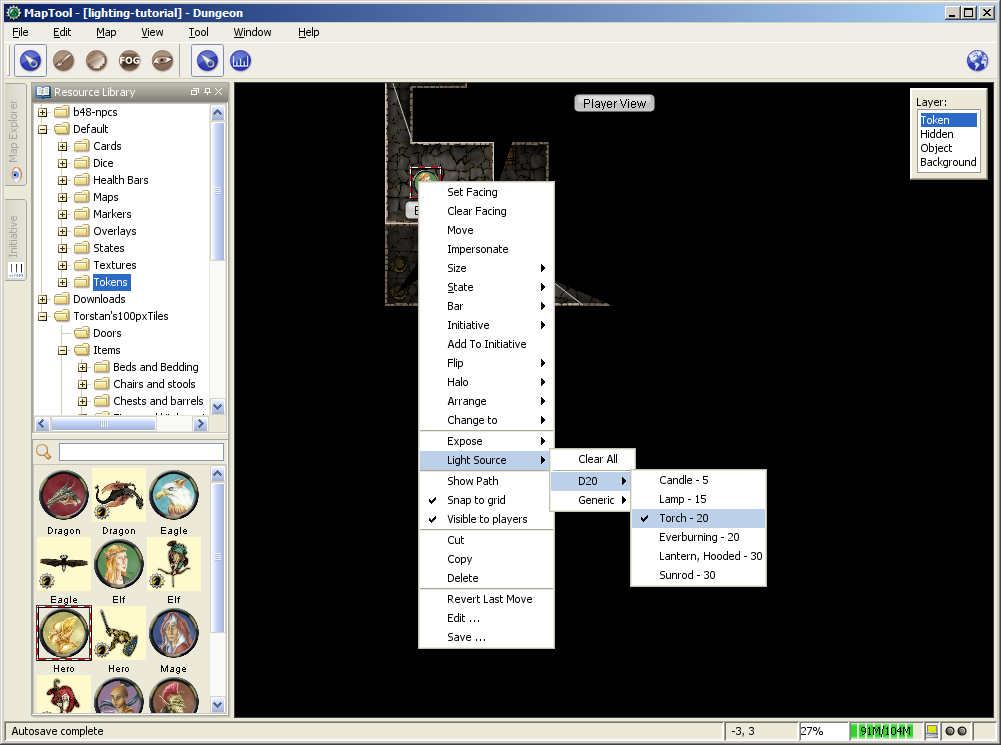
トークンに視界と光源を設定する方法は次のとおり:
- Double-click on the token and go to the Config tab. There, check the Has Sight box, and select the appropriate sight type. Remember that a token can only have one type of sight active at a time.
- Click OK to save the sight settings.
- Right-click on the token, and go to Light Source. Navigate through the submenus until you can select a specific light source. The token now has a light source.
- トークンをダブルクックして、Config タブを開く。Has Sight のチェックボックスをチェックし、適切な視界タイプを選択する。トークンは一度に1種類の視界タイプしか持てないことを忘れないように。
- OKをクリックして視界の設定を保存する。
- トークンを右クリックし、光源を選択。サブメニューを開き、いずれかの光源を選択する。これでトークンは光源を持つようになる。
視覚モード
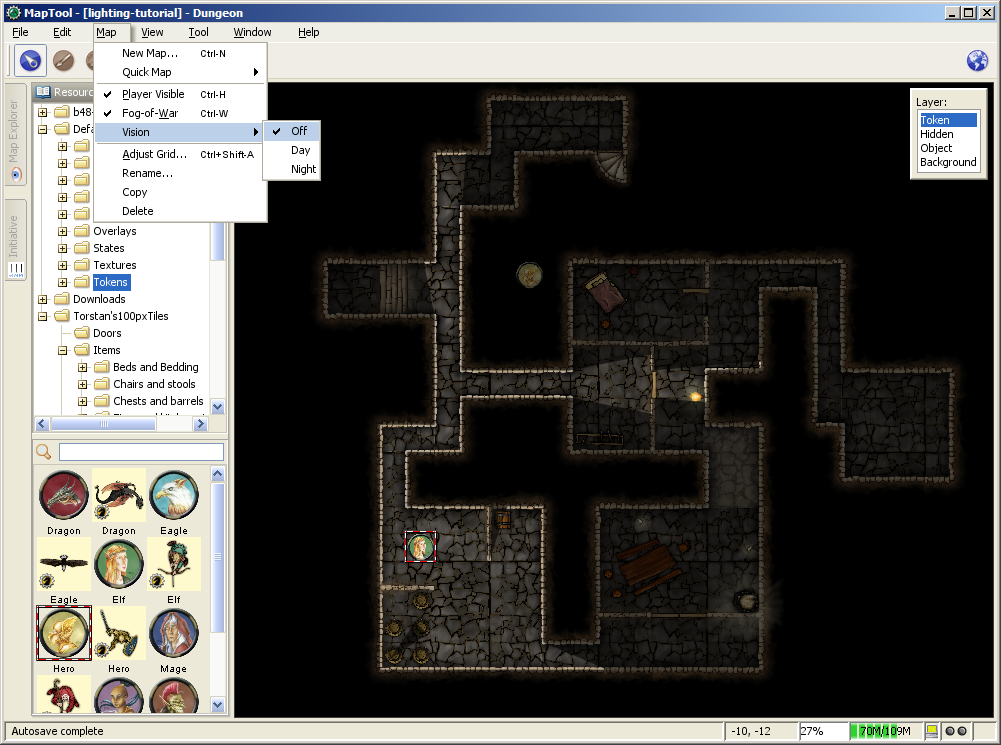
最近ビルドされた MapTool は、視覚と照明がマップにどのように影響を与えるかGMが指定できる、視覚モードの機能を取り入れた。視覚モードは Off(なし)、Day(昼)、Night(夜) の3つがあり、照明と視界がトークンに与える影響はそれぞれ異なっている。
下記の視覚モードの説明では、プレイヤーがトークンを操作する際に何が見えるかは、トークンそのものから見えるものに基づいている。そのため、適切な設定のもとでは、敵のトークンがプレイヤーのトークンから見えるなら、プレイヤーはマップ上で敵のトークンを見ることができる。そして、敵のトークンがプレイヤーのトークンから見えないのであれば、MapTool の画面に敵は表示されなくなる。
Off(なし)
「Map → Vision」の設定を「Off」にした場合、トークンの視覚の設定はプレイヤーに表示する情報に対して影響を与えない。不明領域の下にあるもの以外は全て表示される。
Day(昼)
昼のモードでは、トークンの視覚と視覚が届く距離を決める際に、光源は考慮されない。さらに、マップ上でプレイヤーに隠される場所はなくなる(つまり、マップの全てを見ることができる。全てといっても、必ずしもマップ上の全てのトークンが見えるとは限らないが、ダンジョンや建物の間取りや区画の配置などは見ることができる)。事実上、昼モードは太陽の光が全ての場所に降り注ぎ、全てを照らしているのと同じ状態であり、遮光域に阻まれていない限り、また不明領域に覆われていない限り、全てのものが表示される。
Night(夜)
このモードは計算に光源が組み込まれており、ゲーム内の「夜」を効果的に再現しており、暗闇の環境化にいる光源を持たないトークンは何も見えなくなる。夜モードで不明領域を使用すると、光源は不明領域に覆われている場所を明らかにし、トークンは光源で照らされ遮光域で阻まれていない場所を見ることができる。
視覚モードと不明領域
不明領域はどの視覚モード(なし、昼、夜)でも使える。
- When Map Vision is Off, Fog is removed to the extent of the token's sight (set using the Token Properties dialog). Soft Fog does not appear when using Off Mode, as tokens do not actually "see" anything in this mode. VBL works normally.
- In Day Mode, the Fog will be removed out to the limit of the token's visual range (which, if you note when you create a map, defaults to 1,000 units), and token vision is blocked by VBL. In this mode, Fog of War has both Hard and Soft Fog, as token vision is active.
- In Night Mode, Fog of War (when removed) is cleared to the maximum radius of a token's light source (remember, though - the token must a) have sight, and b) have a light source - without a light source, the token can't see at all!). Thus, when using Fog of War and Night mode for vision, the fog will be removed only where the light source illuminates it. Soft Fog works in this mode just as it works in Day mode.
- マップの視覚モードが「Off」の場合、トークンの視界が広がる範囲の不明領域は取り除かれる(トークンプロパティ・ダイアログで設定)。「Off」モードでは、トークンが「実際に見ていない」場所に半透明の不明領域が表示されることはない。遮光域は通常通り機能する。
- 昼モードでは、不明領域はトークンの視覚の届く最大距離(マップ作成時に設定したものか、初期設定の1,000単位)まで取り除かれる。遮光域はトークン の視覚を遮る。トークンの視覚を有効にしたとき不明領域は完全なものと半透明なものがありうる。
- 夜モードでは、不明領域は光源の届く範囲まで取り除かれる(トークンは、視界を持ち、かつ光源を持っていなければならないことを忘れないように。光源を持たないトークンは何も見ることはできない!!)。そのため、不明領域と夜の視覚モードを使用する場合、不明領域が取り除かれる範囲は照明に照らされている場所だけである。半透明の不明領域は昼モードと同じように機能する。
ゲームでの視界と照明
視界、照明、不明領域はプレイ中にさまざまな方法で相互に関係し合う。まず、照明と不明領域のことは考えず、視界について説明していこう。下記の例では右のサンプルダンジョンを使用する。なお、このサンプルダンジョンはトークンの視線を遮る MapToo の遮光域の機能を使っている(遮光域は、壁や柱などキャラクターの視覚を遮るさまざまなものを再現する機能)。
視程
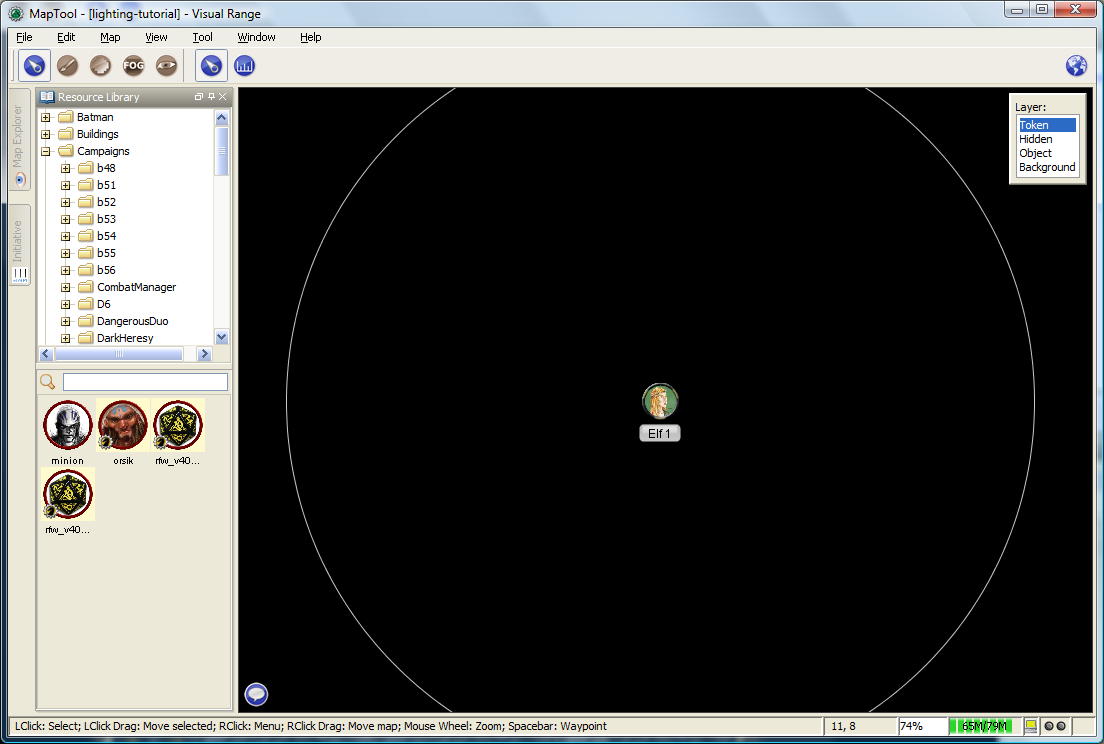
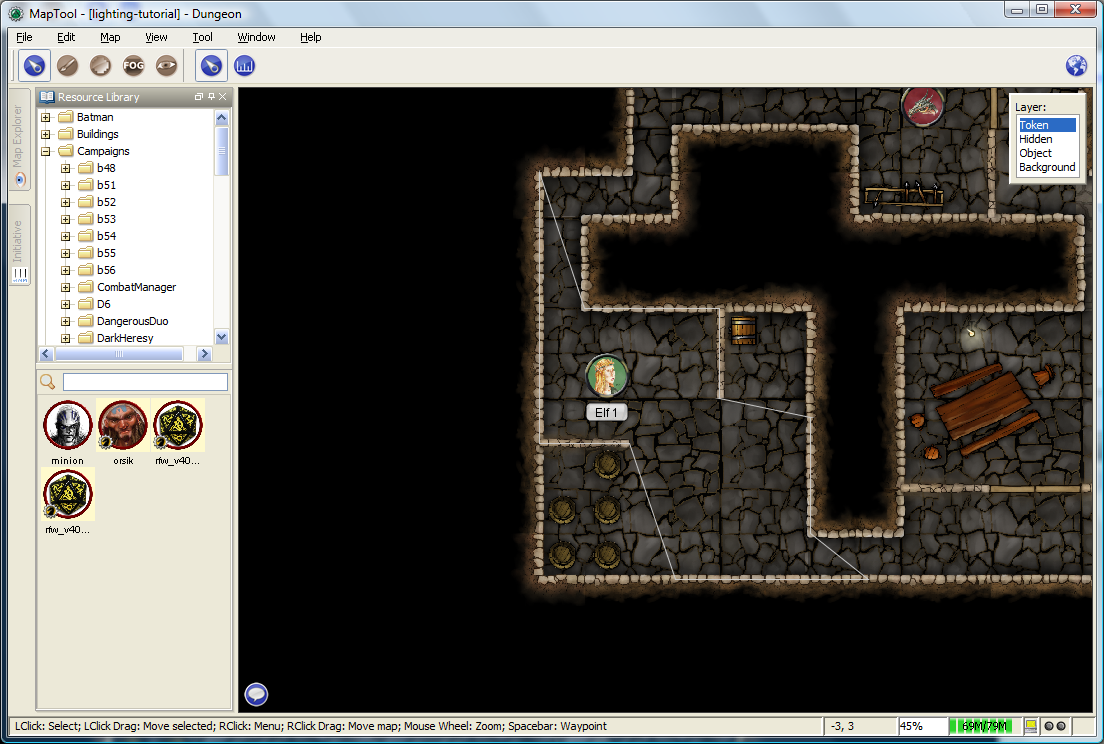
トークンが視界を持つように設定して、トークン上にマウスカーソルをかざした場合、MapTool はトークンの視覚が届く範囲を白い境界線を使って表示する(視界タイプが円形なら円形、正方形なら正方形、円錐状であれば円錐状の形状で)。右のスクリーンショットには「Normal - Short Range」の視界タイプを持つPCトークンが表示されている。白い円はトークンの視程を表すものだ。
最初のスクリーンショットでは、遮光域を使用していないマップであり、そのためトークンの視程に影響はない。二つ目のスクリーンショットでは、同じトークンを、壁に沿って遮光域を置いたダンジョン・マップの中で使い、より実用的な「視線」を表す境界線を実演したものだ。よく見ると、円形の境界線ではなく、遮光域を配置した個所に遮られいびつな形をした白い境界線が見えるはずだ。
視覚モードと視界
前述のとおり、視覚モードにはOff、Day、Nightの3種類がある。それぞれ MapTool がトークンの視界を演算する方法に影響を与える。
視覚モード「Off」のときの視界
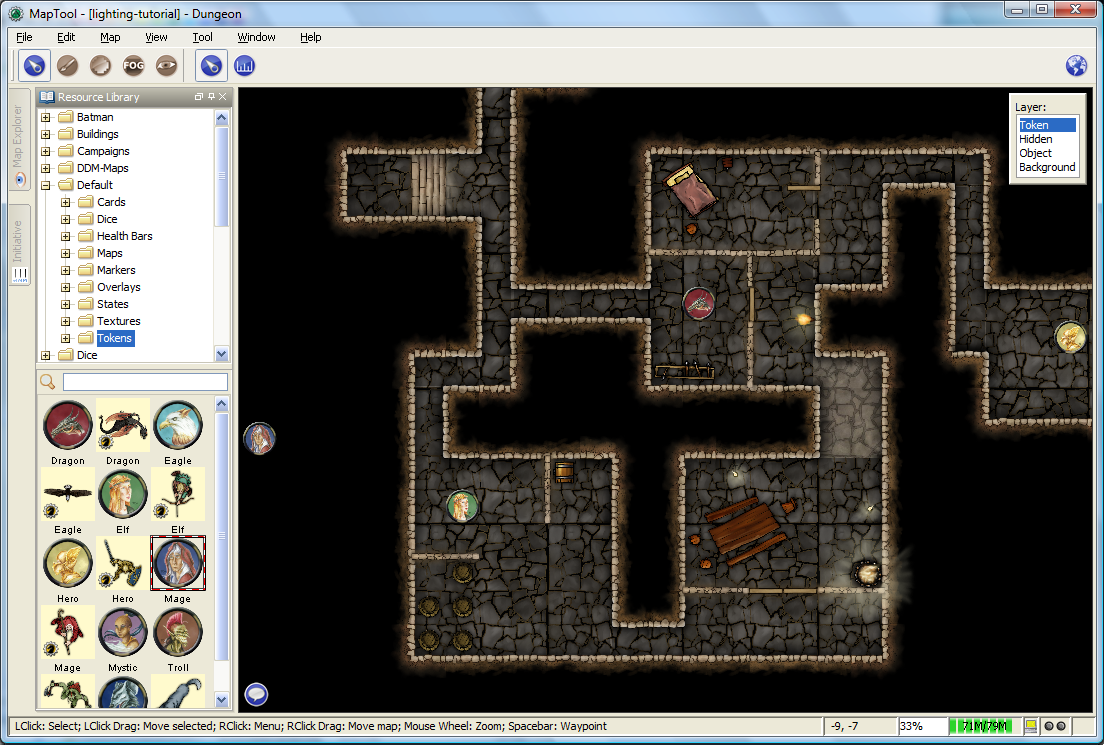
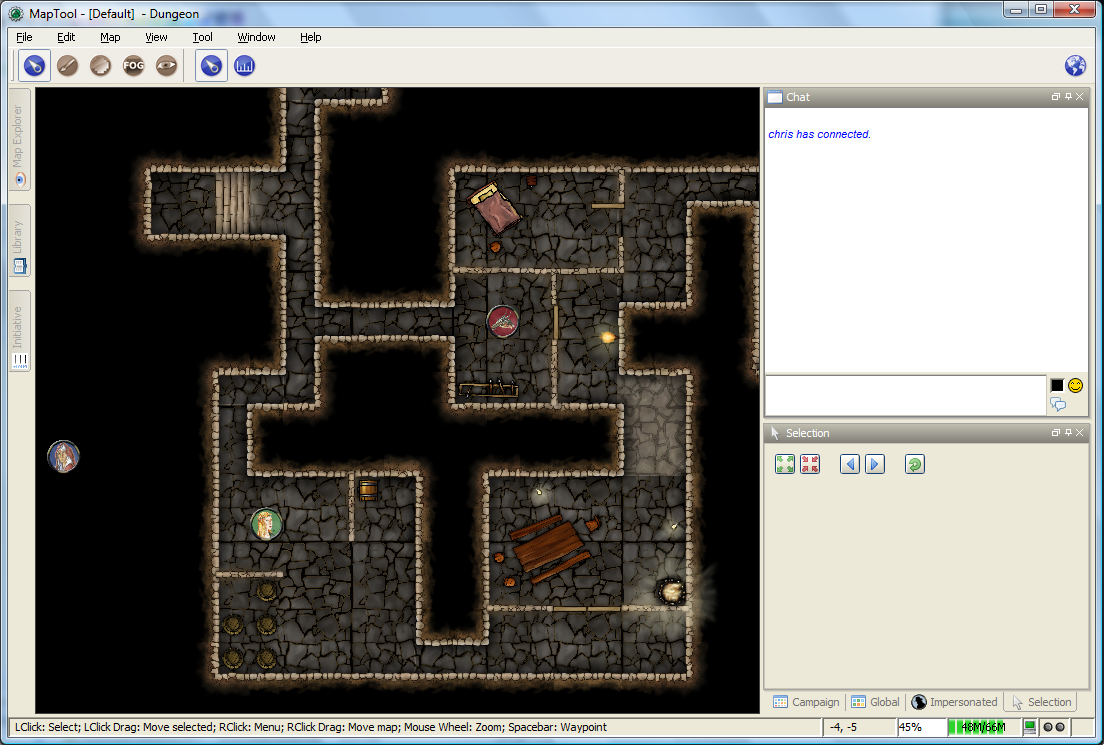
視覚モードをOffにした場合、プレイヤーが見える範囲を決定する際、トークンの視界の設定は考慮されない。プレイヤーはマップ上の全てのアイテムと背景を見ることができる。遮光域は「視程の境界線」を遮りはするが、実際のトークンの視覚を妨げることはない。遮光域を挟んでトークンの反対側にあるものは、プレイヤーの画面にしっかり表示される。
右にある二つのスクリーンショットは次のことを表している。上のスクリーンショットはGM側の表示であり、下は同じマップのプレイヤー側の表示である。両者とも同じものが表示されことがわかるだろう。プレイヤーに表示されないものは、Hidden レイヤーに配置されたアイテムか、GMが意図的に「プレイヤーに非表示にする」設定を行ったものだけである。
Sight when Vision is "Day"
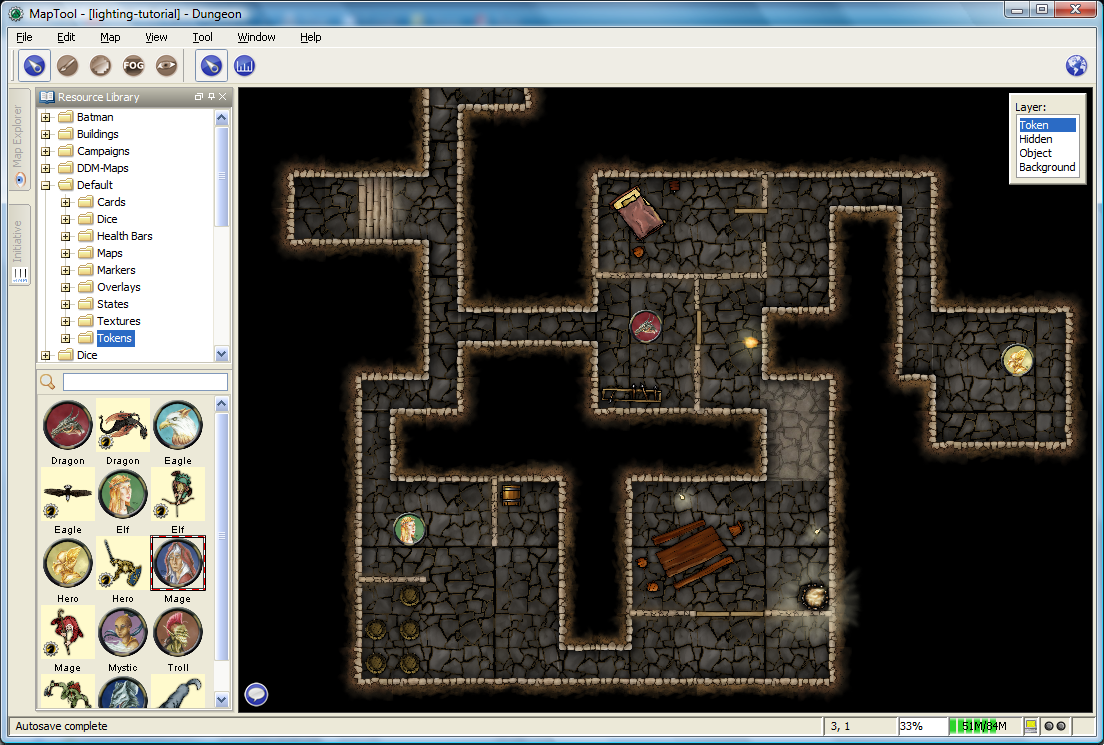
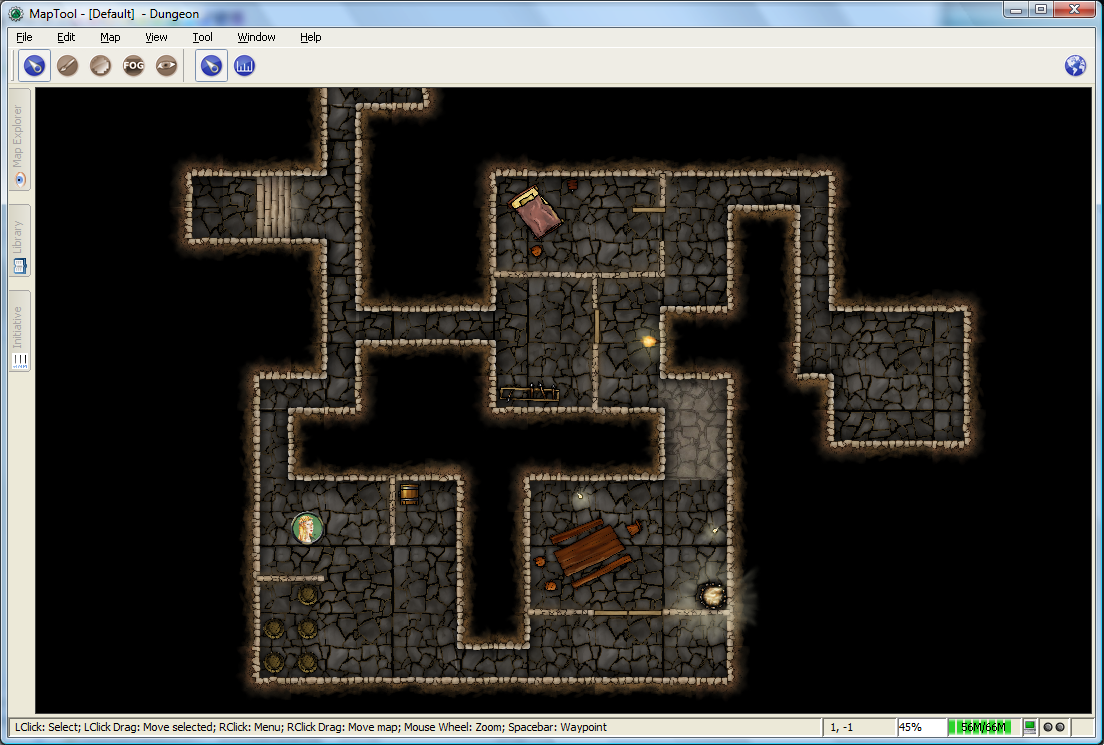
When Vision is set to Day, the token's sight settings are take into account when determining what objects and other tokens are visible to the player. Light source settings are not taken into account. If an object or token lies outside the player's token's vision, it will not be visible to the player. Likewise, if an object or token lies beyond VBL from the player token, it will not be visible.
The screenshots to the right show this (again, the top is the GM's view, and the bottom is the Player view). Note that in the player view, the Dragon and Hero token are not visible to the Elf token (the player token), because they are hidden by VBL.
Sight when Vision is "Night"
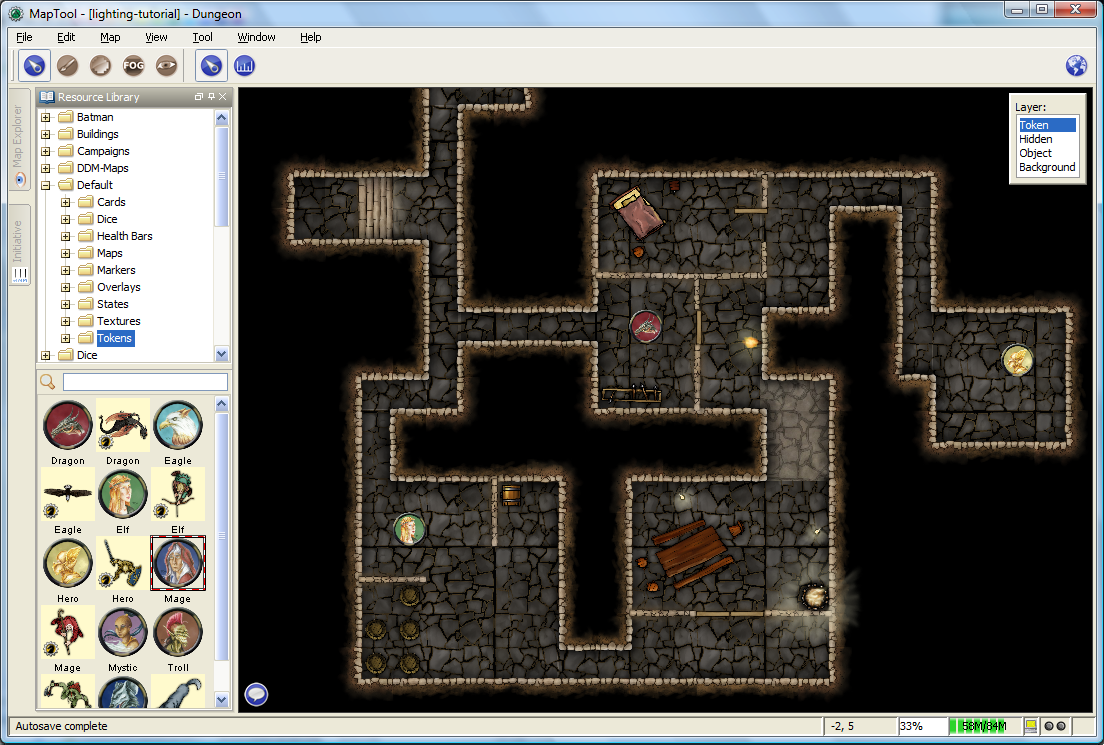
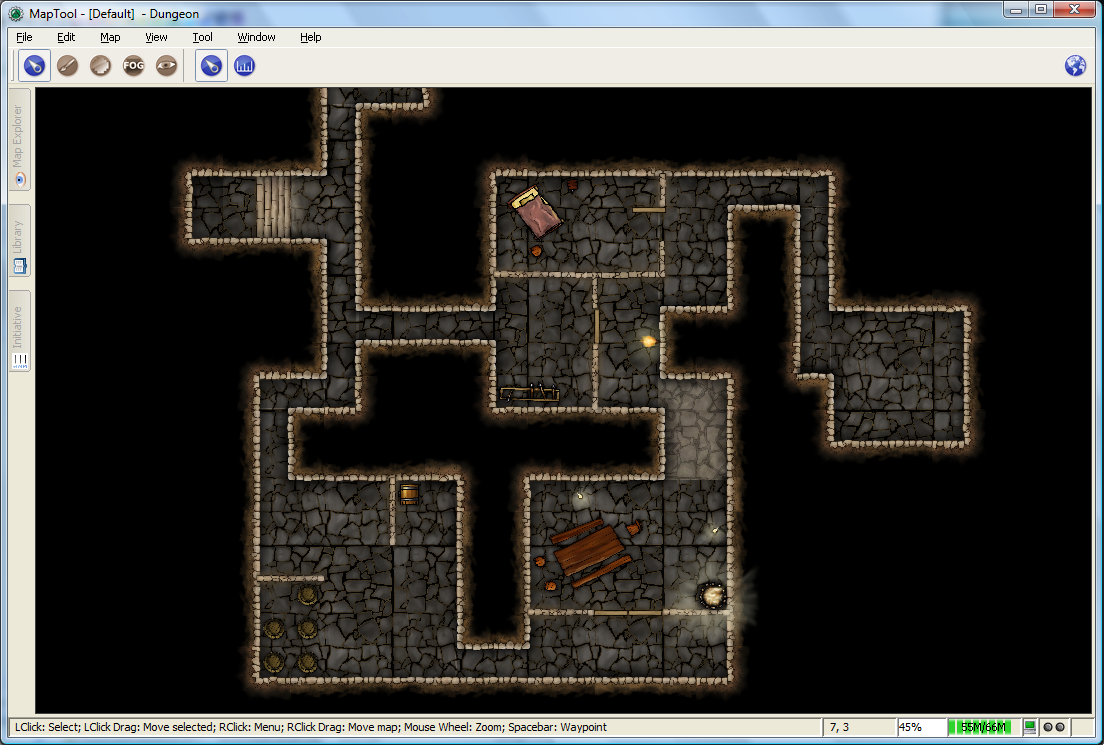
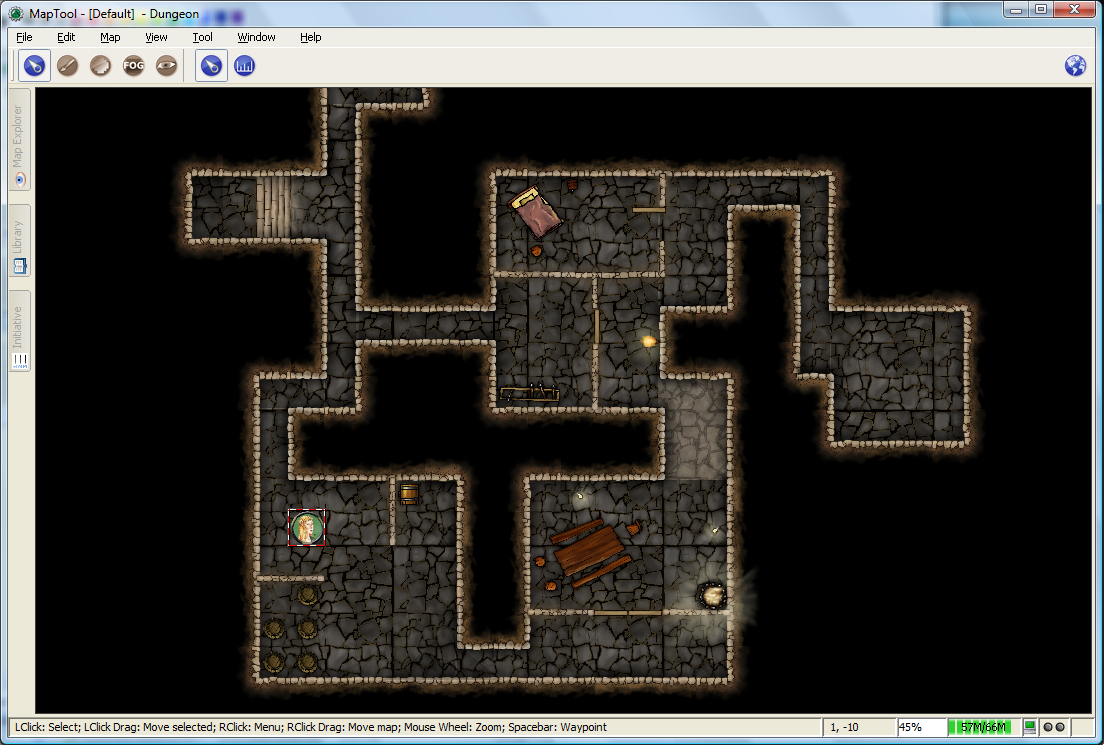
When vision is set to Night, both the token's sight settings and the token's light source setting is taken into account when determining what the token is able to see. If a token lacks a light source, it will be unable to see anything unless it has a sight type that indicates personal light (in other words, a sight type like the "Darkvision" type discussed previously) - in fact, the token itself will not be visible to the player!
The screenshots to the right show Night-mode vision in effect. The top screenshot is the GM view; the second two show the Player view without a light source on the player's Elf token, and then with the "Candle - 5" light source selected. There are several things to note about this:
- "Night" mode vision does not add "darkness" to the map in any visual way - it simply means that without a light source, tokens cannot see other tokens, objects, or themselves.
- In the first Player screenshot, the player's Elf token is not visible in the lower left room of the dungeon - that's because the player's token doesn't have a light source, so it can't see - and therefore, the player can't see anything but the map background.
- In the second Player screenshot, the Elf is now visible because it has a light source active. This light source means that the player can see out to the limit of its light source's area.